No other place to go for your properties and values in Spring

220619 – 230712
Spring Boot: @Value, @ConfigurationProperties, Environment API, and other, not-that-easy to be distinguished goodies.
Do you know @Value annotation in Spring/Spring Boot framework? Well, maybe. However, this post aims to be your one-stop shop, when you are wrangling with the mess of externally defined values, for properties and messages. And not only for your bean-managed classes.

Note, that this is a really long post and it requires you to dedicate some time to read it and work with the examples provided. The post has 5 sections in total and below is the list of the subjects:
- Basic concepts – Important key-points
- Profiles and properties
- The @Value annotation and the Environment object
- The placeholder and the SpEL syntax
- Loading properties from specific files the @PropertySource annotation and the PropertySourcesPlaceholderConfigurer Bean
- Potential Issues and how to avoid them – Basic Workarounds
- Manage and group properties – prefixed properties
- @ConfigurationProperties and binding/mapping external properties to POJO beans – > “properties” beans
- Constructor binding for properties
- @EnableConfigurationProperties for a class-by-class POJO bean
- @ConfigurationPropertiesScan
- Validation of “properties” beans
- Custom Spring Validation
- Constraint Validation Error Messages
- The ValidationMessages.properties file
- The messages.properties and interpolation
- Starting up with localisation – messages in different languages – messages.properties
- Loading and using different message files
- Using a LocalResolver
- Implementing an AcceptHeaderLocaleResolver
- Capturing the Accept-Language header in a Controller/method
- Capturing the Accept-Language header for all requests with a Custom LocalResolver
- Externally values without a MessageSource bean you can use everywhere – The ClassLoader
- Conclusion and takeaways
So, if you don’t have time to deal with it from start to end, bookmark this post. Then take your time and go through it section by section.
Intro
Spring it’s an amazing and flexible framework full of features, and I doubt that there are too many development aspects that it can’t be used for. However, it is true, that because of its flexibility, there is a time cost for one to get deeper into using all the available possibilities.
We can always use Java classes (e.g., static classes – static properties) to define some or all of our settings, and even, we can make and use them as external .jar files. Another option we have is to set some environment variables and use their values in our app.
Though, using external files is a preferable approach, especially because, mainly they are persistent, independent of the Java code, and can be easily updated without the need to recompile our code.
Using external configuration i.e.: values set in external files that can be used (injected) at startup or during runtime, I think that is an area that one has to put some more effort into if she/he wants to get a really good grasp. So, here, it is not possible to cover every aspect and every detail, however, I will try to enlighten this area a bit.
A base repository for our demo purposes
For your convenience, you can use this GitHub repo of mine. In short, this repo: Implements a simple REST API exposing 3 endpoints /api/categories, /api/items, and /api/vendors. No authentication is required – no protected endpoints. It requires a real MariaDB database, so a MariaDB instance listening at the default port 3306 should be existing and is up and running. All SQL scripts (for schemas and some data) are included, under the /resources folder (/resources/bookstore_scripts.sql). Note you can read more about MariaDB in my posts: here and here. It also retains the custom validations presented in my respective posts here and here [see also below about them].

Important Key-points
Before going further, for better understanding, we can make some distinctions and also some references to the most important aspects of our subject.
- Spring almost exclusively, uses external files with key-value pairs for passing predefined values into an application. Those files are known as property files and the default extension that is recognized automatically by Spring is “.properties”.

- There are different external file formats supported. Some of the standard and commonly used external configuration file formats include plain-text files and YAML files. E.g. for the default application properties:
- application.properties
- application.yml

Note that Spring also supports JSON-formatted parameters, but if they concern application configuration properties, they have to be passed via command line arguments
- The default “.properties” extension sometimes can lead to some misunderstandings, for someone who starts dealing with the subject, because is being used for both properties and messages. So, we have to make distinguish between the values set externally, into those concerning system configuration properties, variables, class members, etc., and those regarding messages, e.g., validation, error, or other messages.

We should know that mainly there are 2 main kinds of key-value pair files (property files): those that are automatically loaded by spring when they are found in the class-path (in the /resources sub-folder), e.g., ‘application.properties’ and ‘ValidationMessages.properties’ file. And those that we can load on our own (and which -apart from the classpath- can also be located elsewhere). The latter can generally be achieved for configuration properties using the @PropertySource annotation (JSON files can be also loaded that way), and via a Spring MessageSource object.
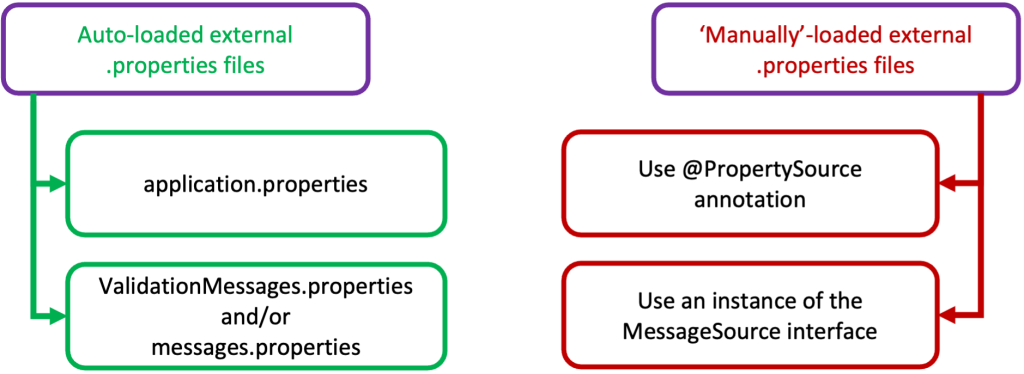
We have to be aware of the difference implementation between externally defined values that are going to be used in bean-managed classes, to those that target non-bean classes (e.g., a POJO class). We can use a class loader to read properties from a file and use them to non-ben classes.

Externally defined configuration property values can be used in Spring managed beans either directly, or via a properties POJO bean-class using the @ConfigurationProperties annotation mechanism.

Spring offers us 2 easy ways to inject externally defined property values directly into bean-managed classes: via using the @Value annotation and/or via the Environment API, using actually the @Autowired annotation to inject it to a bean class member property/variable.

There 2 techniques to read (inject) external property values: using #{systemProperties.myProp} style SpEL (Spring Expression Language) expressions, and/or using ${my.app.myProp} style property placeholders.

- We can use various ways for achieving namespace-like hierarchies. For instance, we can use separate subfolders (directory trees), dot-separated prefixes, or @ConfigurationProperties annotated @Bean methods passing a prefix.
- External messages are any kind of messages that can be output at any stage of our application providing some information to the user. However, the error messages are in the first place of interest when we develop an app.
- The Error messages can be distinguished into those concerning constraint validation, for instance, those defined in the default “ValidationMessages.properties” file, and those that target messages for other failures, e.g. authentication or other error messages, that by default can be defined in a file named “messages.properties” and they usually are loaded using a bean of a MessageSource object.

After that, we can proceed further. Let’s start from the basics.
The application.properties file, and the usage of different profiles
Every Spring/Spring Boot application automatically searches and loads externally defined configuration properties from a default file, named application.properties. The entries of such a file are based on key-value pairs.
Apart from this, it is a common practice to use different profiles for different purposes, e.g.: testing, production, deployment, location, etc. For instance, we can use different profiles for home, or office, etc. We can also use different profiles for other reasons such as our database target like, mariadb, Postgres, mysql, oracle, etc. Spring offers us a quite flexible way to have a number of various application configuration files with the appropriate properties for each one of the cases. What we have to do is to use a specific file name for each one of the property files, following a simple rule, for example, <firstpart>-<target>.properties. If it is about the application.properties, this can be achieved like that:
application-home.properties
application-office.properties
or
application-mariadb.properties
application-mssql.properties
etc.
Those application-<target>.properties files are known as profiles.
Note, that even if we use a number of different profiles, we usually, also use the application.properties file. The application.properties file is where we can put the settings that will guide our Spring application to load the properties of the desired profile to work with.
In order to use the wanting profile(s) each time our app starts up, we have to use a Spring-provided property key named “spring.profiles.active”. For instance:
spring.profiles.active=dev,mariadb
The above entry in the application.properties file loads all the properties defined in the “application-dev.properties” and “application-mariadb.properties” profiles.
Spring also allows us to specify our desired profile(s) using the command line using a similar switch:
--spring.profiles.active=dev,mariadb
If we like to use a different profile as the default one, we can have a respective profile named “application-default.properties” which should be loaded by default. We can also set a different named profile as our default profile up in our application.properties profile like that:
spring.profiles.default=mydefault
This is useful for example when active profile(s) cannot be found. Moreover, if we don’t want to use a default profile, we can set it to “none” like that:
spring.profiles.default=none
Furthermore, we can also use the “spring.profiles.include” property to add other active profiles on top of those activated by the spring.profiles.active property. E.g.:
spring.profiles.include=local
A couple of more point should be also referenced here:
- If we have overlapped properties defined into different loaded profiles the property value in the last loaded profile replaces any prior value from a property with the same key name.
- We can programmatically set active profiles by calling SpringApplication.setAdditionalProfiles(…) before our application runs. It is also possible to activate profiles by using Spring’s ConfigurableEnvironment interface.
The default application.properties file and its versions in YAML and JSON
Below is the repo’s (initial) application.properties file (located in /resources folder, of course):
As you can see, nothing special. However, if someone, instead of the key-value pairs plain text file, would want to use its YAML equivalent, here is, how it should look like:
As you can see, it offers us a bit less writing, as well as a sort of hierarchical grouping, which of course has a better looking.
Note that, in case both: the application.properties and the application.yaml files coexist with overlapped properties-values, then the plain-text application.properties file has precedence over the application.yaml file, i.e. property values defined in it overwrite the respective ones in the application.yaml file.
One more point worth mentioning here is that YAML files cannot be loaded by using the @PropertySource annotation (see below) or @TestPropertySource.
One more thing worth mentioning here, as best practice, is to avoid using mixed types of plain-text and YAML files. You better keep using just only the same file type for your properties, either, plain text or YAML.
Note that, in this post, we will primarily focus on external plain-text files based on key-value pairs.
Adding properties in application.properties file
Now, let’s see how we can add some more external values concerning some of the fields/member variables of our bean classes. For this purpose, we will use the database table names used in our project repositories (CategoriesRepo.java, ItemsRepo.java, and VendorsRepo.java).


So, let’s add them in our application.properties file, like that:
The placeholder syntax
Then we can use the @Value annotation to inject them into our repos. The @Value annotation is a convenient and widely used way for passing externally defined values to variables. It can be used at the field, method, or constructor level in Spring-managed beans. (Recall, that it can be used either with SpEL or the placeholder syntax).
For the CATEGORIES_TABLE field, in CategoriesRepo, we can use placeholder syntax, to inject the value into this class field. This can be done like that:

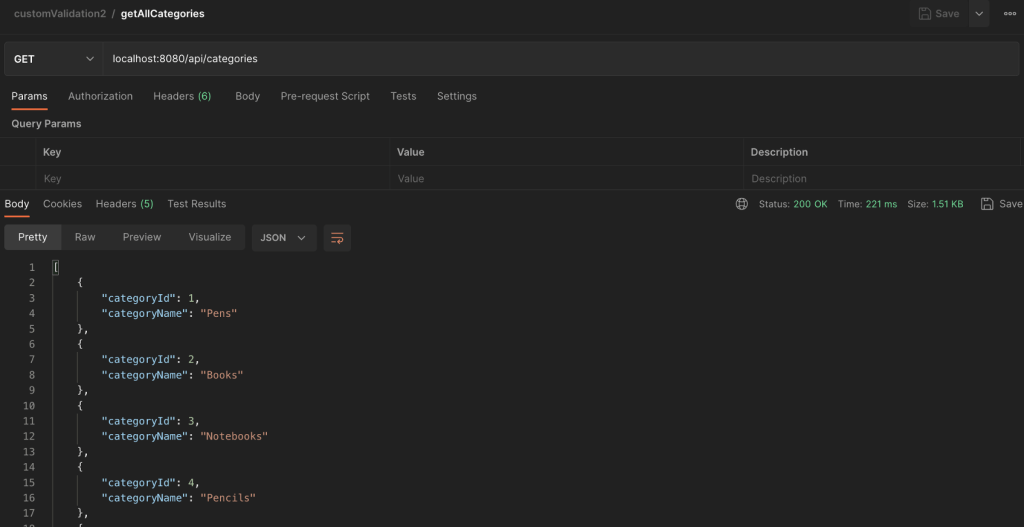
This works fine and you can see the results below via POSTMAN:
Using default values with @Value(. . .) annotation
But what if this value is missing from the outer file (the application.properties file in this case)?

Actually, this causes our application to fail to start:

To resolve such a situation, we can provide a default value separated with colon “:” in the style property placeholder we’ve used. This is how we can do that:

Passing a value to a static (and/or final) variable coming out from @Value
As you might have already noticed, we have also removed the initial final keyword String and this is because we can’t inject values via @Value annotation to final (and static) fields. However, we can use the @Value annotation indirectly.
One option we have to inject values into a final field is through Constructor Injection, like that:
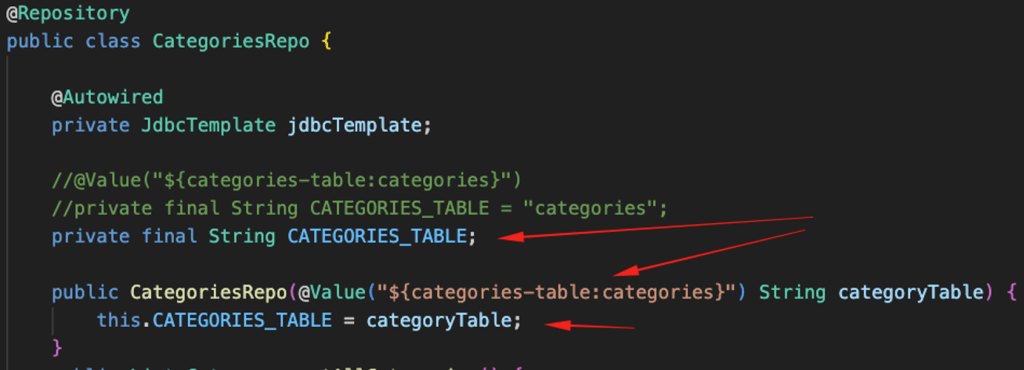
In a similar manner, instead of constructor injection, we can use a @Value setter injection in a non-static member method, e.g.:
SpEL expression syntax
As has already been mentioned before, we can use either the placeholder ${…}, or the SpEL #{…} expression syntax to inject a value using the @Value annotation. So, the above example can be written using the SpEL expression syntax like that:

or for a non-final field and without Constructor Injection:

The systemProperties is necessary because we want to fetch a value from system properties that should have been read from the default profile (the application.properties file), during the startup of our app, and added to the app’s Environment.
Even the fact that the SpEL syntax is a bit more complicated, it is more powerful and quite flexible, allowing us, amongst others, to use placeholder syntax inside it.
In the same way, we can use to pass the externally define values for the rest of the table names to all of our Repos. You can find here the commit of the updated repo.

It has been already mentioned before, that there are cases where we can combine placeholder and SpEL syntax. For instance, let’s say we have defined an environment (shell) variable that defaults to a value, and we want this value to be used as a default value in case of the absence of the respective external property.
Suppose that somewhere in your application properties you have the property “db.mame”:
. . .
db.name=oracledb
. . .
And also, you have defined the shell env variable “DEFDBNAME”:
$ DB_DEF_NAME=mssql
$ export DB_DEF_NAME
Then you can use shell environment variable as default value, using SpEL syntax inside placeholder, like that:
@Value("${db.name:#{environment.DB_DEF_NAME }}")
Passing values to a List or a Map
Apart from passing just one property value, we can also pass a number of values to a List, or a number of key-value pairs to a Map.
Let’s say you have defined some comma-delimited color values to my.colors property in your application properties:
my.colors=Red,Green,Blue,Yellow,Magenta
Of course, we can obtain the whole comma-delimited string passed in “my.colors”:property
@Value("${my.colors}")
private String myColors;
And then we can use poor Java code to split it and place it in a List.
However, SpEL allows us to do it in place.
@Value"#{'${my.colors}'.split(',')}")
private List<String> myColorList;
Besides, we can use curly {…} braces to surround the comma-delimited values string. We have also to include each value in single quotes, like that:
my.colors={'Red','Green','Blue','Yellow','Magenta'}
SpEL recognises this format, and we can use it in a simpler syntax:
@Value("#{${my.colors}}")
private List<String> myColorList;
Similarly, we can pass key:value pairs assigned as values to an application property:
countries.capitals={Greece:'Athens', Cyprus:'Nicosia', France:'Paris', Belgium:'Brussels'}
// Here we also provide the default values
@Value("#{${countries.capitals:{{Greece:'Athens', Cyprus:'Nicosia', France:'Paris', Belgium:'Brussels'}}}}")
private Map<String, String> countryCapitals;
Getting Environment variables
Instead of injecting values via @Value annotation, an alternative is to autowire the Environment instance. Using it, we have direct access to properties in our bean class.
The Environment object represents the environment in which our application is running. It generally consists of the app profile(s) and externally defined properties, e.g.: properties files, JVM system properties, system environment variables, etc.
The Environment instance can be obtained from the application context. Normally, we use the SpringApplication class to bootstrap our application. By default, it creates the appropriate ApplicationContext instance (and refreshes it). Then we can use it to get the Environment like that:
ApplicationContext appcxt = SpringApplication.run(externalValuesApplication.class, args);
Environment env  = appcxt.getEnvironment();
The SpringApplication is also responsible to load all singleton beans. So we can use the @Autowired annotation, to inject the Environment object it in our beans.
After we obtain the Environment object, we can use the .getProperty(“property-name”) method, to obtain the value of a particular property via its key-name.
The example snippet below shows how you can use it with our CategoriesRepo class:
You can find the so-far repo-commit here.

Using the @PropertySource annotation
The @PropertySource annotation is a flexible way to add property sources (files) into our application environment. Previously, we have added the table names properties used in our project repositories into the default application.properties file.
Note that even though it is a good practice to use the “.properties”, extension, we can also use any name and with any ending we wish. Furthermore, we can also use any location, to place our custom-named property files.
First, let’s create a new plain-text file naming it e.g. “db-objects.props”. Then we can cut and paste the table-name properties from application.properties files into the just-created file.
The @PropertySource annotation normally, is being used in conjunction with @Configuration classes for defining property beans, which then, are available to all bean-managed classes.
If there is not yet a class annotated with @Configuration, instead of using a new one just for this, a “quick and dirty” solution is to use the starting class of our app, which in our case is the “externalValuesApplication.java”. And which is “super’ annotated via the @SpringBootApplication annotation. So, what we have to do is to add the @PropertySource annotation and pass it the name of the ”db-objects.props” file. Our externalValuesApplication class becomes:
A better approach for more complex applications, is to use a separate class, annotated by both @Configuration and @PropertySource. For instance, we can use such a class named “PropConfig.java”, with our external file “db-objects.props”, it should look like this:
Even without adding any further code in that class, this is all we need. No other changes are necessary. Spring reads our properties from the db-objects.properties file and puts them in the app’s Environment, together with other settings and property values provided from other sources, e.g.: from the default application.properties file.
Above, we have used the ‘classpath:’ to tell the Spring Boot to look at our resources folder for the properties file.
@PropertySource("classpath:db-objects.props")
However, we can also use any file we wish located elsewhere by providing its full path-name location via ‘file:’, for instance:
@PropertySource("file:/Users/panos/dbsettings/db-objects.props")
In case the properties filename cannot be found, you will probably get an exception error similar to “… BeanDefinitionStoreException: Failed to parse configuration class …”. If you have mobilized your @Value annotated fields, setters, etc, with default values and you wish to let Spring Boot ignore this error, you can use the option “ignoreResourceNotFound” and set it to true, like that:
@PropertySource(<strong>value</strong>="classpath:db-objects.props1", <strong>ignoreResourceNotFound=true</strong>)
Note that, when we use more options apart from the properties filename, we must also use the ‘value=”file-path-name”’ as we did above.
Using @PropertySource with some other options
The @PropertSource annotation is enough flexible and it can be used with a number of options. Below you can see some of them:
Dealing with more than one property files using separate annotations:
Or, if the file is not located in the app’s classpath, we can use its absolute full pathname:
Alternatively, we can use an array of @PropertySource annotations using the @ProperySources annotations, like that:
Note that, since, we can load multiple property files to spring environment, there would be a case when one property key is used in multiple files. So, if there are same keys present in multiple files, then the last property file loaded will override the earlier values.
Dynamically change the name of a properties file using an environment variable
Suppose you want to be able to start your app using a different property file name -even partially different- each time, and on the basis of an environment variable being used dynamically. You can achieve this by using an appropriate OS environment variable like that:
$ envTargetDb=mssql
$ export envTargetDb
Alternatively, you can pass the respective argument in your command line:
-DenvTargetDb=mssql
If you use VS Code, you can add the following line at the end of your preferred configuration, in the launch.json file, in the “hidden” .vscode sub-folder of your project (it overwrites the respective shell environment variable):
"vmArgs": "-DenvTargetDb=mssql"
Of course, it is expected that your property files should have been named accordingly. For instance, in our case, they could be named like that:
db-objects-mssql.properties
db-objects-mysql.properties
db-objects-mariadb.properties
etc.
Then, when we use the @PropertSource annotation we can use the appropriate placeholder into the pathname, like that:
Note that since we use a default value (mariadb), this is what will be used in the absence or failure of the envTargetDb environment variable.
One more fancy usage of the above approach is to define env variables pointing to different pathnames based on different prefixes and also to use a default value within the placeholder. This is useful when for instance such environment variable has not been exposed, or cannot be found elsewhere. Then you have the option to use a default prefix value that you can use if you are sure that it matches the required properties full path name file.
An alternative: Using a PropertySourcesPlaceholderConfigurer Bean
Spring offers us one more option to load/register a property bean via the PropertySourcesPlaceholderConfigurer class. Using a static PropertySourcesPlaceholderConfigurer bean in a Configuration class works similarly to the @PropertySource annotation we’ve previously seen. Even this approach seems not to be widely used, Let’s see an example. We can create a separate Configuration class, but for the sake of quickness, we can use the main class of our application and create such a bean. Here is how we can do that:
The properties file is loaded as Resource in our app. Moreover, since we use ClassPathResource, we have no to use the “classpath:” for the pathname of the properties files. Finally, we can use the setIgnoreResourceNotFound() method with ‘false’ to cause an exception in case our properties file is not found.
That’s it. There is no need to do something else. We can access the properties registered via that bean, as usually we do, via @Value annotation field using placeholder syntax, or via Environment, in any bean-class of our application.
Potential issues and how to avoid them
So far, we have seen how we can set and load externally defined properties and how we can use them using placeholder or SpEL syntax with the @Value annotation, and/or via autowiring the Environment object and using the getProperty() method. This is OK and allows us to use anywhere in our beans those properties. However, there are some points that I want to clarify a bit more, in order, when using them, to avoid some of the common pitfalls.
Important points
You should be aware that generally, you cannot use the @Value annotation for classes/objects that are not managed by the Spring life-cycle management beans mechanism. Spring cannot inject @Value-annotated values into a POJO if the POJO is not a bean and it is not managed by Spring IoC Container (by definition POJO’s are not managed by Spring’s IoC Container).
And this is because the actual processing of the @Value annotation (as well as @Autowired annotation) is performed by a BeanPostProcessor. (Moreover, BeanPostProcessor is not shared across containers even in the same hierarchy). This means, that you cannot access @Value annotated fields/variable/properties values that aren’t wired yet, i.e., you cannot access any @Value annotated variable before the bean (the bean-class where this @Value annotated variable is being used), has been constructed, otherwise, you get a null value.
Also, when you use dependencies between Spring components (bean-classes), pay attention and leave the Spring to do its job alone, without instantiating a new instance of such a component. Otherwise, you will probably face null value issues. For instance, the following code snippet with components ClassA and ClassB returns null for tbName and prints nothing when we call the getTableName():
You probably have noticed the error in classA. It instantiates a new instance of classB. So, to correct the code we can autowire the classB into classA, leaving the job to Spring container.
What we have mentioned above, is also generally applicable to the @Autowire annotation, especially when it concerns the Environment API, which can also be looked up for obtaining externally defined values (from app profile(s) and properties from property files, OS environment variables, command line parameters, etc.)
So, keep in mind, that practically, you should use @Value annotated and @Autowired variables within bean-classes, i.e., classes annotated with @Configuration, @Component, and other stereotype annotations like @Controller, @Service, etc. AND only when those bean classes have been already initialized/constructed.
However, there are cases where for some reason a @Value annotated/injected field, inside your bean-class/component, returns null. And often, in such cases you probably face a NullPointerException error.
Workarounds when you face null pointer exceptions
Below there are a couple of commonly used workarounds that might be fit to your needs.
Use Constructor injection
A common cause is that the property value has not injected yet. So, be careful when you use @Value field or Setter injection:
- @Value Field injection is happened by Spring after the bean-class constructor finishes (after the object has been created / after the class instantiation), via reflection.
- @Value setter injection takes place upon setter method call.
So, where it’s feasible, a better approach is to use the Constructor injection.
Feasible here means that, if you inject a lot of property values in a class constructor, it is not the best approach. Thus, you should use only required (mandatory) property values, appropriate for your particular case.
Implement the EnvironmentAware interface
Implementing the EnvironmentAware interface in a bean class e.g. in a @Configuration annotated class, is quite useful when you use the Environment object and you get a property value via the getProperty() method, as we’ve already seen. It guarantees that your bean class will access the Environment object upon it is ready (aka all property values loaded).
Use a @PostConstruct annotated method
Note that the “original” @PostConstruct and @PreDestroy annotations were part of JSR 330 (Dependency Injection). They were deprecated in Java SE 9 and removed in Java SE 11. However, they are practically effective, via the JSR-250 lifecycle annotations (jakarta.annotation package) in Jakarta EE 9. (So, be aware to not be confused with the old javax.annotation package).
Normally, the @PostConstruct annotation can be used to annotate a particular non-static void method of a class, which for our cases here, should be a Spring-managed class (aka a bean). The @PostConstruct annotated method runs before the bean is injected into the Spring context, and thus, inside this method, we can safely initialize the externally defined property values, assigning them to class fields. Let’s see a simplified example case. Consider we have the following component class that uses a @Value annotated field (the value obtained is “categories2”):
When you try to autowire this component and use its “printMyProperty()” method, i.e.:
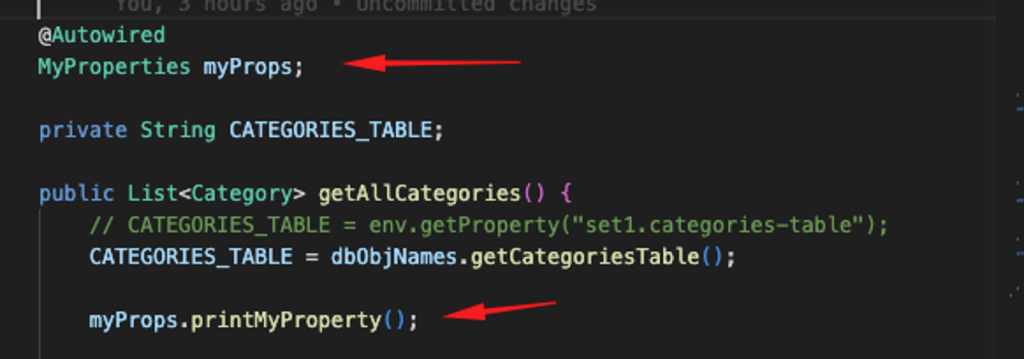
You get a null property value, e.g.: “The name of the table is: null”
But after you assign the property value from within a @PostConstruct annotated method, like the one below:
it works OK (e.g.: “The name of the table is: categories2”).
A common case that one can get a null exception for a property value is when you use it in a bean created in a child Spring context e.g. in a servlet context while your component (the one with an e.g. @Value annotated field) has been created in the parent context.
Note that if you use Constructor injection for all your property values, then using a @PostConstruct method is redundant.
One more important point here is that a @PostConstruct annotated method will be invoked only once in the bean lifecycle.
Now, let’s proceed to the next section.

As we’ve already said the previous sections which have focused on how we can set and load externally defined properties and how we can use them using placeholder or SpEL syntax with the @Value annotation, and/or via autowiring the Environment object. The next section is about using externally define properties in a more manageable and structured manner, e.g. by assigning or mapping external property values to the fields of a POJO class.
@ConfigurationProperties
Using different property files having various properties definitions/values and injecting them here and there in our bean classes is not the best practice. When your app is getting bigger and bigger and you keep scattering your properties over the whole app and adding or changing properties and values, you will catch yourself struggling to locate where this property has been defined, where else it has been used, what are the defaults you’ve used in different classes, and so on. Sooner or later, it might become a real nightmare.
A proven good practice is to keep related properties together (e.g. in the same properties file). Apart from that, we can group them together, even if they have been defined elsewhere, or are they are located in different files. Of course, we can group property files in separate folders (subfolders), but a better option we have is to precede their names with a meaningful prefix-. Moreover, following the prefixes naming style, allows us to organize our properties on a hierarchical approach as well as to activate only a given set of properties under certain circumstances. [You can check on your own, that the predefined system Spring properties used in the application.properties file follow this naming style]
Below you can see a simple example of how we can use the logic of the prefixes naming style for some of the database-concerning properties:
Grouping properties via @ConfigurationProperties and Relax binding
The @ConfigurationProperties is considered the preferred approach when we want to select specific properties on a prefix basis (regardless of where they have been defined), and use them via a structured object such as a specific POJO/JavaBean class. This is known as “relaxed binding”.
Generally, relax binding follows the “kebab” style-naming rule for ext. properties naming. Actually, it is one of the options of the “relax binding”. The following tables (tables 3 and 4 taken from the Spring official Core Features) provide all the naming options we could use:
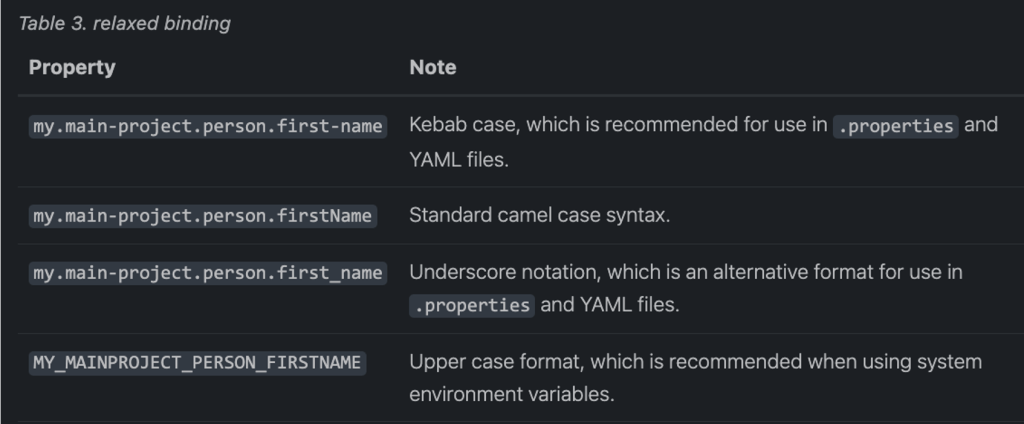
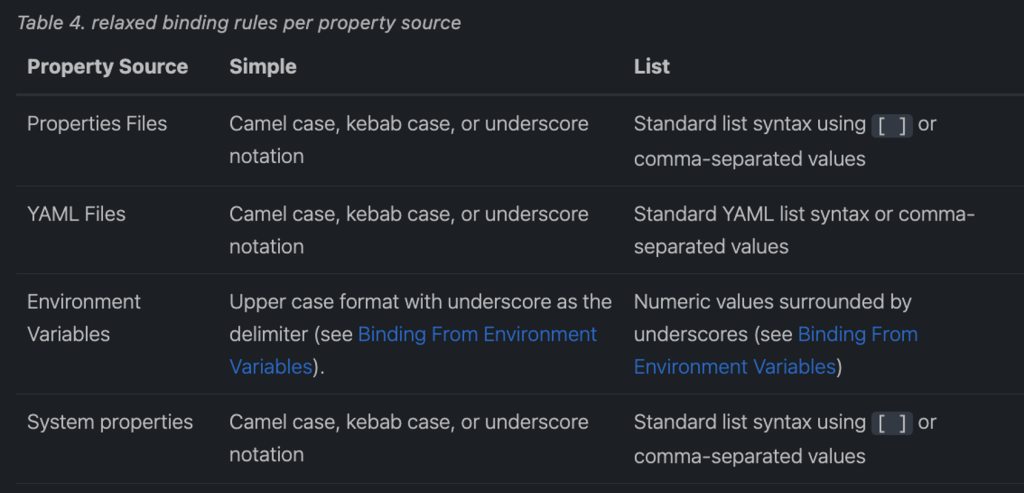
So, the recommended style for property naming is the lower-case, kebab format.
The @ConfigurationProperties annotation actually maps and binds (specific) properties to fields and/or setters of a POJO class. That way, we actually register our properties as a Spring bean that can be used in other bean classes of our app. For the purpose of an example, suppose we have properties prefixed by “set1.” and “set2.” such as the ones you see below:
The properties can be set inside the default application.properties file, where they can be loaded automatically. However, in our case, we will use a separate properties file, e.g.: the “db-objects.props” file and we will load it (all of its properties) using the @PropertySource annotation, the almost same way, we’ve previously seen in “PropConfig.java” @Configuration class:
Then suppose we want to be able to use either the set1 or the set2 of the properties via fields (getters) of a POJO class. What we have to do is to create a POJO-like class, e.g. in the “DatabaseObjectNames.java” class, and annotate it using the @ConfigurationProperties. We can do it like that:
Please keep in mind that you should be also aware of a some more things:
- we have to use getters and setters for all property bindings
- for a successful mapping of properties to POJO-like field names, we have to use a kebab-case for naming our properties. So, for instance, the “set1.categories-table” property corresponds to the “categoriesTable” field of the POJO (prefix “set1” does not count).
- we can ignore possible errors caused by invalid POJO fields (fields of the wrong type) and thus, cannot be bound to properties, by setting the “ignoreInvalidFields” flag to true
- a valid prefix is defined by one or more words separated with dots
- if there are more properties than the POJO’s fields prefixed with the same prefix, they are considered unknown to the POJO and they are ignored, but if we wish not to ignore them, then we can set the “ignoreUnknownFields=false”.
- If you do not provide any prefix, then all properties are loaded, but this not recommended
- It is not recommended to inject other beans in the POJO.
As you can see, we have also used the @Component annotation, which makes our POJO a Spring-managed bean, and thus we can inject it (e.g. using @Autowired annotation) in other beans of our application. Below is how we can do it in our CategoriesRepo class:
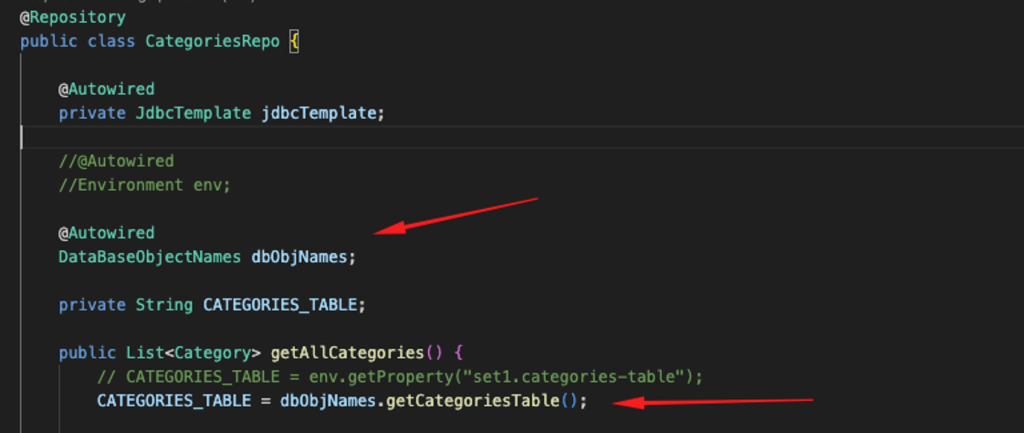
That way, changing a group of prefix-based properties is a piece of cake. As you can understand, in our case, we can do that by just changing the prefix in the @ConfigurationProperties annotation of our POJO class.
Constructor Binding and @EnableConfigurationProperties
You can see, that our POJO class is also annotated with @Component annotation, and moreover, we haven’t used any constructor. Actually, we left Spring to use the default constructor, the empty one, and this is mandatory for normal component-classes we wish to use for our properties binding, like the one in the above example.
Another way to bind properties to POJO fields is by using a POJO single parametrized constructor. However, it is important to underline that we cannot use constructor binding with “normal” beans, e.g.: @Component beans, beans created by using @Bean methods, and beans loaded by using @Import. And this is because we have to remove the @Component annotation and keep just the @ConfigurationProperties.
The @ConfigurationProperties on its own does not make our POJO a Spring-managed bean with bound properties. It remains just a POJO. In order to register a bean of a @ConfigurationProperties annotated POJO class, we have to use the @EnableConfigurationProperties annotation, not at the POJO, but in another @Configuration annotated class. (We can also add the @EnableConfigurationProperties to the main Spring application class -the one annotated with @SpringBootApplication).
Since we have already used the “PropConfig.java” @Configuration class, we can use it for our purpose like that:
After that the updated -via constructor binding- “DatabaseObjectNames.java” class, becomes:
A couple of more notes here:
- Using a parametrized constructor for property binding means that you make the POJO field bound to properties, immutable. Thus, there is no need for using setters.
- If you use just one single constructor but you don’t wish to use it for binding, then you have to annotate it with the @Autowired annotation.
- If you want to use more than one single constructor, then the one you wish to use for binding should be annotated via the @ConstructorBinding.
- If there is no matching property for a field or a setter, the unbind POJO field will be null but no exception is thrown. However, we can assign default values for POJO property fields in the constructor parameters using the @DefaultValue annotation, and it will be used if such a property cannot be found or is empty.
- The use of java.util.Optional within a @ConfigurationProperties annotated POJO is not recommended (Optional is mainly intended for use as a return type).
Scanning for @ConfigurationProperties annotated POJOs
You probably have understood that prefix(es) naming-style, allows us to centrally manage our properties. For instance, we can put, if not all, but a reasonable number of properties in just one file and then use them on the prefix-basis to define corresponding beans for our needs.
Previously we have seen how we can load a prefix-based properties file and how we enable property beans configuration on a class-by-class basis using the @EnableConfigurationProperties annotation in a configuration class.
@ConfigurationPropertiesScan
Now we can go a step further and enable configuration property scanning using the @ConfigurationPropertiesScan annotation. It works in a similar manner to component (bean) scanning, and thus, it offers us more centralized management of our properties (property classes).
In order to enable scanning of the classes annotated with @ConfigurationProperties, the usual way is to add the @ConfigurationPropertiesScan annotation to our main application class (the one that is annotated with @SpringBootApplication).
Thus, apart from the @ConfigurationProperties annotation, we don’t have to annotate our property classes with stereotype annotations, like @Component, and/or other meta-annotations like @Configuration. (Classes annotated with @Component will not be picked up by this annotation). And of course, we don’t also have to use the @EnableConfigurationProperties annotation in a configuration class. We can simply add the @ConfigurationPropertiesScan annotation to our main application class and that’s all.
However, aside from the main application class, it is also possible to add the @ConfigurationPropertiesScan to any @Configuration class. In such case, you have to be aware, that the default scanning, starts from the package of the class that declares the annotation. Nevertheless, you can also define specific packages for scanning, by passing their names into the annotation, like in the following example:
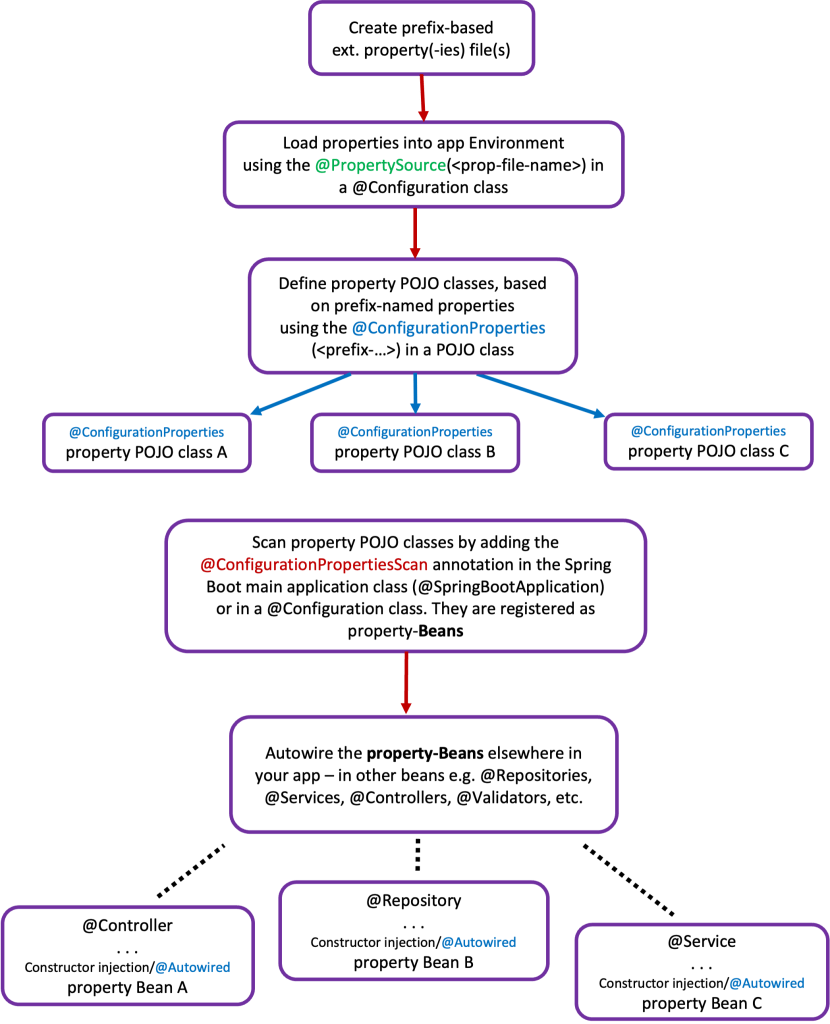
In the diagram below, you can see the logic of a centralized management of externally defined properties in Spring Boot via the key-annotations: @PropertySource, @ConfigurationProperties, and @ConfigurationPropertiesScan:
Validation of @ConfigurationProperties annotated beans
Do you remember that previously we mentioned that we can pass a default property value in a constructor-injected property field, using the @DefaultValue annotation? The default value will be used if such a property cannot be found or its value is empty. This is pretty cool but also recall that if there is no matching property for a field or a setter, the unbind POJO field is set to null but no exception is thrown. So, how we can stay aware if such a value is for instance, empty?
A really positive side effect of using @ConfigurationProperties annotated property beans is that we can use them -as any other bean classes- with JSR-303/349/380 bean jakarta.validation constraint annotations. This means that pretty simple we can use standard validation constraints to validate our externally defined property values. Of course, what one has first to do is to use the Hibernate Validator dependency in her/his app. e.g.:
The Hibernate validator offers us a quite long list of built-in validation constraints, as well as other additional constraints, covering categories such as field constraints, property constraints, container element constraints, class constraints, etc.
That said, we can use our known “DataBaseObjectNames.java” which is a properties bean annotated with the @ConfigurationProperties(prefix=”set1″) annotation. (Please, also recall that the set1 properties are loaded via the configuration class “PropConfig.java” from the “db-objects.props” properties file). What actually we have changed, is that we have just added the Spring @Validated annotation at the class level, as well as the @NotEmpty built-in validation constraint for each one of the class fields. See it below:
Then suppose that for some reason the value for categories table name in the “db-objects.props” properties file is empty:
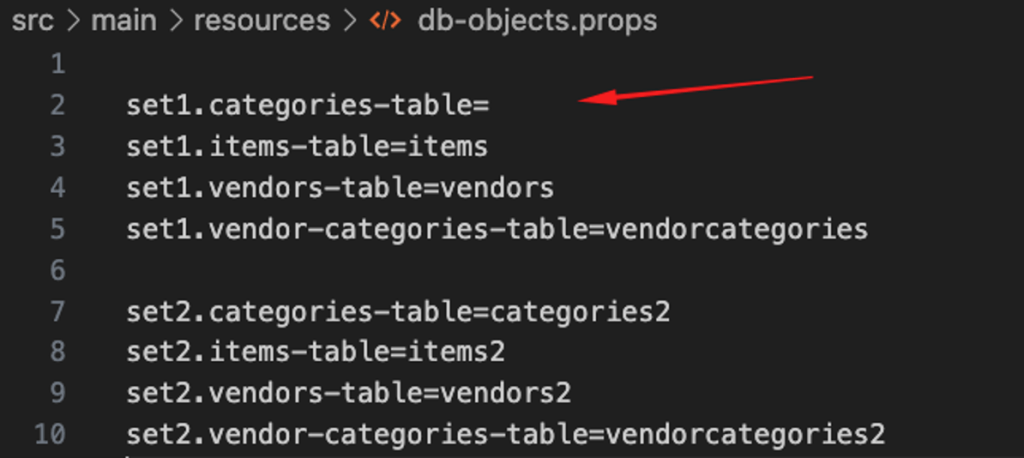
If you try to run the app, you get a startup failure with an error similar to the following one:

Note that the Validation Exception error occurs even if we have used a default value like below:
public DataBaseObjectNames(@DefaultValue("categories") String categoriesTable, . . .)
That’s OK so far and you can use any of the built-in constraint validators, in a similar way. But what if you want to use your very own custom validation for your properties bean?
Custom Spring Validator
OK, the last word for the validation of property beans here is about using a custom Spring Validator. Before proceeding to see an example implementation, I think that a clarification between a custom constraint validator and a custom Spring validator is absolutely necessary.
I have already posted a couple of posts about Custom Validation in Spring Boot (Parts 1 and 2), as you can see below:
Note that, both of the example implementations of the above posts can be also found inside the “Validators” package folder of our working repo.
So, one can think that implementing a custom Spring Validator here relies on the above ones. But, it actually, does not. The above posts deal with custom constraint validation based on Hibernate jakarta.validation.ConstraintValidator (ex javax.validation.ConstraintValidator) interface.
So don’t get confused with this example below, which deals with a custom implementation of the org.springframework.validation.Validator (Spring Validator) interface.
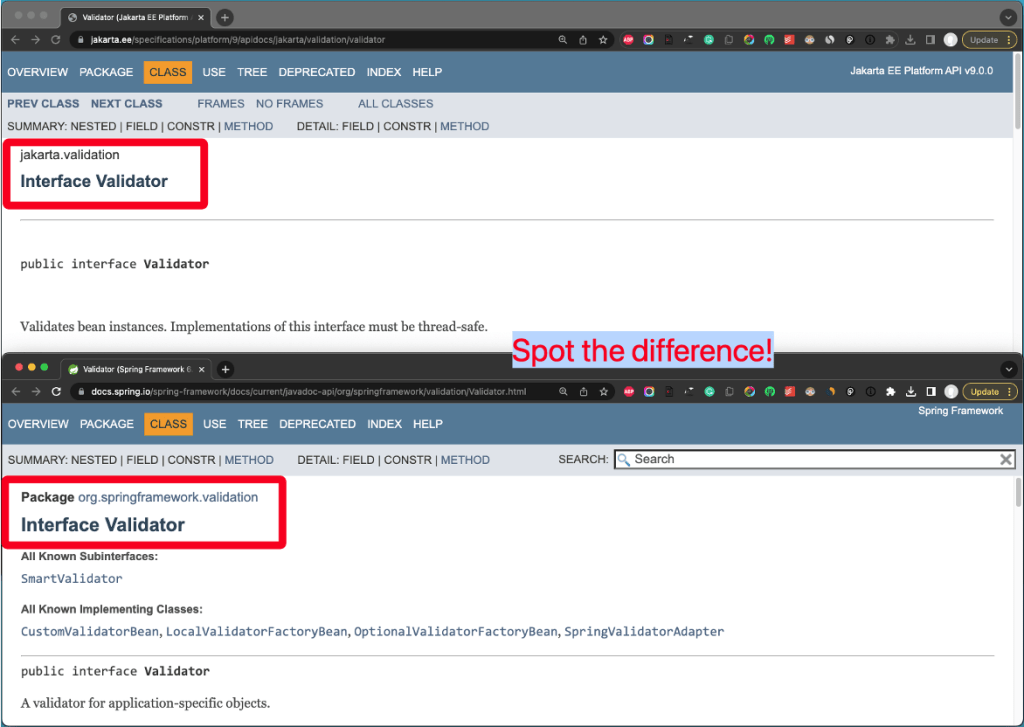
You should keep in your mind the fundamental differences:
- use custom constraint validator for Hibernate/JSR-303 jakarta.validation based custom constraints for any bean-class fields - involves an annotation interface - errors are thrown at run time
- use a custom Spring Validator for a properties bound POJO-class registered as ‘properties’ bean via @ConfigurationProperties – no annotation interface is required - errors thrown at startup
After the above clarifications, now it’s time to proceed with a simple example of a custom Spring Validator. Our example scenario is about to validate if a table name contains a specific word. For instance, for the categories table the name can be any string containing the word “categories” (in upper- or lower-case), otherwise it is rejected. This means that the property “set1.categories-table” in the “db-objects.properties” file can have a value like: “categories1”, “myCategories”, “special-CATEGORIES”, etc.
As it has been mentioned, in order to create a custom Spring Validator class, it should implement the ‘org.springframework.validation.Validator’ interface. So, let’s create a new class inside our project package folder “Validators”, and name it e.g.: “TableNamesPropertiesValidator.java”. This class, of course, implements the Validator interface.
The implementation of the Validator interface requires to use/override the 2 interface methods. The first is the boolean “supports” method that is being used to define the target properties bean class. Recall, that our properties bean class is the “DataBaseObjectNames.java”, so our custom Spring Validator should target this class. The second is the void “validate” method, and this is where our real validation logic takes place.
Bellow, you can find the example code of our custom validator:
A couple of notes about the above code:
- In the same way, we validate if the field-property “categoriesTable”, can be used for the rest of the property-fields. (This is why, by intention, I have used the BasicTableNamesEnum and commented-out similar commands for future use). So, you can do that on your own.
- The target object is our target class (in our case, this is the “DataBaseObjectNames” class).
- The ValidationUtils class offered by Spring provides a couple of quite handy methods for checking empty values, ready to be used. Here, just for demo purposes, we use the static “rejectIfEmptyOrWhitespace” method. This is better than the default constraint @NotEmpty annotation we have used in our target class (If you wish we can remove the @NotNull annotation).
- When, in the “validate” method, we reject a property we can provide some more specific info for the rejection reason, e.g. the failed field, the provided external property value, etc., with the conjunction of error messages.
After we have prepared our custom validator (the “TableNamesPropertiesValidator”), what we have to do in order to use it in a properties bean (the “DataBaseObjectNames.java”), is to make it (our custom validator) also a bean! And more precisely a static bean. Defining a bean as static causes Spring to create that bean in a very early stage, even before @Configuration class(es), and thus, any probable problems with other configuration beans, can be avoided.
Furthermore, we have to name this bean (the name of the method returning it) using a special (reserved) name for it: “configurationPropertiesValidator”. This is necessary because only the beans that are named like that will be applied to respective @ConfigurationProperties properties beans.
You probably know well, that normally, beans can be created in configuration classes. Thus, we can go back to our “PropConfig.java” class, and do it. This is how it can be done:
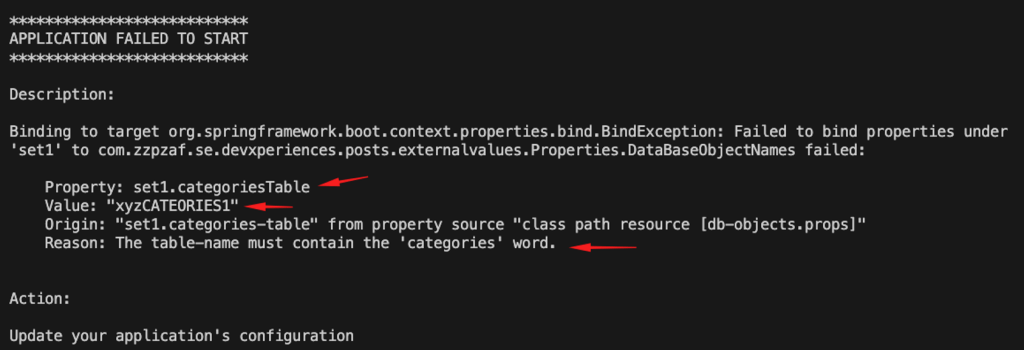
That’s it! No more to do about the custom Spring Validator. This was just a handy example of how one can also use validation constraints with the property beans. You can check its functionality, giving different values to the “set1.categories-table” like the example values we have previously seen. For instance, for “set1.categories-table=xyzCATEORIES1” you get a startup failure with information like the one below:
No more to say about externally defined properties here. We can proceed to the next session which is about error messages.
You can find the so-far repo here.

So far, we have seen properties as key-value pairs defined in external files. The same is absolutely true for whatever messages (e.g.: error messages) we want to define externally and use within our app. The reason we reference them distinctly here is that they have special treatment from the Spring framework (as they should), mainly due that there is a real need to use them in different human languages.

Generally, we can say that the property values, we’ve seen previously, rarely, or not that often, require translation. However, sooner or later, you will realize that your application targets are expanding to an international audience. And this is why we have to deal with messages separately from property values.
As we have already stated from the early beginning, error messages can be divided into those concerning constraint validation, for instance, those defined in the default “ValidationMessages.properties” file, and those that target messages for other purposes, e.g. error messages, that by default can be defined in a file named “messages.properties” and they usually are loaded using a bean of a MessageSource object. Note, that Spring provides support for the parameterization and internationalization for both of them.
Constraint Validation Error Messages
In the previous section, we have referenced the fact that the members of any class, can be validated using standard JSR-303 jakarta.validation constraint annotations (or custom constraint annotations based on JSR-303 jakarta.validation). So, when we talk about constraint validation error messages, we mean the messages that are used with those annotations.
For example, an area where constraint validation is heavily used is the DTOs that are widely used in API development. So, let’s say we have a float field in a DTO that should be greater than zero, aka a positive number, and for that purpose, you have used the standard @Positive annotation, e.g.:
@Positive
private float itemListPrice;
If in a POST body, this number is negative then, the error response includes the default validation error message “must be greater than 0”:

But what if we want to change this default error message?
ValidationMessages.properties
First, you should be aware the ‘hibernate-validator’ provides default constraint error messages, pre-defined in its own validation error messages bundle. This bundle is the JSR-303’s default validation messages bundle and it holds the default name: “ValidationMessages.properties”. So, if you have added the ‘hibernate-validator’ dependency in your project, via your dependency manager (as we’ve previously done via Maven), then those default error messages are loaded automatically. This is actually the result of the ValidationAutoConfiguration class that loads the default messages via the instantiation of a default LocalValidatorFactoryBean object (with a bean named “defaultValidator”). The ValidationAutoConfiguration class, in its turn, has been fired automatically by the Spring Boot auto-configuration mechanism for our app’s context, when we bootstrap it via the @SpringBootApplication annotation.
However, Spring is powerful enough and allows us to overwrite those default values by creating our own ValidationMessages.properties file in the project’s “resources” subfolder (classpath). If the Spring finds that file in the classpath, then, by default, it loads it automatically, overriding the default one, and manages it via its context.
So, the first option we have is to create the ‘ValidationMessages.properties’ file in our project “resources” subfolder and put an entry in that file, for a property we are interested in, e.g. in our case the default property (key) name is “jakarta.validation.constraints.Positive.message”, and give it a value of our own error message. For instance:
jakarta.validation.constraints.Positive.message=Def: The Item Price should be VALID, aka greater than zero.
This time, giving a negative value, results with our overwritten message:

This is OK, but not that cool. First, by doing so, we change the default message entirely, everywhere in our application, which as you can understand, is not a good practice, especially if we want to change the default error messages for others or the rest of the standard constraints.
Another option we have is to go to our code, and change the error message ad-hoc, by including our own message as a parameter in the annotation, like that:
@Positive(message = "The Item Price should be a positive number.")
private float itemListPrice;
Again, when we pass a negative message we get the error response, but this time it returns the error message we have defined via message parameter:

This option is OK, but again, it is not the best one. This is because every time we want to add or change such validation settings, we have to intervene in our code to change it.
messages.properties and interpolation
Even so, Spring offers us the preferable solution. For this purpose, we have to create a new messages file. Spring, by default, recognizes such a file, and if its name is “messages. properties”, it loads and manages it automatically, as well. Having such a file in our classpath, we can add our custom message entries to it. Entries are key-value pairs, as usual, and moreover, here we can add messages key-names we like, without having to use the default constraints names, we’ve seen with ValidationMessages.properties.
So, let’s add the following entry in it:
items.price.positive=The Item Price should be VALID, aka greater than zero.
Then in order to use it with the message parameter in our @Positive annotation, we have to interpolate it, aka putting the key name inside curly brackets, like that:
@Positive(message = "{items.price.positive}")
private float itemListPrice;
Note that interpolation syntax is pretty close to the placeholder syntax, and actually the difference here, is that we don’t use the $ dollar symbol in front of the first bracket.
Again, we can see that in the case of a negative value, now we get back our externally defined error message:

Note, that we can also use the “ValidationMessages.properties” to add our very own entries, but since the “ValidationMessages.properties” is primarily dedicated to the default constraint names, mixing them with our custom entries, would not be the appropriate approach. However, we can still do that. So, in the case where we use the same key-name in both of the files, the one inside the “messages.properties” has precedence and overwrites the one with the same name in the “ValidationMessages.properties” file.
Starting up with localization – messages in different languages – messages.properties
One more important aspect is that one can create and use messages in different locales and languages. Spring, by default, uses the messages.properties file. So, the messages in this file can be in any language you wish. However, normally we use just one language to write them, e.g. English.
You can define any other language you prefer, by adding an underscore and the corresponding 2 letters from the ISO 639-1-2002 standard, as suffix after the basename ‘messages’ in the name of the file. This is something like that: “messages_XX.properties” where XX is the language code. So, if you wish, you can use the French language for your messages, then you have to put them inside a file named “messages_fr.properties”, for German: “messages_de.properties”, for Greek: “messages_el.properties”, and so forth.
For example, let’s create the “messages_fr.properties” file and put the following entry in it:
items.price.positive=Le prix de l'article doit être VALIDE, c'est-à-dire supérieur à zéro
Before using the French language messages file, we have to instruct Spring to use it. The first option we have for that is to set it in our application.properties file by adding the following entry:
spring.web.locale=fr_FR
After that, checking again a negative value, we get back our externally defined error message in French:

Note that the “spring.web.locale=…” setting, also affects the default constraint validation messages, and also picks up a corresponding “ValidationMessages_XX.properties” file, if any.
Furthermore, be aware in case you have more language-specific messages properties files, then the default file “messages.properties”, serves also as a fail-back option when the specified language/locale cannot be found. If you don’t have a “messages.properties” file, then in a such “not-found” case, your message interpolation will fail, as well. However, this can be also customized further, using the settings below.
Apart from the locale (language) configuration inside the “application.properties” file, Spring also provides a number of other settings that one can use for better tuning of the messages used via the “messages.properties” file(s). The following table is an extract of Spring Common Application Properties, concerning messages settings:
| Name | Description | Default value |
| spring.messages.always-use-message-format | Whether to always apply the MessageFormat rules, parsing even messages without arguments. | false |
| spring.messages.basename | Comma-separated list of basenames (essentially a fully-qualified classpath location), each following the ResourceBundle convention with relaxed support for slash based locations. If it doesn’t contain a package qualifier (such as “org.mypackage”), it will be resolved from the classpath root. | messages |
| spring.messages.cache-duration | Loaded resource bundle files cache duration. When not set, bundles are cached forever. If a duration suffix is not specified, seconds will be used. | |
| spring.messages.encoding | Message bundles encoding. | UTF-8 |
| spring.messages.fallback-to-system-locale | Comma-separated list of basenames (essentially a fully-qualified classpath location), each following the ResourceBundle convention with relaxed support for slash-based locations. If it doesn’t contain a package qualifier (such as “org.mypackage”), it will be resolved from the classpath root. | true |
| spring.messages.use-code-as-default-message | Whether to use the message code as the default message instead of throwing a “NoSuchMessageException”. Recommended during development only. | false |
As you can see, we can use the “spring.messages.fallback-to-system-locale” and set it to “true” if we want to use the system locale as a fail-back option.
For example, you can set the “spring.messages.cache-duration’ to 5 seconds, and then, after you started the app, change the message inside the messages_fr.properties file and recheck the response again after 5 seconds. This is really cool!
So far, so good, however, another interesting part follows now.
Loading and using different message files
Now we are ready to see how we can load message files with different names and/or located elsewhere and register and use them as beans.
Our “weapon” here is also offered by Spring, and this is a bean instance of the MessageSource interface. As the official documentation states, this is the “Strategy interface for resolving messages, with support for the parameterization and internationalization of such messages.” But the real implementation can be realized via one of the classes: ResourceBundleMessageSource or ReloadableResourceBundleMessageSource, which Spring also offers us. The latter is usually the preferred choice since it is capable of reloading files based on timestamp changes, and also of loading properties files (which can be XML-based property files as well) that can be located anywhere in our system and beyond the classpath. Moreover, one can specify a specific character encoding, e.g. UTF-8.
As we often say, a bean can be created in a configuration class, however, for our example here, we can use again our favorite “PropConfig.java” class (the one we have used so far). Below you can see a simple implementation of a MessageSource bean added to it:
Note that above we’ve used the classpath with “messages”. “messages” is actually the basename, so other locale/language-specific files, can also be loaded. (This is actually about the same files we’ve used so far). However, we can use any file name we wish which also can be located elsewhere, apart from the app’s classpath. Furthermore, instead of “setBasename” method we can use the “setBasenames” method and provide comma-separated names for more than 1 file. E.g.:
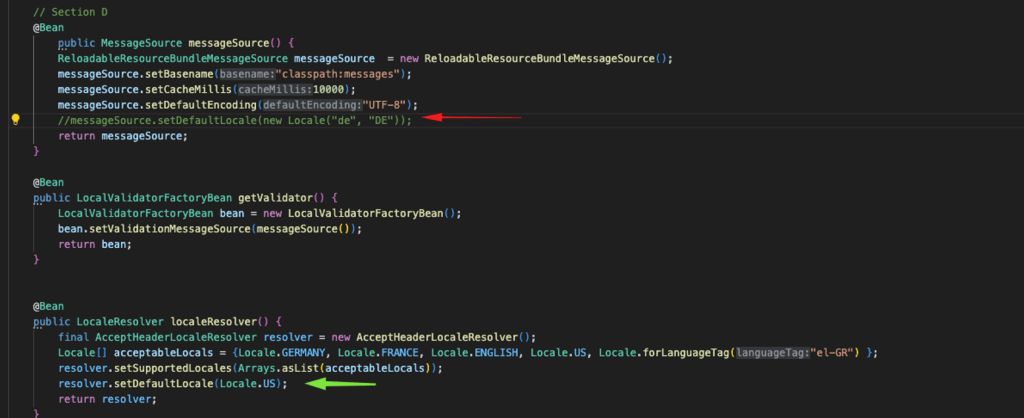
Note also, that we have set as default language/locale the German Language.
The fact that we have defined our MessageSource bean, does not mean that the messages loaded for the messages file provided are automatically ready for using them with our validation purposes. Another bean, based on the Spring LocalValidatorFactoryBean (we’ve referred to it at the beginning of this section), is also needed. The LocalValidatorFactoryBean takes our messageSource bean and uses it as Validation Message Source. Thus, it actually overwrites the default “defaultValidator” bean, which is being created during Spring validation auto-configuration at startup.
This is the snippet we can add to how we can after the MessageSource bean:
By doing so, we are able to use the key-value pairs inside our messages.properties file(s) for validating our fields in our application beans.
You should remember, that we have configured the default locale to French, in our application.properties file (spring.web.locale=fr_FR). However, you can see earlier defining our messageSource bean, which we have set as the default locale/language the German language. This means, that now the German language has precedence over the French language. So, if the German language is found, then the German language will be used. The German language will also be used if the French language file is absent. You can test this, if for instance, remove/rename temporarily the “messages_fr.properties” file in your application deployed folder, like in the Tomcat below:
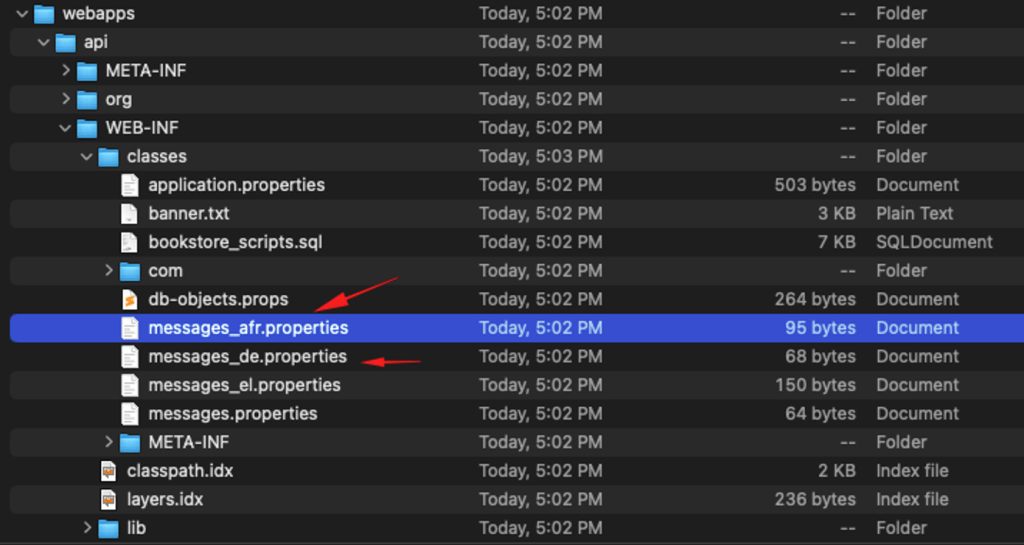

Finally, if neither the messages_de.properties file (or the message property in it), then the default fail-back messages.properties file will be used.
Using a LocalResolver
Up to now, we have seen how to set a default locale via the “spring.web.locale=…” application.properties file. However, if we wish to determine and manage the current locale at runtime, we can use another Spring “weapon”, and this is a bean implementation of the LocalResolver interface. In fact, an implementation of the LocalResolver interface makes it easy to customize our application for languages and locales (country), even currencies, and timezones (date/time) without any code intervention.
If you read the official documentation, you see that Spring also offers us ready-made implementation classes for the most common cases which allow us to set the locale dynamically and even by the client/user. Those cases concern the dynamic setting of the locale, for a session, via cookies, and via a request header, actually the Accept-Language header. So, for those cases the implementation classes offered are the SessionLocaleResolver class, the CookieLocaleResolver class, and the AcceptHeaderLocaleResolver class respectively. The latter is the most appropriate approach for a REST API like here.
Implementing an AcceptHeaderLocaleResolver
Below is an example snippet that implements an AcceptHeaderLocaleResolver bean that we can add after the previously defined LocalValidatorFactoryBean:
The important point here is that we have defined a list of the locales that our application supports, and thus they are acceptable. If the client request via the Accept-Language header a language/locale that it is not in our acceptable list, then
Also, you may have noticed, that for the Greek Locale and GREECE, we have used the Language Tag, since GREECE is not yet (and this is a pity) in the list of predefined county constants of the Java Locale class.
Capturing the Accept-Language header in a Controller/method
For a specific endpoint request, we can capture the Accept-Language header requested by the client/user in the respective endpoint controller, particularly in the method you wish. So, suppose that you have a Post method in your controller for adding an item. Then you can capture the Accept-Language header, using the @RequestHeader annotation like that:
Now, let’s test it via Postman, by adding an acceptable header (here for Greek/GREECE:
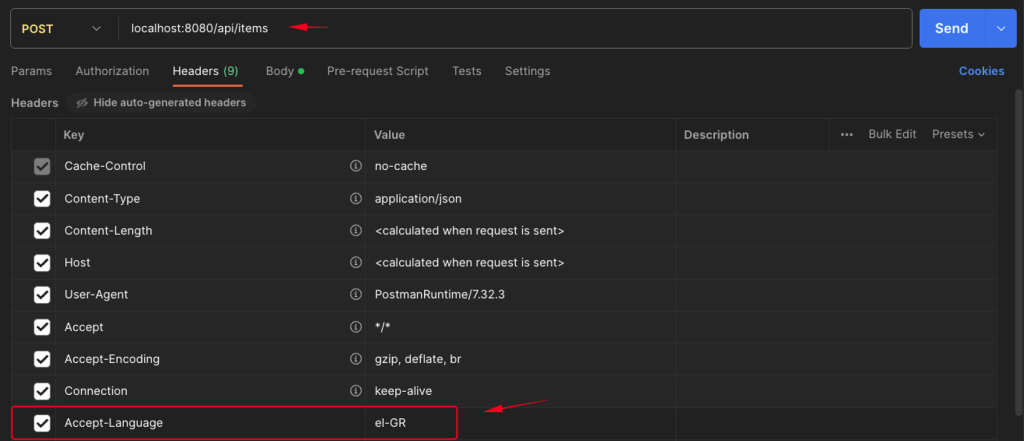

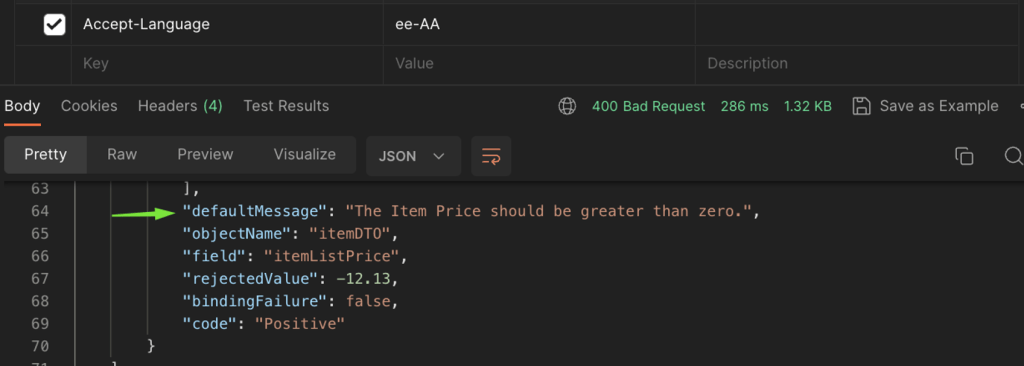
Note that if a non-acceptable/unknown language has been sent via Accept-Language header, then the German language, defined in the MessageSource bean, will be used. If no default value has been set in the MessageSource bean, then the default US language/locale in the LocaleResolver bean will be used. See below the related screenshots:
Capturing the Accept-Language header for all requests with a Custom LocalResolver
Using a @RequestHeader in each of the methods in our application maybe is not the best approach (DRY). So, probably a better solution is to create a custom LocalResolver, based, of course on the AcceptHeaderLocaleResolver class. By doing so, we have the ability to override the resolveLocale() method and capture the Accept-Language header from any incoming request. Then, according to the provided language/locale value, we can assign it (return it) directly as our selected/preferred locale. Here is an example:
Please notice from the above example, that we also can pass more than one language/locale via the Accept-Locale header, by providing them separated by commas (comma-delimited string, e.g: “el-GR, fr-FR, en-UK, …”). This allows us to match and select the first value provided with the first acceptable language/locale in our (custom) list.
After that, we can use the CustomLocalResolver as our bean:
Finally, we can remove the @RequestHeader from our controller method, since it is not needed any more:
That’s it. You can test it with any of your endpoint and in any controller method.
Other options
Of course, it’s also possible to capture the header(s) of all incoming requests using a custom Spring interceptor, for example, an implementation of the HandlerInterceptor interface, capable to capture any header such as the Accept-Language header (and much more). However, using an interceptor is a more general approach and a bit “heavier” here, when we want just to get and set the language/locale preferred by the client/user. Therefore, we will omit it in this article.
On the other hand, using a SessionLocaleResolver class bean together with the LocaleChangeInterceptor class bean also provides the ability to dynamically switch to the locale passed through a request (query) parameter. (The default parameter name accepted by the LocaleChangeInterceptor, is “locale”. SessionLocaleResolve is widely used especially in Spring Web (e.g. MVC) applications.
Recall that when we use custom or “ready-made” interceptors, we must always register them into the application interceptor registry.
The final reference here is the FixedLocaleResolver class. This is another pre-packaged LocalResolver implementation that always returns a fixed default locale (which defaults to the current JVM’s default locale). Note that fixed locales and time zones cannot be changed after use.
OK, until now we’ve mainly talked about validation-related messages. But, what about other messages used elsewhere? Let’s see how we can deal with them.
Other Messages
As we’ve already said, externally defined messages can be used everywhere in our applications. Apart from Validation errors that can concern other types of errors (e.g. authentication errors, exceptions, response errors, etc.), as well as other areas such as informative messages, logging, running processes, and so forth.
Hopefully, we already have our MessagesSource in place, and moreover, we have also referenced the fact that we can use more than one external file with it. Furthermore, note that we can also define and use not just one, but multiple MessageSource beans, e.g.:
You can see that we have used the bean @Qualifier annotation. This is necessary for distinguishing beans of the same type, otherwise, we can get an error similar to: “… Unsatisfied dependency expressed through field ‘infoMessages’: No qualifying bean of type ‘org.spring.framework.context.MessageSource’ available: expected single matching bean but found 3: validationMessageSource,infoMessageSource,messageSource …”
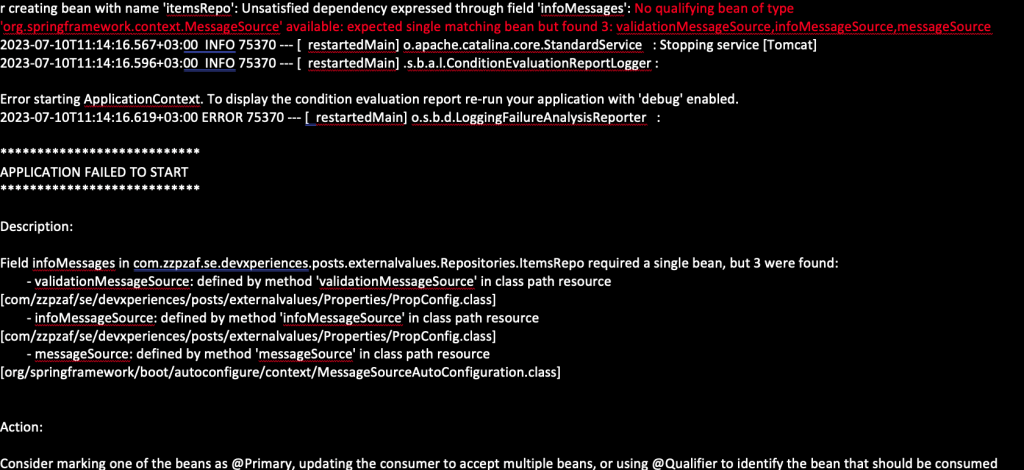
Thus, we can just rely on MessageSource beans for our needs. What we have to do, is simply to auto-wire the MessageSource bean we like, in any other bean class of our app. Then, since messages are also key-value “properties”, we can get the desired message using its key-name string (the code) passing it into the getMessage() overloaded method that the MessageSource provides.
Now let’s see a simple implementation example. For this, you can create a \resources sub-folder and name it e.g. “information”. Then put there a couple of properties files, for instance, the files: “infomessages.properties”, “infomessages_de.properties”, “infomessages_el.properties” and “infomessages_fr.properties”. Then you can add the key “info.items.repo-method” in all of them and give it the appropriate string for each respective language, as a value, e.g.:
info.items.repo-method=The method has been loaded for a response.
info.items.repo-method=Die Methode wurde für eine Antwort geladen.
info.items.repo-method=Η μέθοδος έχει φορτωθεί για απόκριση.
info.items.repo-method=La méthode a été chargée pour une réponse.
The 2nd bean we’ve seen in the previous example snippet, the one that is qualified with @Qualifier(“infoMessageSource”), is responsible for managing these files. So, you can copy-paste it into our known configuration “PropConfig.java” class. Now, suppose you want, in one of our project repositories, to provide a simple message that is output to the console. This message is actually the above one with the key name (code): “info.items.repo-method”.
The snippet below is an extract of the project’s “ItemsRepo.java” class (inside the package folder “Repositories”, and it shows you how easily can access this message:

As you can see above, since the getMessage() method is an overloaded one, it can be called, providing or not, the desired locale. If we omit the locale parameter, then the message will be “Greek to you” :-), because the default locale in the “infoMessageSource” bean is the Greek locale. But, if we wish we can change this, by passing our preferred locale, as we did above by using the German locale/language. Feel OK to test it via Postman
Changing the locale of the non-validation-related messages
You should be aware, that the non-validation-related messages are not affected by a LocaleResolver and/or any user preference, e.g.: via an Accept-Language header. If you get a closer look at the syntax of the overloaded .getMessage() method provided by the MessageSource interface, you will see that we can provide a locale as a parameter, that does the job. E.g.:
this.errNoUserFromHeaderMsg = otherMessageSource.getMessage("MSG.ERR.AUTH.GETTONG_AUTHORIZATIONN_HEADER_ERROR", null, "Error getting the Username from Bearer JWT token! - ", Locale.ITALIAN);
This is OK for the “ad-hoc” changes but useless if we want to automatically align the locale according to the user preference. A trick that we can use and that works in many cases is to get the current instance of the HttpServletRequest and capture the user preference from it. The HttpServletRequest object is passed into almost any key method of the Http Request-related classes (filters, interceptors, controllers, etc.). Furthermore, all request-scoped beans (e.g.: a custom Authentication Provider object, a custom UserDetailsService, etc.) can be autowired with the HttpServletRequest object. E.g.:
private
@Autowired HttpServletRequest request;
In those cases, we can capture the locale by using the .getLocale() method of the HttpRequest. After that, we can pass it to the locale parameter of the getMessage() method to do the job. E.g.:
this.errNoUserFromHeaderMsg = otherMessageSource.getMessage("MSG.ERR.AUTH.GETTONG_AUTHORIZATIONN_HEADER_ERROR", null, "Error getting the Username from Bearer JWT token! - ", request.getLocale());
So, you can try to apply this “trick” (or similar techniques) in your own implementations.
A question: Should we use all of our error messages with all the locales we use?
As you know, a Spring application in most cases uses a large number of 3rd-party “ready-made” libraries/packages. Those libraries use their very own internal messages thrown when exceptions occur. The vast majority of those messages are by default in the English language. And it would be painful enough to correspond them to our external messages (or override them) in another language/locale. In my opinion, we have to avoid doing so, unless there is a particular reason/assignment for this.
In that sense, we have to think carefully, about which of our external messages really need to be “translated”. Practically, which of them should be picked up from the corresponding locale message properties file, on the basis of the locale the user provides (by any means, e.g.: Accept-Language header, request query parameter, etc.).
One of the “rules” I mostly follow, is to avoid adapting to a switched locale, those of my external messages that are used together with a 3rd-party libraries message (which I don’t control). Take a look at the following snippet for calling a method of extracting the user name from a JWT token:
As you can see above, using the locale parameter, results in our “errNoUserFromHeaderMsg” message to switch to the respective language. But then, we mix it with the internal exception message (which provides more details for the error nature) thrown from the 3rd-party library used. The final result is to have a mixed-language message which of course is not the appropriate approach.
So, leaving the messages we wish for in English is quite simple. We can use the English language for our messages in our failback <basename>.properties file, and then, we have left out their keys in the other <basename>_XX.properties locale files.
That’s it. Working similarly you can define and manage your own messages files and use them in your bean-classes. However, a question that you might wonder about, is “What if I want to use externally defined messages without using a MessageSource bean, in my non-bean classes?”. You can get a good grasp by reading the next and final section of this post.
You can find the so-far repo here.

There could be cases where we don’t like to use a MessageSource bean for our externally defined properties/messages. And moreover, we want to use them in any class of our application, and even in classes that are not managed as beans from the Spring framework. The preferred solution here is to use a class’s Classloader.
ClassLoader.
As you probably know, Java is a dynamically compiled programming language, and the concept of classloading is central to it. In other words, each individual .class file generated by the compiler is loaded by the JVM and dynamically linked on-demand to other files at runtime. For instance, when an already loaded class depends on another one, then the latter will also be loaded via the class loading mechanism (“class lazy loading”). Actually, the very first class is the one loaded via the static main() method declared in this bootstrap class of your app. All the consequently classes are loaded by the previously loaded and running classes. The class loading process is based on the ClassLoader abstract class, offered by Java. A typical strategy is to transform the name into a file name and then read a “class file” of that name from a file system. Every Class object contains a reference to the ClassLoader that defined it.
Furthermore, the instance of every class we use is able to load dynamically any other class or other pieces of code or data and resources. (The latter is what we are going to do here).
This can be achieved by using the getClassLoader() method provided by the java.lang.Class class. The method does not accept parameters, and it actually returns the ClassLoader object for the particular instance of a class.
Let’s start our example by creating our own class that we will use to load our resources (actually our properties/messages files). We can give it any name but here I will use the “UnmanagedProperties.java”. Put this class in our project’s “Properties” package folder. For loading externally defined properties (i.e. messages) we will use a static method that will load the key-value pairs from an external file and will return them as an object of a Java Properties class.
Below is how we can do that:
What we actually do above, is to get the ClassLoader object of our class, and then we load our key-value pairs from a file (with the filename passed in as a parameter to the loadUProperties static method) using the getResourceAsStream method of the ClassLoader. Note that, the key-value pairs are loaded as an InputStream object from the external file. This is because after that, we use the load method of the Properties object, to load this InputStream. Finally, we close the input stream, and … that’s it all!
Now, we have our messages accessible via their keys, the similar way we did previously via the MessageSource getMessage method. Furthermore, since we have used a static method, we can access them directly without instantiation of the class, and this allows us to use them in any other class of our app, regardless if this is a bean-class or not!
Since -as we’ve already said about class loading- the process is dynamic and takes place at runtime, we can use any file we wish, during the runtime of our app. Of course, we get an IO exception error if the filename cannot be found. If we don’t provide a full path name, then it is presumed that our file is located in our classpath, (i.e. inside the “/resources folder).
For testing purposes, we can create a key-value pairs file and put there our “un-managed” properties. Let’s, name it uMessages.properties, and put an example entry e.g. “unmanaged.message.test: This is a simple test message.”. We can either use the column : or the equal = sing as a separator between keys and values.
After that, we can get this value in any method, e.g. we can use again the same getAllItems method of the ItemsRepo, as previously:
The result:

Note that this also allows us to use different language message files (we can use the same name style i.e.: uMessages_XX.properties, where XX is the language identifier ), but we have to ad-hoc select the file we wish to be loaded.
So far, so good! But since using a file name each time we want to get an ‘unmanaged’ message is not that convenient way. Moreover, loading again and again the same file, also is not a good practice. So, an improved version of the UnmanagedProperties class is given below:
Now, getting an “un-managed” message is much simpler, just like the line code below:
String umsg = UnmanagedProperties.getUMessage("unmanaged.message.test");
That way, we can at runtime to dynamically load any message or properties file for configuration or other purposes.
Other techniques
Obviously, there are also other approaches that one can use. For instance, let’s say we have a non-bean class and we want to assign external values to some of its fields. This non-bean class should have a constructor with parameters for the fields we want to assign the external values.
The technique we can use is to instantiate this non-bean class via another bean class. As we know, a bean class can have access to external values, e.g. via the @Value annotation. So, in the bean class, we can get the desired external values for some of the class fields via the @Value annotation.
Then we can use those fields in a specific method, to instantiate the non-bean class, passing those fields as parameters to the constructor of the non-bean class. Calling the specific method of the bean class actually passes the external values to the field parameters of the non-bean class.
As you can understand, this technique is not a clear non-bean solution, but it is not that big deal to implement it. It actually, could be considered close to the builder pattern.
So, you can probably think about other approaches as well, and implement your very own solution. However, I think that the ClassLoader is the clear winner here.
With this, we close the last section of this post, and we are closer to its end.

Well, we did it! Of course, it is not possible to cover all the details of the presented topics and subjects. However, I hope you obtained a good grasp of the landscape of the external property values, their different faces, and their implementations. Just for a recap, below are some takeaways for you.
- Using direct access to the properties loaded into the app’s Environment object by using the Environment object or the @Value annotation is OK for ad-hoc usage and relatively simpler apps.
- Using @ConfigurationProperties annotated POJOs is the recommended way for grouping and passing ext. configuration property values (key-based properties) to Spring components (beans).
- Using a MessageSource bean in conjunction with a LocalResolver is quite powerful and the preferable way to manage different languages/locales. It allows you to start internationalizing your app and your validation messages.
- You can also use a MessageSource bean for any other non-validation message you wish to use with your app bean classes.
- If you wish, you can load and use externalized properties and messages anywhere in your app without using the Spring-managed beans mechanism. The preferable way here is via a ClassLoader, which gives you the possibility to dynamically load external messages/properties ad-hoc, at runtime.

If you are still here :-), I’d like to say that I admire your courage, dedication, and patience in reading such a long post. I think, however, that you obtained a really integrated view and a deeper awareness of using properties and messages with your Spring apps.
Well, THANK YOU!
Find the final repo here.


love your post, I read through all of it and have a better understanding of how external configuration file work