Use URL Slugs for your Angular SPA blog website

241103-11
About
This post is the 6th sequel of a series of posts on building an Angular-based blog site. The previous posts are listed below:
1. Angular: Use Tiles to implement a Holy-Grail layout for your blog
2. Angular: Add dynamic data to your blog using a Spring Boot backend and MariaDB
3. Containerize and automate the deployment of a 3-tier full-stack project
4. Angular: Update the frontend project and add HTML content support for your blog site
5. Angular: Revise the frontend project to incorporate Markdown content support for your blog site
In this post, we’re going to update all three layers of our project: the MySQL database, the Java/Spring Boot backend, and the Angular frontend, with the frontend getting the majority of the changes.
Intro
Angular is an amazing framework for developing web applications, particularly Single Page Applications (SPAs). However, for enthusiasts of Angular looking to create a web blog site, there are numerous challenges to deal with. A primary issue is that SPAs typically operate under a single URL and dynamic content. At the same time, a blog site needs to accommodate various article or post URL requests through the browser. The browser requests actually should be based on a post’s ‘slug’).
So, in this article will explore how we can enhance our blog site project by incorporating effective ‘slug’ management features.
Slugs
A ‘slug’ refers to the section of a URL that appears after the domain name and usually points to a particular page or post on a website. In the context of a blog post, it’s often a concise, human-readable identifier that reflects the post’s content. For instance, in the URL `https://example.com/blog/what-is-a-slug`, the slug is `what-is-a-slug`.
A slug, can be created freely. However, slugs are really important for SEO (Search Engine Optimization) because they help search engines and users understand how relevant and contextual a webpage is. This means that how you create or choose a slug is key to making your post more visible. Here are some tips to keep in mind when selecting a slug:
• Use only lowercase letters to prevent any case-sensitivity problems.
• Use hyphens to separate words, as search engines see them as spaces.
• Keep the slug short and descriptive: aim for slugs that clearly explain the content.
• Include the main keyword(s) from the post, but don’t overload it with extra or unnecessary words.
• Avoid using stop words like “and,” “the,” or “of” unless they are necessary for clarity.
A slug is similar to other types of metadata, such as titles, categories, and tags, and it can be kept in its own column in a database table. Because slugs are made up of text, you can use a text column type to save them. In our situation, where we’re using MariaDB, a VARCHAR column type is a good option since it can hold up to 65,535 characters. Here I will use a VARCHAR(300), which is plenty for most common cases. (BTW using a URL of more than 2000 characters is not recommended at all).
Database updates
In the case you’ve checked out the posts ‘Angular: Add dynamic data to your blog using a Spring Boot backend and MariaDB’ in this series, you might be aware that the table ‘testarticles’ is where we keep our articles (posts). So, you can add a new column called ‘slug’ to it, by using the following SQL command:
ALTER TABLE testarticles ADD articleSlug VARCHAR(500);Also, we must keep our slugs unique. So you can use the following SQL command:
ALTER TABLE testarticles ADD CONSTRAINT UNIQUE(articleSlug)Finally, if you haven’t updated the ‘articleContent’ column from TEXT to MEDIUMTEXT (see the 2 previous posts in this series), you can do this now, by using the following SWL command:
ALTER TABLE testarticles MODIFY articleContent MEDIUMTEXT;So, up to now the ‘testarticles’ table becomes:
In order to create the articles’ slugs for our demo purposes we can automatically create them, by updating the new ‘articleSlug’ column from the ‘articleSubTitle’ column, using an SQL script. The script:
- makes all characters lowercase
- removes all stop words like “and,” “the,” or “of”
- removes all special characters like -,’, “, /, \, (, ), [, ], {, and }
- leaves only 1 space between words
- replaces the space with just 1 hyphen
Here is the ‘update_slugs.sql’ script that does the job:
Take a look below, at how the nested REGEX statements work one by one:
- REGEXP_REPLACE(articleSubTitle, ‘\\b(and|the|of)\\b’, ”): Removes stop words and, the, and of.
- REGEXP_REPLACE(…, ‘[^a-zA-Z0-9 ]’, ”): Removes all special characters, keeping only alphanumeric characters and spaces.
- REGEXP_REPLACE(…, ‘\\s+’, ‘ ‘): Replaces multiple consecutive spaces with a single space.
- REPLACE(…, ‘ ‘, ‘-‘): Converts single spaces to hyphens.
- LOWER() and TRIM(): Ensure the result is lowercase and removes any leading or trailing hyphens.
- REGEXP_REPLACE(…, ‘^-+’, ”): This removes any leading hyphens (^-+ matches one or more hyphens at the start of the string).
You can see the result, below:
Note that in a real-world project, you will probably want to augment your slugs by prefixing them with other metadata, like author name, date, etc. But I am pretty sure you can do this on your own.
Let’s move forward with updating our Spring Boot backend. As you will notice below, only a few changes are necessary.
Spring Boot Backend updates
Before starting work with Java, below, is also the updated SQL part for the ‘testarticles’ table in the schema.sql script:
Backebd starting repo
As our starting repo we use the one here.
First, we have to update the Article class (Article.java) with a slug property, which becomes:
Next, we can update the interface IPostsRepository.java:
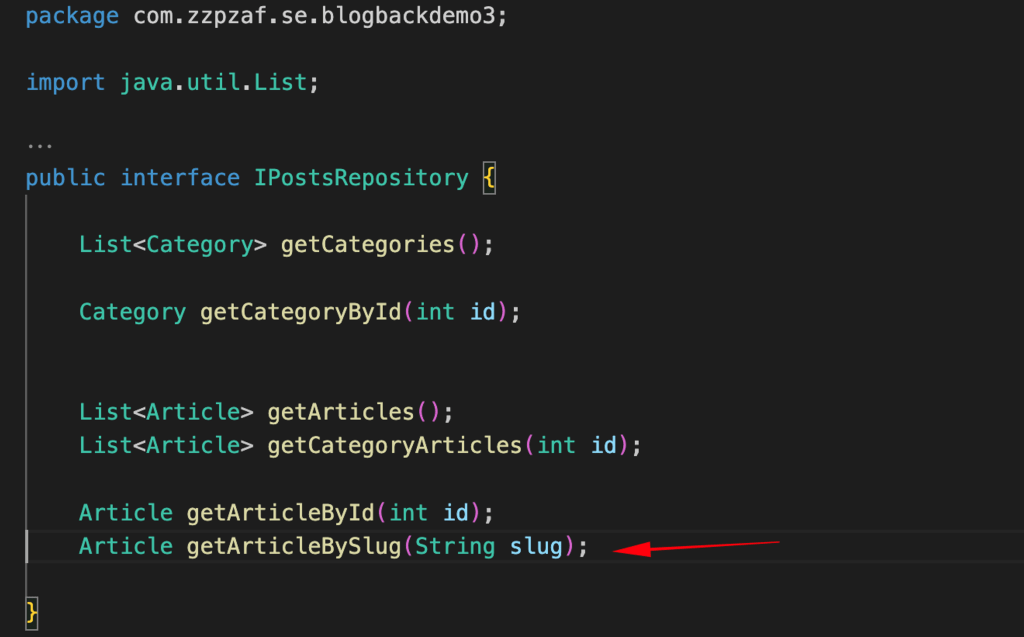
And then the corresponding repository PostsRepository.java:
The last update in the backend here is to the controller PostsController.java:
👉 And this is the commit with all the above changes.
Now it’s time to refresh our Angular frontend, and this update is going to be quite significant.
Frontend Updates
Updating the NGINX server default site setting
Before proceeding with Angular code updates, we must change a bit our NGINX default server configuration. This is necessary since if you try to add a path to your browser address bar, you will get redirected to the default “404 Not Found” error. This happens because our NGINX default server configuration is guided to act like that. You can refer to the ‘Containerize and automate the deployment of a 3-tier full-stack project’ post (which is the 3rd part of this series), to see the settings in the ‘my-default’ file. This file provides the configuration for the default site for the NGINX server. Below is the location code snippet that causes this behavior and should be updated:
. . .

    # Check if there is a file or folder that matches the request URI, otherwise show a default 404 error.
    location / {
        try_files $uri $uri/ =404;
    }
. . .
Here, instead of redirecting any unknown (to NGINX) path to the default 404 error handling page, we can redirect it to our app’s starting point, .i.e.: to our app ‘index.html’ page. Furthermore, we can again add an (optional) code snippet for redirecting the unknown paths to our custom 404 error handling page.
The updated ‘my-default’ file is given below:
Since it is located in the folder, you can access it from within container and copy it to the NGINX default site folder, (replacing the existing one) e.g.:
cp ./my default /etc/nginx/sites-available/defaultAfter that you must reload the NGINX updated server configuration, e.g.:
nginx -s reloadOr just restart the frontend container.
Now we can proceed with updating the Angular code.
Working on Angular frontend
The starting repo
👉 You can locate the initial point to move forward with the upcoming changes in this repo.
In our Angular blog posts project, till now, the current method for selecting a specific post or article involves clicking on the article title within the left pane (LeftpaneComponent). It is important to note that users can only select articles that are categorized under the currently chosen category in the navigation row (NavrowComponent). Consequently, direct access to a specific article is not feasible.
The intended functionality for our application is to enable users to utilize the browser’s address bar to request the article they desire. As one can appreciate, it is nearly impossible for a user to remember or know the article ID she/he wishes to locate. Moreover, exposing directly the article ID is also not recommended at all.
As you suspect, entering the article’s slug in the browser’s address bar is the appropriate way to locate it, and this practice is commonly adopted (and SEO friendly as well :=)). Since we have already updated the NGINX default server configuration, anything entered into the browser’s address bar, is redirected to our Agular app (intex.html), and the same is true for the slugs. So, now our goal is to capture the path text entered into the address bar, and try to use it as a slug. Then we can search and locate the specific article by the slug provided, otherwise, we can return and display a 404-Not Found message.
Capturing the path text entered in the browser’s address bar
The Location service and the case of using a dummy component
Angular typically manages URL paths using the Angular Router. In this article, we won’t dive deep into how to use the Angular Router since there are plenty of resources available on that topic. However, it’s important to understand that we can usually set up paths along with their corresponding components in the ‘app.routes.ts’ file in the latest versions of Angular.
However, in our case, we aren’t looking to set a specific router path for a dedicated component (well, just yet). The Location service can be used to capture the current path directly, regardless of whether it matches a defined route in our application. So, while we typically use Angular Router to move around the app, the Location service doesn’t handle navigation directly. Instead, it lets us adjust the URL without going through the Angular Router.
The Angular Location service helps us work with the browser’s URL. It’s useful for tracking changes in the URL. We can read the current URL, change it, and navigate back or forward in the browser’s history. Here, we are mainly going to use it to to reactively capture changes to the browser’s URL path (popstate navigation). While Location is not fully reactive like RxJS Observable, it does provide a way to detect URL changes reactively using the onUrlChange() method. This method allows you to register a callback that is triggered whenever the URL changes, including when the user navigates through the browser’s history or interacts with the app’s back and forward buttons.
Now, if you’re curious about which part to use for capturing the URL path with the Location service, I want to clarify that it’s not really about a specific component. Instead, we’ll be implementing it in our ContentService. First, we must inject the Location service to the ContentService. Then, inside the ContentService constructor() we can get the current path and monitor its changes. Below you can see how we can initially update our ContentService:
As you can see above, the ‘this.location.path()’ retrieves the current path from the browser’s address bar without needing it to match an Angular route. And the ‘this.location.onUrlChange()’ reactively captures changes to the URL path, without having defined Angular routes.
Now if you compile the app, and navigate to your browser address bar to:
http://localhost:8001/my-slugYou will see that in the browser’s inspection console, something similar to:
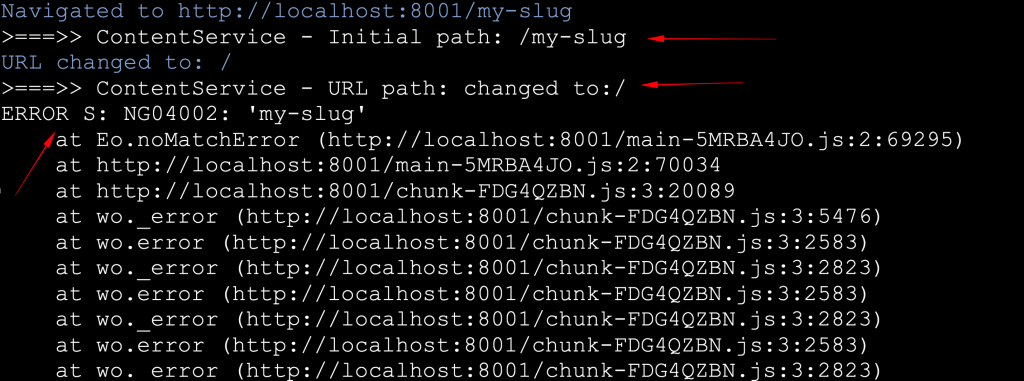
So, the Location service works pretty well, and we can capture the URL path entered in the browser address bar. However, it is also clear that the URL path automatically is changed to the / home path, and that there is also an ‘NG04002’ error. Let’s see what happens, and how we can avoid the ‘NG04002’ error.
The reason the URL path changes to home/path is due to the new settings in the NGINX default server configuration that we discussed earlier. While this is the expected outcome, it’s not what we want. Ideally, we want the URL path to stay as the user entered it, so they can see and understand what’s happening.
The ‘NG04002’ error means that there’s a route path that hasn’t been handled because there isn’t a matching Angular Router path defined. While this is a normal behavior, it’s not really the best situation either, because such an error indication in the browser’s console can be pretty confusing. One way to get around this error is by configuring the Angular Router to send any URL typed in the address bar back to the home (/) page. However, this goes against our intention to avoid redirection and keep the path that was originally entered in the browser’s address bar unchanged, as we discussed earlier.
So, what is the solution?
While it might not be the best solution at the moment, I decided to define a Route path that can handle any path (**) and link it to a fake/dummy component.
For this purpose, we can create the dummy ‘NoopComponent’ like this:
Then we can set up the ‘app.routes.ts’ file like this:
The NoopComponent is displayed without altering the URL, and it doesn’t perform any actions. However, it helps us track and log the path, and now we don’t get the ‘NG04002’ error anymore.
Now, if you recompile the app, and navigate to your browser address bar to:
http://localhost:8001/my-slugThe result is as it is expected:
Navigated to http://localhost:8001/my-slug
>===>> ContentService - Initial path: /my-slug
URL changed to: /my-slug
>===>> ContentService - URL path: changed to:/my-slug
👉 Find the till now updates in this commit of our repo.
Responding to the browser’s address bar changes
Once we’ve got the text from the path that was typed into the browser’s address bar, we can move on to the next step. The first thing we need to do is update the blogObjects.ts file, specifically the IArticle interface, by adding a new property called ‘articleSlug’.
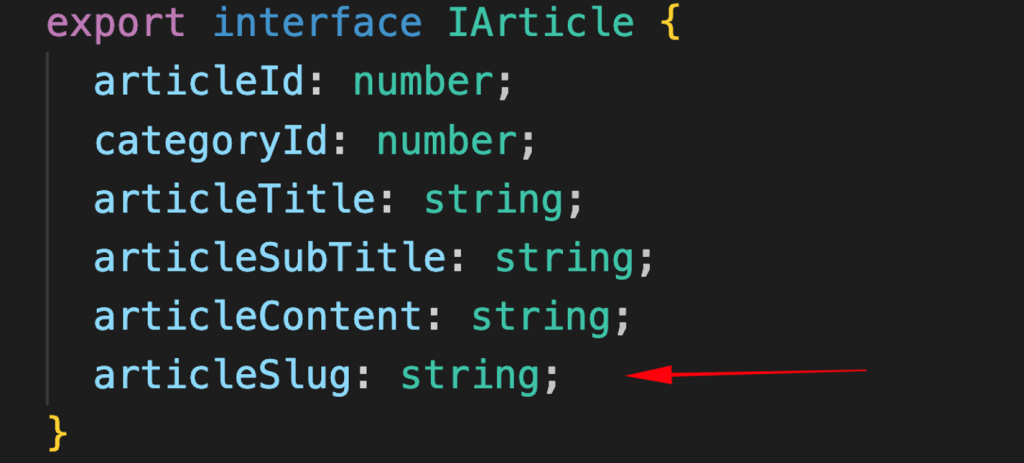
Note that after this, a few code adjustments are made when assigning values in ContentService and MainComponent.
The next update concerns the DataService, where besides getting an article from the backend by using its ID (articleId), we must also get it by using its Slug (articleSlug). So, we can use just 1 factory method for both cases. The factory ‘getArticle()’ method decides which will be the real method that will be called to do the job, depending on the type of the parameter passed to it.
You can find the code updated in the DataService, below:
Now we can respond to the browser’s address bar changes. This can be done, by firstly updating the ‘signalArticle()’ method into the ContentService, so it can be called via a parameter of either a number (e.g.: articleId) or a string type (articleSlug).
This is the updated signalArticle() method:
The method can be called from the DataService constructor, after we have captured the url via the Locator (and removed the prefixed slash ‘/’)
This is the updated constructor() method:
One more tiny adjustment is also necessary in the ‘signalCategoryArticles()’ method. This concerns the first article fetched after the category update (which actually impacts the content in the MainComponent). Now, this is done only if the address bar is empty.

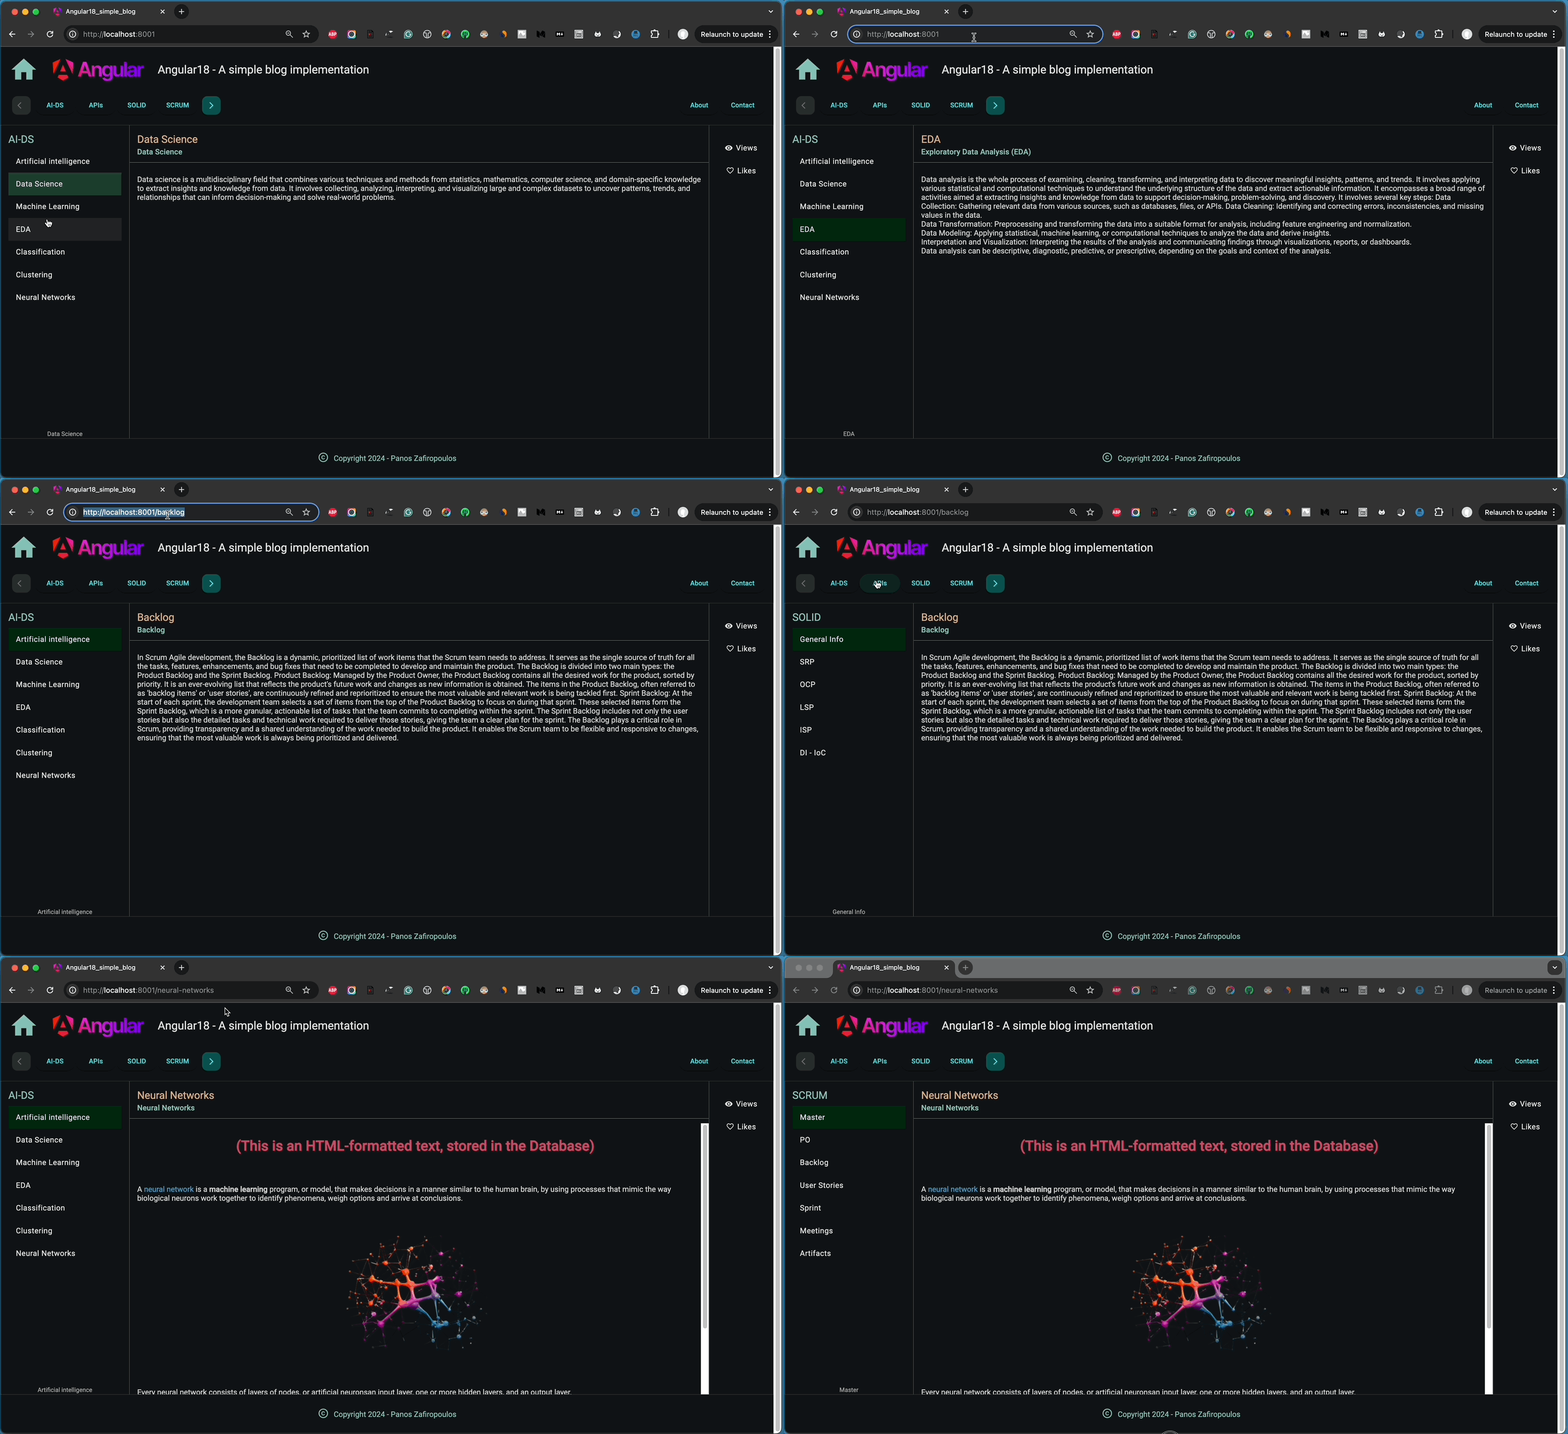
You can see below how our app responds to the slug added in the browser’s address bar.
👉 Find the new updates in this commit of our repo.
Updates for Full Slug Support
Even though our app responds to the address bar changes, many issues should be solved. As you can see above, the main issues we have are:
- The article content is fetched, but the Leftpane (LeftpaneComponent) is not updated with the articles of the same category of the article displayed (into MainComponent).
- When we click on the title of an article on the LeftPane, the address bar text remains frozen, – no slug is displayed in the address bar.
- When we click on a category on the NavrowComponent the LeftPane is updated OK, but the article the article fetched, (and displayed into MainComponent) remains intact.
So, we have to take some further action.
A crucial thing to grasp is that every time we hit enter in the browser’s address bar, our Angular app gets re-initialized, even if the URL stays the same. This is completely normal because the browser sees it as a command to reload the current page. Unfortunately, this leads to a full-page reload, which means our Angular application starts over again. While this is the standard behavior for most browsers, it needs some special attention for single-page applications like our Angular app. We will mainly focus on making changes in the ComponentService.
To start, we need to modify the ‘signalArticle()’ method in the ComponentService. After we fetch the article, we should use the Location service to update the address bar with the slug of the article we just retrieved. This is especially important for articles accessed by their ID (articleId), like when we click on an article title in the LeftPane.
So, ‘signalArticle()’ the method becomes:
After this update, we can really simplify the ContentService’s constructor a lot. There’s no profound reason to keep tracking URL changes anymore because the URL will always change based on the article’s slug. This change happens automatically in the app whenever a user clicks on an article’s title in the LeftpaneComponent or when a new article is fetched and shown. Plus, if the user edits the text in the address bar, we can manage that through location.path. So, anytime the URL changes for any reason, we can just use the signalArticle() method to make the necessary updates. Lastly, we don’t need to call the signalCategoryArticles() method directly from the constructor since it gets triggered by signalCategory(), which is called whenever an article changes through the signalArticle() method.
So, the ContentService’s ‘constructor()’ becomes:
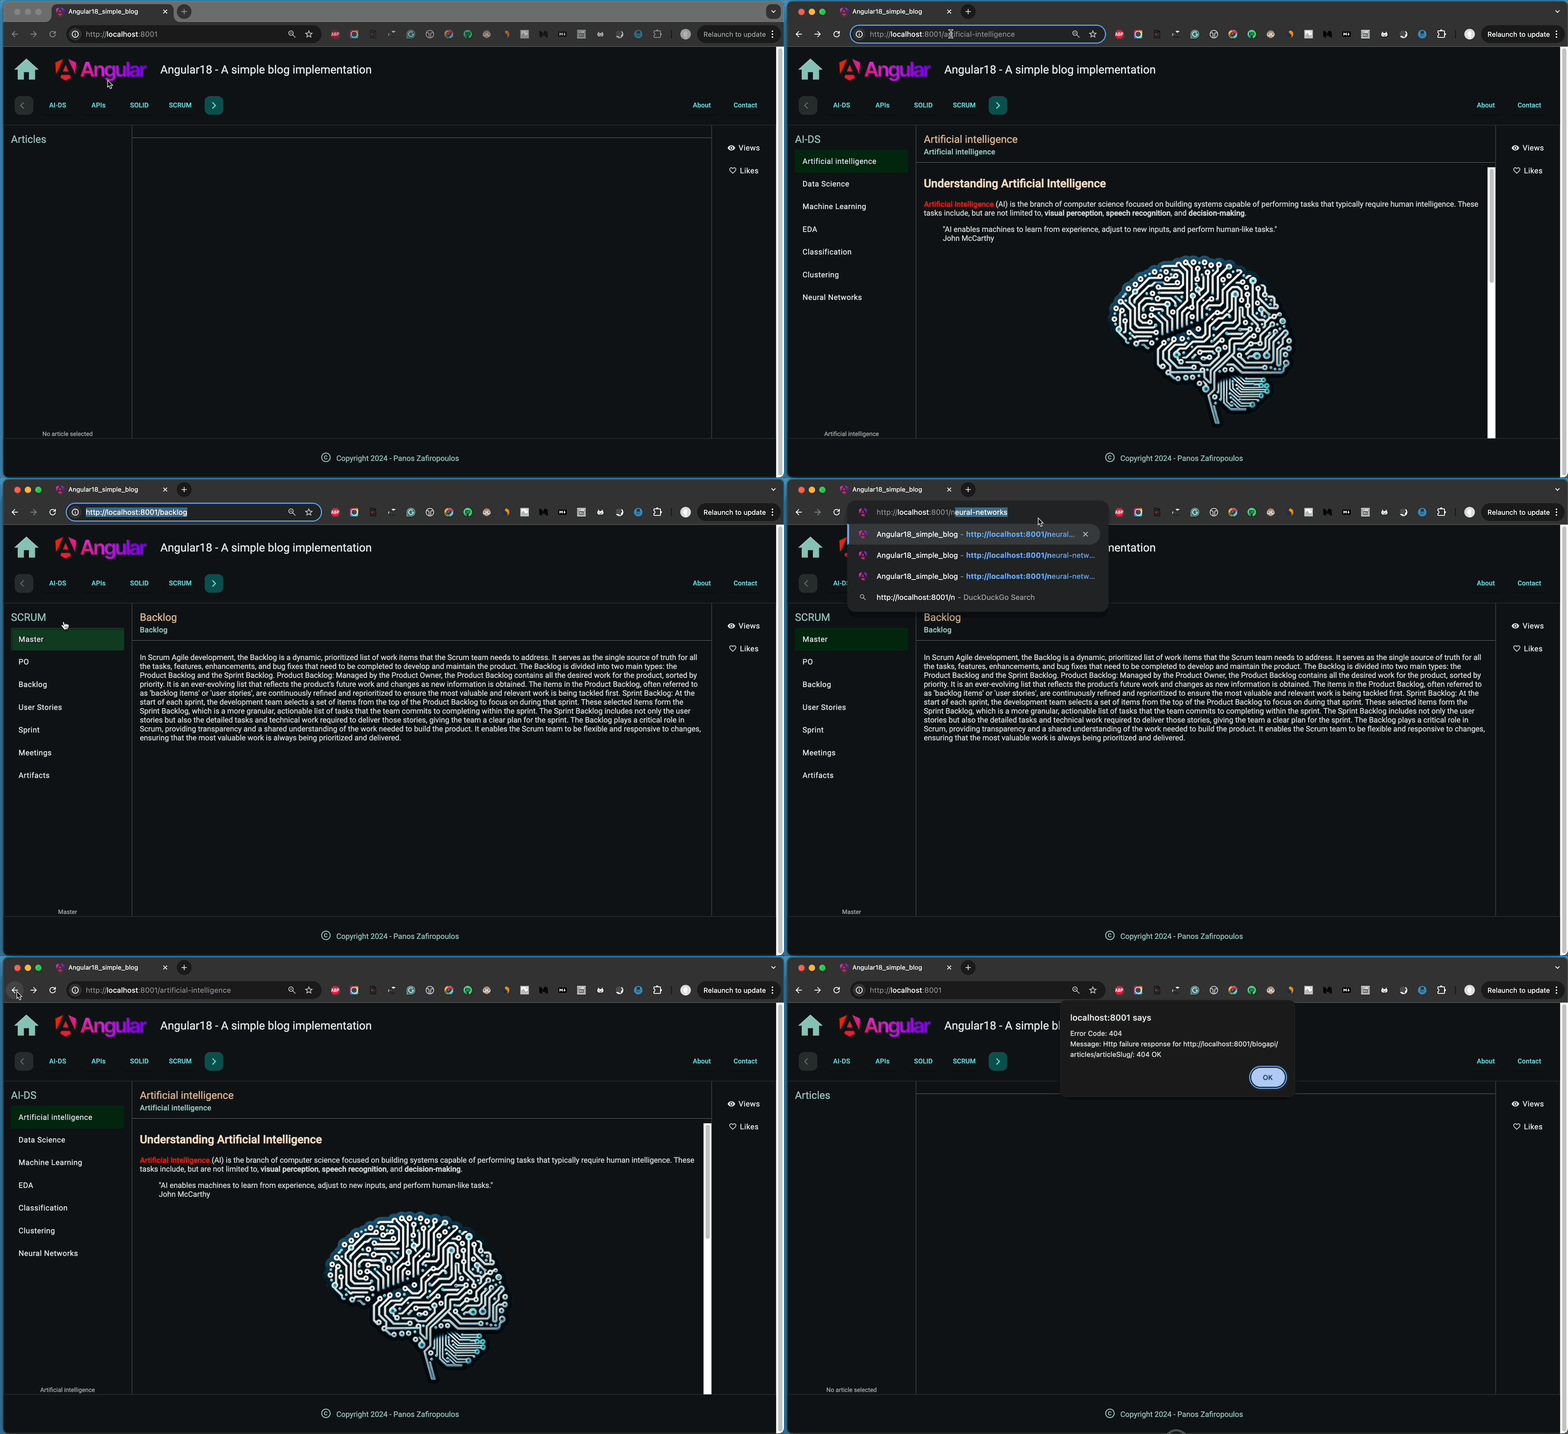
The result is much better now:
👉 Find the last updates in this commit of our repo.
Final updates
We still need to make some important changes to enhance how our app interacts with users.
To start, it would be helpful to add and show slugs for our static pages like Home and About. Additionally, for better clarity, we should add a prefix to the path request for posts (articles), such as ‘/posts/’.
Next, we need to ensure that the Home page appears by default when no path or article slug is entered. As you may have noticed, if you only enter the ‘domain name’, it currently leads to a “404” – Not Found alert.
We should also create a dedicated “404” error “Not Found” page that will show up for any unknown articles or static HTML pages.
Moreover, we can improve the user interface, particularly in the NavrowComponent, by implementing a toggle button to show or hide the post categories submenu.
Finally, some refactoring here and there has also to take place, like in the LeftpaneComponent for highlighting the selected post/article.
Let’s see them step-by-step.
Adding slugs for our static pages means that we can update The IPage interface and the Pages constant in the blogObjects.ts file, like this:
As you can see, we also have defined the NotFound page with PageId = 99 (and no slug).
For a prefix ‘posts/’, we can use a literal, but a better approach is to add it as property in our environment files, e.g.: in the environment.ts file:

Most of the updates concern the ContentService. To handle different situations like an empty path, unknown path, etc, we can use a number of checking conditions in its constructor. As you can see below, we also display the NotFound page 99 for unknown paths. See below the changes added to the ContentService constructor:
The postPrefix is now a define property of the ComponentService and it is obtained from the environment object:
postsPrefix: string = environment.postsPrefix;The page slug is shown after the page retrieval cause by a user click on the specific button. This is an update in the signalPageContent() method:
The NotFound page is also output when the backend fails to return a requested article in the signalArticle() method. Note, that if no article is found, the backend sends a fake IArticle object with articleId = 0.
There’s also an important update regarding the article slug. This is necessary when after a click on a page button, the user clicks on the same category that it was also previously clicked (in the NavrowComponent). In this case, it doesn’t refresh the articles for that category, and the page slug in the address bar stays the same. Here’s how we can modify the signalCategoryArticles() method:
The NavrowComponent has been updated with a toggle button that shows or hides the categories menu (navMenuItems2). For this, we use the new boolean property ‘isNavMenuItems2Visible’, which is switched to true or false upon the user’s click on the toggle button. The user click is handled in the new method ‘toggleNavMenuItems2()’.
Lastly, for the NavrowComponent note, we exclude the NotFound page (PageId=99) to be part of the pages-menu (navMenuItems1).
The updated section of the NavrowComponent class (navrow.component.ts) is given below:
And its template (navrow.component.html) is updated like this:
Finally, the refactored LeftpaneComponent for highlighting the selected post/article is given below:
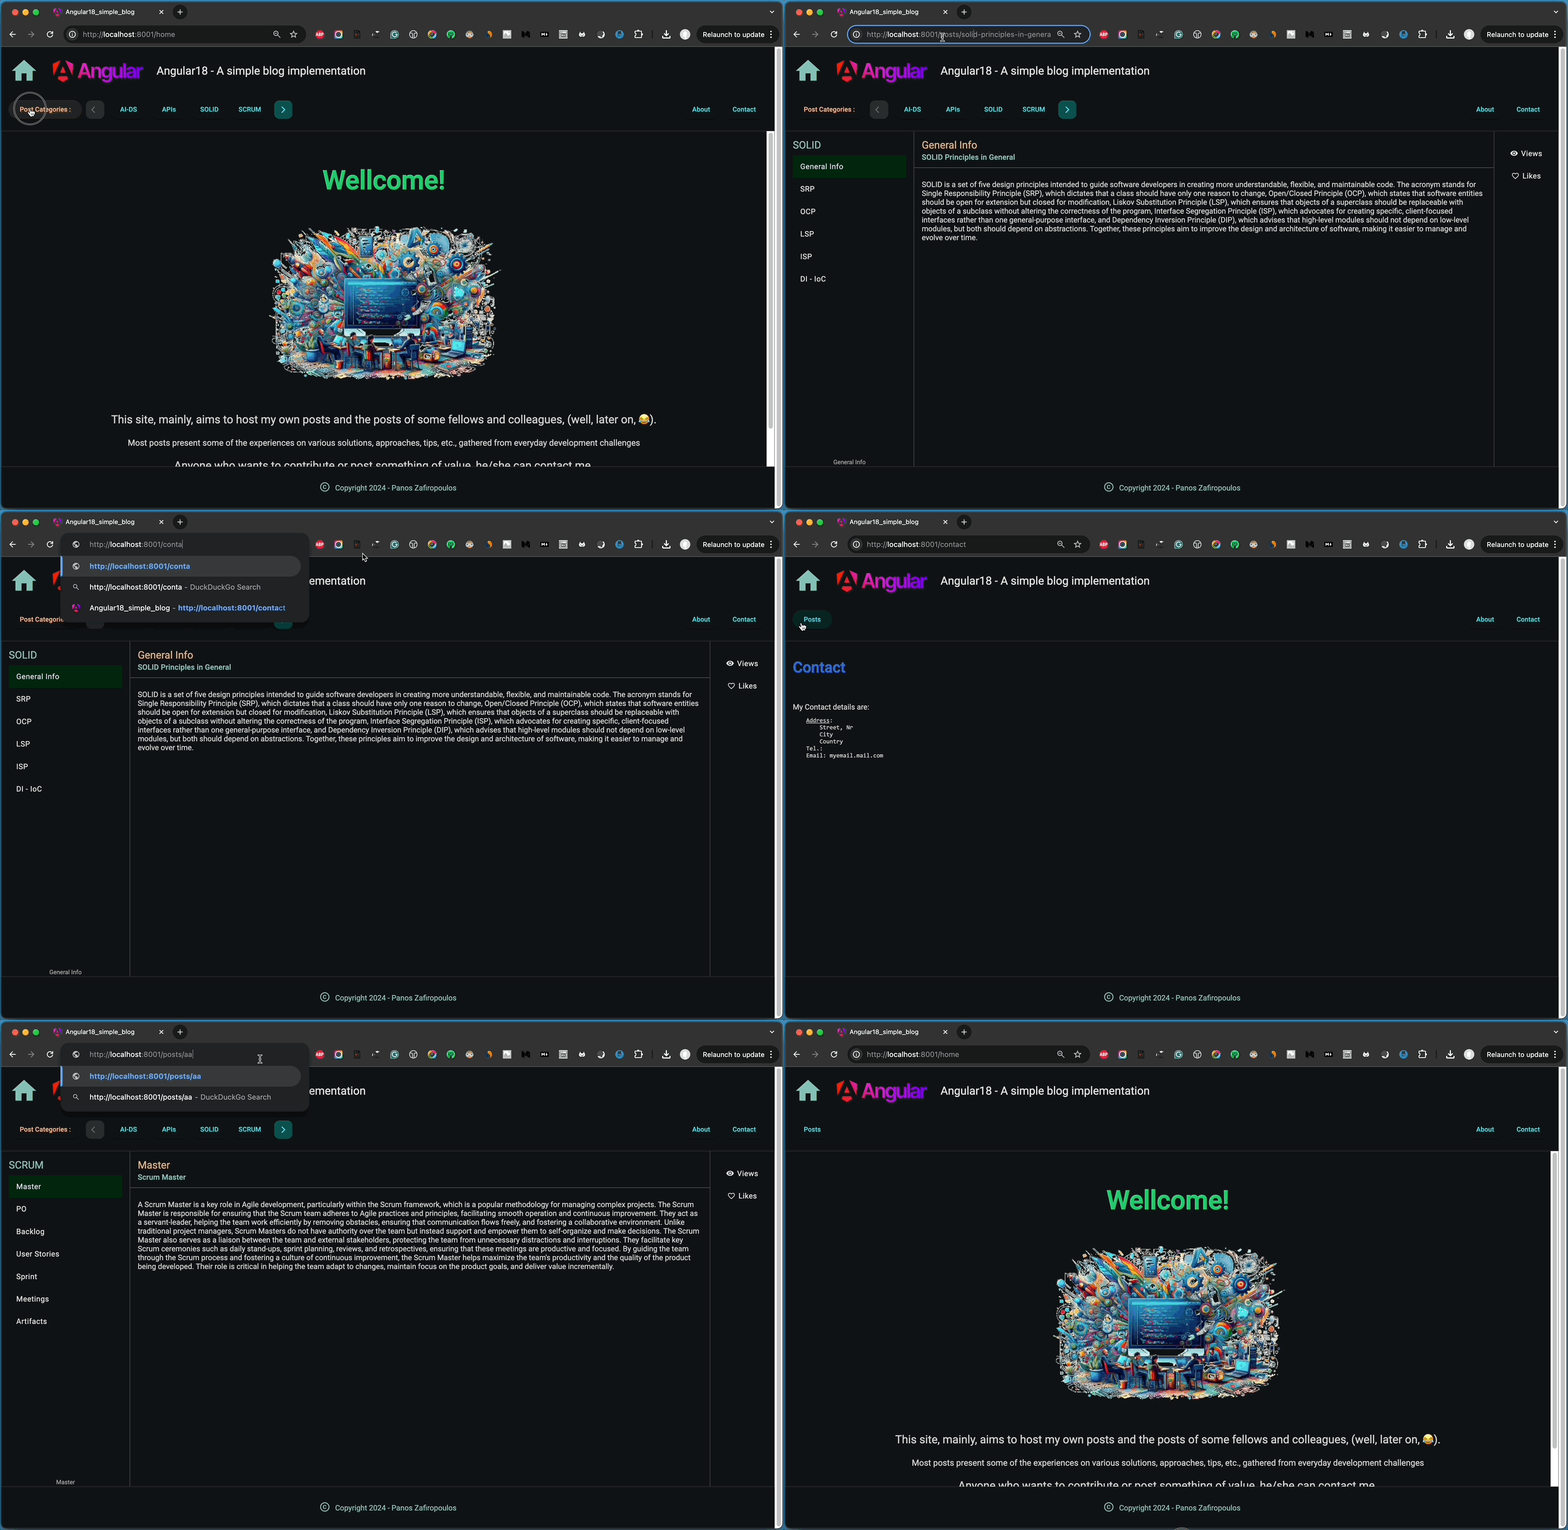
The outcome is fairly satisfactory, as demonstrated below:
That’s it! we did it!
👉 Find here the last commit of our repo.
Recap
This post focused on enhancing an Angular blog site by incorporating URL slugs, allowing users to access specific articles directly through the browser’s address bar. We started by addressing the challenges typical of Single Page Applications (SPAs), which usually rely on a single URL. By implementing slugs, the project gains better usability and improved SEO, making the blog site more accessible and user-friendly.
We explored what a slug is: a human-readable, lowercase URL identifier that often reflects the content of a post. Slugs are crucial for SEO as they help search engines understand the relevance of a page. We also discussed how to create slugs effectively, including best practices like avoiding special characters, using hyphens, and removing stop words.
Backend Updates: We made changes to the backend by adding a new articleSlug column to the ‘testarticles’ table and ensuring uniqueness. An SQL script was provided to automatically generate slugs from existing article titles by converting them to lowercase, removing special characters, and replacing spaces with hyphens.
Frontend Enhancements: On the frontend, we leveraged the Angular Location service to capture URL paths entered in the browser’s address bar without relying on predefined routes. A dummy component (NoopComponent) was introduced to handle unmatched paths gracefully, preventing errors and preserving the entered URL.
We also made updates to the Angular components and services improving the UI, and ensuring that the address bar reflects the current article’s slug.
So, that’s it for now! Thank you very much for reading, and stay tuned!
The next post in this series will likely focus on making our project even more SEO-friendly. Till then, happy coding!
