
Search Engine Optimization (SEO) for your Angular blog site
 for your Angular blog site")
241120-241205
About
This post is the 8th sequel of a series of posts on building an Angular-based blog site. The previous posts are listed below:
1. Angular: Use Tiles to implement a Holy-Grail layout for your blog
2. Angular: Add dynamic data to your blog using a Spring Boot backend and MariaDB
3. Containerize and automate the deployment of a 3-tier full-stack project
4. Angular: Update the frontend project and add HTML content support for your blog site
5. Angular: Revise the frontend project to incorporate Markdown content support for your blog site
6. Use URL Slugs for your Angular SPA blog website
7. Integrate Server-Side Rendering (SSR) into your existing Angular blog site project
The last two articles about SLUGs and SSR paved the path for optimizing our blog site for SEO.
As we’ve discussed a slug is a URL-friendly version of the post title, typically lowercase, with spaces replaced by hyphens, and special characters removed. Slugs play an important role in making URLs better for SEO because they help with readability, relevance to keywords, and getting more clicks. When a slug is optimized well, it can really boost how visible a page is in search engine results and improve the experience for users. Plus, having a unique slug helps create a canonical URL for an article/post, which is useful for avoiding issues with duplicate content by guiding search engines on which URL to focus on.
Implementing SSR to an Angular project is highly recommended especially for blog sites that rely on search engine traffic or have dynamic, content-rich pages. In the case of SSR, the server provides a fully rendered HTML version of the page. Thus, the search engines and crawlers immediately see the content, improving crawlability and indexability. Furthermore, SSR reduces the time-to-first-byte (TTFB) and time-to-interactive (TTI) metrics. This practically means faster loading of our pages. Finally, SSR ensures that important metadata tags, and structured data, can be correctly rendered for each page, and this is quite crucial for search snippets and social sharing.
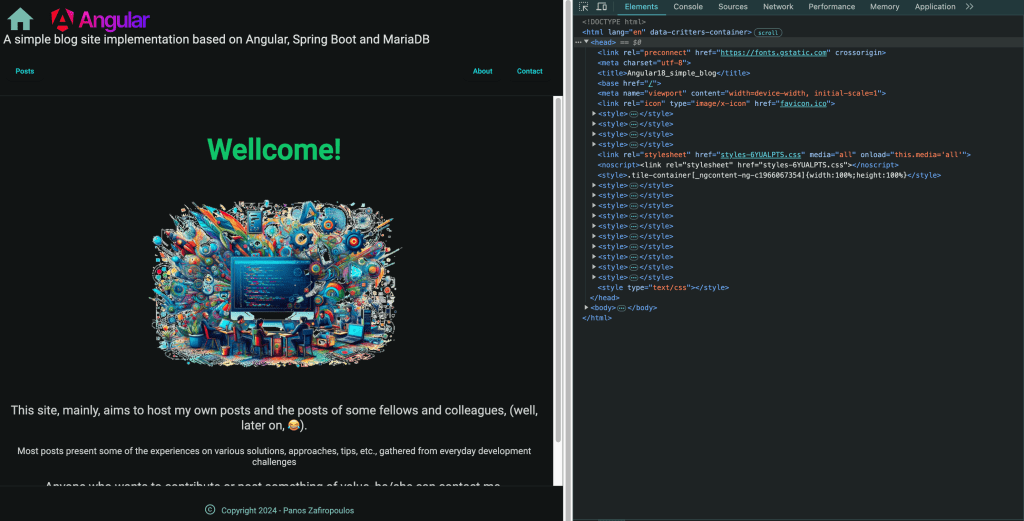
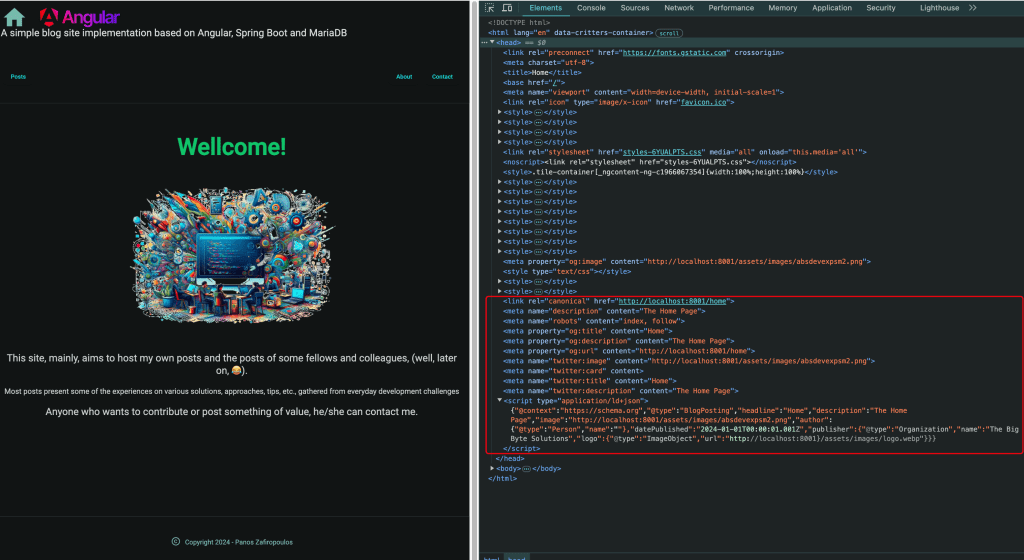
But still, our app lacks SEO. If you take a glimpse at the head HTML element you will not be able to see any Meta tags or Structured Data that are essential for SEO:
So, in this article, we’ll explore how to dynamically incorporate important metadata tags (and structured data) that are essential for Search Engine Optimization (SEO). This will involve making updates to our backend application using Java/Spring Boot, as well as our database, which is MariaDB, and our frontend Angular application. Additionally, we will enhance our multi-container setup by introducing a CDN-like container that will directly serve different types of static data, for future use.
In particular, for our Angular frontend, we will explore how to create a specialized SEO service using the Renderer2 and RendererFactory2 Angular services, which can be easily accessed from any component. Additionally, we will address some bugs and refactor our code where necessary. Lastly, we will see how to fine-tune SSR for some edge cases avoiding certain pitfalls.
SEO in brief
SEO, or Search Engine Optimization, is a way to improve a website’s visibility on search engines like Google. It involves using specific techniques and strategies to help a site rank higher in search results, making it easier for people to find. This can include optimizing content, using keywords, and improving site structure. Overall, the goal of SEO is to attract more visitors to a website by making it more appealing to search engines.
Metadata tags and structured data are fundamental to SEO because they provide search engines with crucial information about a webpage’s content, helping improve its visibility and relevance in search results. Tags like <title> and <meta name=”description”> communicate the page’s title and summary, directly influencing how it appears in search engine result pages (SERPs) and impacting click-through rates. Proper use of metadata ensures that your content is better understood by search engines, aligns with user intent, and attracts more targeted traffic.
Structured data, implemented using formats like JSON-LD, plays a critical role in enhancing the way search engines display content in SERPs through rich snippets. This includes additional details such as star ratings, pricing, event dates, or breadcrumbs, making the listing more attractive and informative. Structured data helps search engines categorize and prioritize content accurately, improving the likelihood of higher rankings and richer search results, thereby boosting engagement and driving organic traffic.
Essential metadata
Below you can find a short presentation of the most used metadata, that we will try to implement in our application:
Title Tag (`<title>`)
The title tag defines the page’s title shown in search engine result pages (SERPs) and browser tabs. This is a critical ranking factor in SEO and greatly impacts click-through rates (CTR).
Best Practices:
– Keep it concise: 50–60 characters (to avoid truncation in SERPs).
– Include the primary keyword, and place it near the beginning.
– Make it engaging to attract clicks.
Example:
<title>10 Proven SEO Strategies to Boost Traffic | MyBlog</title>Meta Description (`<meta name=”description”>`)
It provides a brief summary of the page/post content, displayed below the title in SERPs. While it’s not a direct ranking factor, it affects CTR and user engagement.
Best Practices:
– Limit to 150–160 characters.
– Use compelling, action-oriented language and include target keywords.
– Tailor it for search intent.
Example:
<meta name="description" content="Discover 10 actionable SEO strategies to improve your website's rankings and attract more organic traffic.">Favicon Metadata
It is necessary to display the site’s icon in the browser tab, bookmarks, and search engine results.
Best Practices:
– Use a 16×16 or 32×32 pixel `.ico` file for the favicon.
– Add multiple formats for compatibility.
Example:
<!-- Default Favicon for Browsers -->
<link rel="icon" href="/favicon.ico" type="image/x-icon">
<!-- PNG Favicon for Modern Browsers -->
<link rel="icon" href="/favicon-32x32.png" sizes="32x32" type="image/png">
<link rel="icon" href="/favicon-16x16.png" sizes="16x16" type="image/png">
Canonical Tag (`<link rel=”canonical”>`)
It prevents duplicate content issues by specifying the preferred URL for a page, and also signals to search engines which version of a page should be indexed.
Best Practices:
– Include on every page, even if no duplicate content exists.
– Use absolute URLs.
Example:
<link rel="canonical" href="https://www.example.com/seo-tips">Robots Meta Tag (`<meta name=”robots”>`)
It controls how search engine crawlers interact with the page. It can be used to prevent indexing or follow/unfollow links.
Best Practices:
– Common values: `index, follow` (default), or `noindex, nofollow`.
– Use for pages like login pages or admin sections that shouldn’t be indexed.
Example:
<meta name="robots" content="index, follow">Viewport Meta Tag (`<meta name=”viewport”>`)
It ensures the page is responsive and mobile-friendly by controlling how it scales on different devices. This tag is essential for good user experience and SEO since mobile usability is a ranking factor.
Best Practices:
– Use `width=device-width` to match the screen size of the device.
– Use `initial-scale=1` for default zoom.
Example:
<meta name="viewport" content="width=device-width, initial-scale=1">Open Graph Tags (for Social Media Sharing)
This is actually a set of tags. Using them results in enhancing how links to your page appear when shared on platforms like Facebook, LinkedIn, or X (ex Twitter). It ensures consistent branding and messaging across social platforms.
The Social Media key-tags:
– `og:title` (Post title): ~50 characters.
– `og:description` (Post summary): ~150–200 characters.
– `og:image` (Preview image): Absolute URL to the image.
– `og:url` (Page URL): Canonical URL of the page.
Example:
  <meta property="og:title" content="10 SEO Strategies to Boost Your Blog">
  <meta property="og:description" content="Learn actionable SEO strategies to rank higher and drive traffic.">
  <meta property="og:image" content="https://www.example.com/images/seo-tips.jpg">
  <meta property="og:url" content="https://www.example.com/seo-tips">
Twitter Card Tags
– Optimizes the appearance of shared links on Twitter.
– Similar to Open Graph tags but tailored for Twitter.
Best Practice:
– Use the `summary_large_image` card type for blog posts with visuals.
Example:
  <meta name="twitter:card" content="summary_large_image">
  <meta name="twitter:title" content="10 SEO Strategies to Boost Traffic">
  <meta name="twitter:description" content="Learn actionable SEO tips to rank higher and attract more readers.">
  <meta name="twitter:image" content="https://www.example.com/images/seo-tips.jpg">
Note that, the `summary_large_image` value means that Twitter /X will display a card with:
– A large, full-width image (appearing prominently in the tweet).
– A headline/title.
– A description.
– An optional URL link.
This format is typical for blog posts, articles, and content, and benefits from a strong visual impact.
Other values for types of Twitter/X Cards that can be used are:
summary
– Displays a small thumbnail image, title, and description.
– Best for text-heavy content or simple previews.
summary_large_image
– Displays a larger image with the title and description below it.
– Best for visual content or posts where an image enhances engagement.
player
– Displays a video or other embedded media in the card.
– Best for multimedia content.
app
– Displays details about a mobile app with links to install it.
– Best for promoting apps.
Structured Data (`<script type=”application/ld+json”>`)
It helps search engines understand the content and context of the page. This enables rich snippets (e.g., star ratings, recipe cards, FAQ sections) in SERPs.
Best Practices:
– Use JSON-LD format (preferred by Google).
– Add schema types relevant to the page (e.g., `Article`, `BlogPosting`, `Product`).
Example:
  <script type="application/ld+json">
  {
    "@context": "https://schema.org",
    "@type": "BlogPosting",
    "headline": "Angular SEO for your blog site to Boost Traffic",
    "image": "https://www.example.com/images/seo-tips.jpg",
    "author": {
      "@type": "Person",
      "name": "Panos Zaf"
    },
    "datePublished": "2023-11-10",
    "description": "Learn actionable SEO tips to rank higher and attract more readers."
  }
  </script>
Note that there are some more meta tags or other informative HTML elements that can be used (e.g. alternative links for Multilingual Sites, or an excerpt element, etc), but it’s up to you if you wish to add to your list.
Incorporating these metadata tags in our page’s `<head>` section creates a strong foundation for SEO, improves user engagement, and enhances the visibility of our content across platforms.
It’s time to kick off the implementation phase. This process will involve making changes to all three layers of our blog site: the database, backend, and frontend. We’ll tackle each necessary update one step at a time, with commits included for every step. If you’re more interested, you can skip ahead to the section about the SEO update in our Angular frontend, which is discussed in the final part of this post.
Updating the database
We’ve already made a significant SEO update using SLUGs, by adding the ‘articleSlug’ column into the ‘testarticles’. Now we’re gearing up for more changes.
Keep in mind that not every meta tag needs to be included in our database tables. Some tags that deal with broader meta information (like organization type, favicon, Twitter card type, viewport scale, etc.) can be set up later in the frontend Angular app.
For now, we can actually use some columns for multiple meta tags. For example, even though they serve different SEO functions, we can utilize the ‘articleTitle’ (which is 100 characters long in the table) for the <title> meta tag, the ‘headline’ in structured data, and the Open Graph’s `og:title`. Since the ideal length for the <title> in SERPs is 50-60 characters, we can compromise by using just the first 60 characters for the <title> meta tag, while we can use the full length for the ‘headline’, which can go up to 110 characters. Plus, since the ‘articleSlug’ has a ‘UNIQUE’ constraint, we can also use it for the Canonical Tag.
A key update in the ‘testarticles’ table is the addition of the ‘articleDescription’ column. This will serve as a concise description and can also be used for an excerpt element if we want. Given that, a typical description is around 150-160 characters and an excerpt is about 50-200 characters, we can set this column’s length to 250 characters.
Besides updating our database with only the necessary meta tag columns, we’ll be making some other updates, like adding more columns, timestamps, and UUIDs, for future needs. Moreover, we will create a brand-new table ‘users’ for our future site users so that they also can be authors for the site’s posts.
Backing up the database
Before proceeding further, making a backup of our existing tables with their data sounds like a pretty good idea.
Use the following bash command (in your host’s terminal) to enter the database container:
docker exec -it net2-database-mariadb bashUse the mariadb-dump command from within the container’s bash terminal to back up the existing tables with all their data and export them to the shell
/usr/bin/mariadb-dump -h localhost -P 3306 -u root -ppwroot --skip-ssl --databases testblog2 --tables testcategories testarticles > backup_$(date +"%Y%m%d_%H%M%S").sqlAfter that, we can proceed to update our table schemas and data.
Now you can enter into the MariaDB SQL shell for working further with our database tables and the related data.
mysql -h localhost -P 3306 -u root -p --skip-sslUpdating the articles table
Use the following SQL command to update the ‘testarticles’ table:
Use the following SQL command to rename the ‘testarticles’ to ‘articles’ table:
RENAME TABLE testarticles TO articles;The new structure of the ‘articles’ table becomes:
Updating the categories table
Use the following SQL command to update the ‘testcategories’ table:
Use the following SQL command to rename the ‘testcategories’ to ‘categories’ table:
RENAME TABLE testcategories TO categories;The new structure of the ‘categories’ table becomes:
The new ‘users’ table
Creating the ‘users’ table
The structure of the new ‘users’ table is given below:
Creating a trigger for automatically hashing a user’s password upon a new row insertion into the ‘users’ table. The trigger leaves the password intact if it has length of exactly 80 characters and if it is also consisting of only hexadecimal characters:
Add some users into the table for demo purposes:
Update the userId in the articles table, e.g for the user with userId = 1:
Update articles SET userId = 1;After all the above updates, it is a good idea to back up the whole ‘testblog2’ database, using the following command:
mariadb-dump -h localhost -P 3306 -u root -p --skip-ssl --databases testblog2 > testblog2_backup_$(date +"%Y%m%d%H%M%S").sqlFinally, for your convenience, below you can find the fully updated schema of the ‘testblog2’ database:
With this, we finished the necessary updates to our database, and we can proceed to update our Spring Boot backend, accordingly.
Updating the Spring Boot backend
👉 I’ve created a new repository (blogbackdemo4) for the next updates. You can find the initial commit here.
We have to make some updates to the backend so it can manage the changes that have been made to the database. Here’s what needs to be changed:
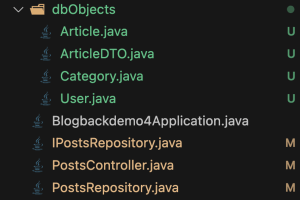
– The two classes: ‘Category.java’ and ‘Article.java’
– A new class ‘ArticleDTO’ will be used to provide article data to the frontend
– The repository interface: ‘IPostsRepository.java’
– The implementation class for the repository: ‘PostsRepository.java’
– The class ‘PostsController.java’
– Lastly, we will also introduce a new class for users called ‘User’.
The ‘ArticleDTO’ merges information from both ‘Article’ and ‘User’ objects. This is what we’ll primarily rely on in our Angular frontend to gather important data from an article that is also relevant for SEO.
You can simply look at the commit in the repository for these updates since there’s nothing else really important to point out.
👉 Find here the updated commit of the repo.
Updating the Angular frontend
We will be using a new repository (ang18-SSR-SEO-SupportBlog2) as the basis for updating the frontend.
👉 You can find this repo’s initial commit, here.
We will carry out the updates needed for our Angular frontend, in four main steps: 1. Updates reflecting the backend changes
- Updates reflecting the backend changes
- Initial Refactoring
- Content Service Refactoring for proper navigation
- SEO Updates
Commits are provided in each step.
The last step, which is the fourth one, is the most crucial part of this post since it implements what it is needed for the SEO of our SSR project. If you wish you can jump directly to it, by stepping on the 3rd step commit.
The first two steps are mostly about making sure the frontend aligns with the changes in the backend, so we won’t focus too much on those.
The third step is really important for managing the browser’s back and forward buttons and ensuring smooth navigation. This change requires using the Angular Router instead of Location to handle navigation correctly.
1. Updates reflecting the backend changes
Here’s a summary of the updates required to first align our Angular Frontend with the changes made to the backend:
Updates to dbObjects/blogObjects.ts (Interface Enhancements):
The ICategory and IArticle interfaces have been updated to reflect necessary improvements for compatibility or feature extension. A new IArticleDTO interface was created, which extends the IArticle interface, introducing additional properties to represent enriched data transfer objects (DTOs).
Modifications to DataService
The service now utilizes the IArticleDTO interface instead of IArticle, aligning with the newly introduced DTO structure. The methods getArticle, getArticleBySlug, and getArticleById have been renamed to getArticleDTO, getArticleDTOBySlug, and getArticleDTOById respectively, reflecting their return type changes to IArticleDTO.
Updates to ContentService
The IArticleDTO interface replaces the use of the IArticle interface, enabling support for additional properties in the service. The $article signal’s initial property values now include the additional properties introduced by the IArticleDTO interface.
Adjustments in MainComponent
Similar to ContentService, the $article signal has been updated to incorporate the additional properties of the IArticleDTO interface, ensuring that the component can handle the extended data structure seamlessly.
👉 Find the commit with the above updates here:
2. Initial Refactoring
Below are the changes for an initial fundamental refactoring:
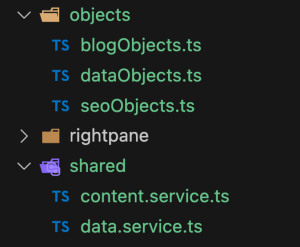
The folder named ‘blogObjects’ has been changed to ‘objects folder.’ The interfaces and classes that were related to data have been moved from ‘blogObjects.ts’ to a new file called ‘dataObjects.ts.’ In this new ‘dataObjects.ts’ file, a class named ‘ArticleDTO’ has been introduced, which implements the IArticleDTO interface and sets initial values for its properties. Additionally, a new file called ‘seoObjects.ts’ has been created within the ‘objects folder’ to prepare for future SEO-related objects.
The services, DataService (data.service.ts) and ContentService (content.service.ts), have been relocated to a new subfolder called ‘shared.’
👉 Find the commit with the above updates here:
3. Content Service Refactoring for proper navigation
The ContentService should be refactored. This was necessary for better handling of URL (route) changes. The main change is that now we use Angular Router which is more aligned with Angular’s navigation system and it provides more reliable history management than direct location manipulation. Now we use ‘router.navigate()’ instead of Location service (‘location.replaceState()’/’location.go()’ ) for navigation.
We have actually, replaced all ‘location.go()’ calls with ‘router.navigate()’ for updating the URL paths with slugs, in methods: signalCategoryArticles(), signalArticle(), and signalPageContent(). We use the ‘‘router.navigate()’ in conjunction with the ‘{replaceUrl: false}’ flag parameter. This results in a proper history of new entries that work also with browser back/forward buttons (that it was a missing option before). One exception is for our Home page (with PageId =1) where we use the flag: ‘{replaceUrl: true}’ which replaces the current URL in history instead of pushing a new entry. This ensures that the / Home page does not reset the browser’s history. Note I have created a specific private method -the ‘routerNavigateTo()’ that does the job.
A remarkable change concerns the reorganization of the constructor() code that listens to the URL changes. Now the constructor “duties” are carried out by 2 separate private methods: ‘listenToBrowserNavigation()’ and ‘handleURLChanges()’.
In the ‘listenToBrowserNavigation()’ method first, we monitor URL changes by using both: the Router Events Listener, and the PlatformLocation onPopState event.
The Router Events Listener constantly monitors for any router events. This listener triggers when:
– router.navigate()is called
– URL changes programmatically
– After popstate events (back/forward buttons)
The ‘this.router.events’ is an Observable that emits different types of navigation events, and the .pipe(filter(event => event instanceof NavigationEnd)) filters to only catch NavigationEnd events. The Router navigation lifecycle includes events like:
– NavigationStart : Navigation begins
– RoutesRecognized: Router matches URL to route
– GuardsCheckStart: Route guards begin evaluation
– GuardsCheckEnd: Route guards complete
– ResolveStart: Route resolvers begin
– ResolveEnd: Route resolvers complete
– NavigationEnd: Navigation completes successfully
Catching NavigationEnd event means that we can capture the location path after the router completes the navigation process successfully.
PlatformLocation is an Angular service that encapsulates all calls to DOM APIs which allows the Router to be platform-agnostic. The service includes browser location (URL) functionality and provides a unified API for working with browser history and URL changes. The platformLocation.onPopState() specifically targets browser back/forward navigation events, so it won’t interfere with other navigation methods (clicking buttons, entering URLs manually, etc.). Keep in mind that this will only trigger for actual browser history changes (back/forward buttons), not for programmatic URL changes made using location.go(), which is exactly what we wanted here.
The changed URL path is captured from either the Router Events Listener or the PlatformLocation onPopState event and then is passed as a string to the next private method: ‘handleURLChanges()’, which actually provides the same functionality (for updating the corresponding signal) that previously was located inside the constructor().
Finally, notice that we use a flag: the ‘isPopStateNavigation’ flag. This is necessary, in order to avoid a duplicated call, that normally is triggered by a ‘router.navigate(); command -after a back/forward browser click captured via the ‘PlatformLocation onPopSstate’. The updated ContentService code is given below:
👉 Find the commit with the above updates here:
4. SEO Updates
Now it’s time to start forming the objects and properties that could be used to create the essential meta tags and the structured data script that would make our posts (articles and pages) SEO-friendly.
The seoObjects.ts
A good approach could be to divide them into 2 groups, e.g.: Post Tags and Post Structured Data. For this purpose, we can create the 2 respective classes: ‘PostTags’ and ‘PostStructuredData’. Moreover, we can define some constant or pre-default values that could be suitable in our case. For instance, such values can be used for the type of organization of our blog site, its name/title, its favicon, the type of the author of each post, the type of the logo image, etc.
Below, you can find how we can code the necessary objects and their properties, inside the seoObjects.ts file:
After this, we can go further applying SEO to our blog site.
The SeoService
There are various ways we can apply the meta tags and structured data to our posts (articles and pages). It is obvious that the MainComponent should be involved in this process since this is the place where we dynamically obtain the needed data from the backend and the content from the static pages. So, a first approach could be to implement this logic inside the MainComponent, by adding in it a number of necessary methods.
However, a much better approach is to use a dedicated service for this purpose. Then the service can be called directly from the MainComponent (or any other component we would like to use in the future). For example, we can create the new SeoService:
ng g s /shared/seo --skip-tests=trueNext, we can proceed to work with the SeoService to implement our logic. Hopefully Angular provides us with the Meta and Title services that we can easily use here. Moreover, we can also use the directly the document (DOM) object, but direct use of the document is restricted during server-side rendering, as it’s a browser-specific global object. Nevertheless, instead of using it directly, we can use the DOCUMENT token. This offers an abstraction layer of the document object, allowing us to interact with the DOM in a platform-independent way (CSR/SSR environments).
So, a first approach of SeoService implementation is given below:
An interesting topic is that we will use the 1st found image in the content of an article or a page, as the main image of the post, using it as the ‘twitter:image’ and the post image in structured data. For this, we will use a regex expression that is able to capture any 1st image found either in Markdown or HTML content. [See the getPostFirstImageAsMain() method].
Another point is that we use the trimText() method when the length the text exceeds a predefined value.
The last point worth to be referenced is that in cases where no article creation date is provided, we use a fixed date instead of using an empty one [see formatDate()].
Using the Rendere2 in our SeoService
As you can see above, we simply use directly the document object (DOCUMENT is a built-in Angular token).
While the usage of an injected DOCUMENT token might seem to work OK, relying on it directly can lead to unpredictable behavior or errors during the SSR phase. For instance, operations like ‘document.createElement’ can throw errors, if the environment is not properly tuned. And this is because the document object generally, is not purposed for SSR.
Angular provides the Renderer2 as another abstraction for DOM manipulations to ensure compatibility across different platforms and rendering engines (e.g., server-side rendering, web workers, or native mobile rendering). Renderer2 is part of Angular’s dependency injection system, making it tightly integrated into Angular’s framework. Moreover, it allows Angular to optimize DOM manipulations for performance and ensures consistency across components.
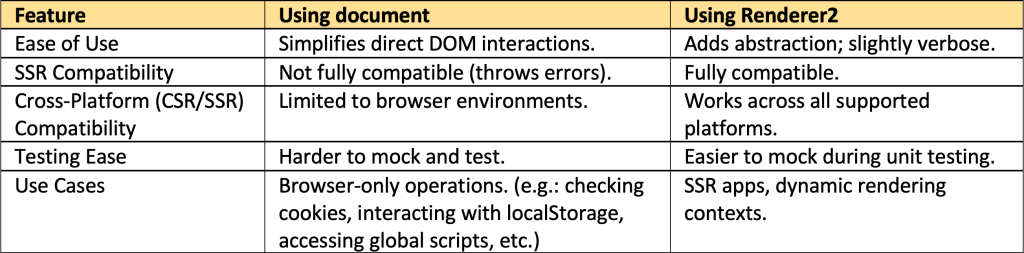
The Rendere2 guarantees that the rendering process for document manipulation (adding meta tags, structured data, etc.) takes place only in the browser (CSR). Moreover, the Renderer2 class is necessary when we need to set a property or an attribute whose name is not statically known. In such cases, Renderer2 provides us with suitable methods like ‘setProperty()’, ‘setAttribute()’ etc.
Renderer2 is usually used in components since it’s part of the Angular rendering engine and fits into the Angular context of a component’s view. In a service, though, there isn’t a direct rendering context. However, still, we can still inject Renderer2 into a service by using another service, the RendererFactory2 service that Angular provides. This also makes it possible to handle dynamic elements throughout our components.
For this purpose, we can use the createRenderer() method of the RendererFactory2 to create an instance of Renderer2 in our SeoService. This is how we can do this:
private renderer = inject(RendererFactory2).createRenderer(null, null);The first argument (hostElement) is null because we’re not associating the Renderer2 instance with a specific host element. The second argument is about the type of the base class to implement (RendererType2) when we want to associate custom rendering data and styles with a rendering implementation. Here we don’t want to do so, and thus it can be also null.
After this, we can use the Renderer2 ‘createElement’, ‘setAttribute’, ‘createText’, and ‘appendChild’ methods for DOM manipulations instead of document methods. For instance, we can do this, when we want to add the StructuredData script:
Note that Angular’s Meta and Title services are specifically designed to work seamlessly across both client-side rendering (CSR) and server-side rendering (SSR). However, there are additional steps we need to take to make sure our app operates smoothly with SSR.
Even though Renderer2 is abstracted to work across different platforms (browser and SSR), certain operations (like selecting or appending root elements) might behave differently in SSR. Additionally, there are cases where we can’t avoid working on things that depend on window object (even when we want to work on document object), other browser-specific APIs, or when we have a library or API that only works in the browser-only (for example, a chart library, etc).
These cases can also be mixed with services like Meta and Title. So, in such cases, we must ensure that the related actions are performed only in the browser (CSR part); otherwise, we can face building errors like ‘error NG05104’. This can be avoided by recognizing the platform our code is running and allowing those actions to run only in the browser platform.
Checking the platform (CSR or SSR)
For this purpose, we need first to inject the Angular’s PLATFORM_ID token that indicates the running platform, and check it using the isPlatformBrowser utility function which returns whether a platform id represents a browser platform:
  private platformId = inject(PLATFORM_ID);
  private isBrowser: = isPlatformBrowser(this.platformId);
We can then confidently execute the related code actions only when we make sure that our code is set to run in the browser (CSR), for example:
Considering everything mentioned above and after making some necessary refactoring, our SeoService (“Renderer2 version”) becomes like this:
Then, what we only need in our MainComponent, is to inject the SeoService, and call its updateTags() method, passing the necessary parameters (Page nr, article, and the content). Thus, our MainComponent becomes:
We have almost finished; however, 2 more updates are worth doing.
The first concerns the ContentService. If you have gone through my previous article: ‘Integrate Server-Side Rendering (SSR) into your existing Angular blog site project’ you might have missed (or noticed) an error that was kept that kept popping up during the building process, that warned us with a message similar to: “ERROR ReferenceError: window is not defined’)”.
This error appeared immediately after the @angular/ssr installation, and the reason is that we very early were trying to update the categories signal ($categories) by fetching the categories from the backend, via the DataService (using the HttpClient service and an Observable). The $categories signal is needed to update the browser content (in NavrowComponent)with the categories from the backend. So, it is necessary, to assure that this takes place when the browser environment (CSR) is ready and skip it in SSR. The solution is simple when we inject the Angular’s PLATFORM_ID token and check if this runs in the browser environment.
Then instead of using this:
  constructor() {
    if (this.$categories.length === 0) this.signalCategories();
    this.listenToBrowserNavigation();
  }
we can use this:
  constructor() {
    if (isPlatformBrowser(this.platform) && this.$categories.length === 0) this.signalCategories();  //Without browser checking, this caused a build error
    this.listenToBrowserNavigation();
  }
The second update concerns the way the HttpClint works. By default, HttpClient uses the XMLHttpRequest API to make requests. The ‘withFetch’ feature (Angular 15 or newer) switches the client to use the fetch API instead. fetch is a more modern API and is available in a few environments where XMLHttpRequest is not supported, e.g.: it does not produce upload progress events. So, as the Angular team recommends, switching to fetch API is strongly encouraged. A practical usage is when we incorporate it, we can easily implement interceptors, for managing headers, logging, or modifying requests/responses. Moreover, it really helps us to understand better an occurred error, by popping up a full call trace. (This was what actually happened before and helped to solve the previous ‘ReferenceError’).
We can switch to the fetch API, by calling the provideHttpClient() with ‘withFetch’ in the providers’ array of our app.config.ts, e.g.:
...
    provideHttpClient(withFetch()),
...
So, after these updates, we can build/run our app and check it with the browser’s dev tools. You can see the working result below:
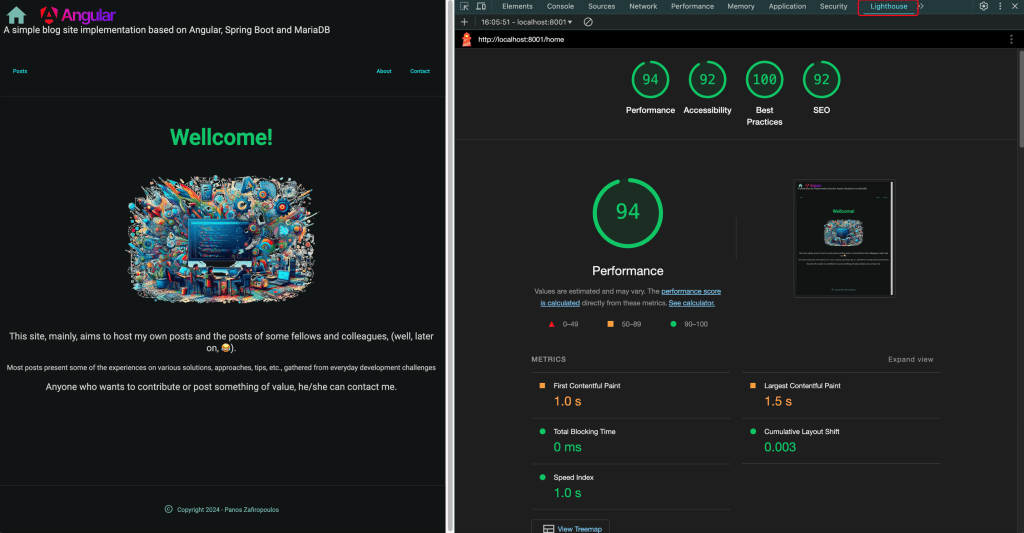
Of course, the Lighthouse results vary from page to page depending of many other factors like image type and size, the existence or not of some attributes, and so on. However, we have made a significant step ahead in making our SSR app, SEO-friendly.
👉 Find the final commit of the Angular frontend here
So that’s it for now!
I hope you enjoyed 👏 this post. Stay tuned, and … keep coding!