Custom Validation in Spring Boot best explained – Part 1

Case 1 – integer custom validation, that should match one of the values in a given array
Intro
Spring Boot is a full-fledged framework with a plethora of modules and features. So, in a REST API application, validation of data, in a JSON body, could not be missed. The possibilities offered, go beyond the rich set of “ready-made” annotations and allow us to define our very own validation checks that can also concern a combination of fields (JSON keys).
In this post, we focus on a common case, when we have to check if a value in a JSON field, passed in the body of a POST request, is one of the values provided in an array we define. Think about that, like the case we have to check if a city in one JSON field, is the one that really belongs to the cities’ array of that country. If the city does not match any of the cities in the array, then it does not belong to that country, and thus the request (e.g. POST request) should be failed. Similarly, we can think about how we can validate, ingredients against a Product, a specific Sub-Category against the main Category it belongs to, and so on.

Prerequisites
It is supposed that you have some familiarity with Spring Boot development, REST APIs, Maven dependency management and POM files, JSON, and other related subjects (Spring annotations, DTOs, application properties, how to connect to a database using JDBC, JdbcTemplate, etc.).
If you wish you can access this post, which provides a very basic introduction on how to start working with Spring Boot, JDBC, and MariaDB database in order to build a fundamental REST API.
For your convenience GitHub repos are provided, so they can be used, as starting points for each of the case examples of this post.
The Hibernate Validator Dependency
Here we are going to use the Hibernate Validator engine dependency (which is also a compiled dependency when we use the spring-boot-starter-validation).
So, in our project pom.xml file we have to have included it, like that:
The Hibernate validator offers us with a quite long list of built-in validation constraints, defined by the Jakarta Bean Validation specification, as well as of other additional constraints. Those constraints cover the categories:
- field constraints
- property constraints
- container element constraints
- class constraints
Especially, for built-in field validation constraints (all field constraints are specified in the Jakarta Bean Validation API) you can find the full list here.
Be prepared
Short intro to Custom validation
Defining a custom constraint validation, mainly, includes the creation of a custom validation interface for the annotation, and the validator implementation class which actually implements the validation.
The annotation validation interface (The constraint annotation)
The annotation type is defined using the @interface keyword. The name of the annotation interface defines the annotation itself, that we can use for our validation (e.g. in a field or a bean or DTO, or in a request query parameter). In the annotation interface we can define also some other parameters:
- the target (as we said FIELD, PARAMETER, CLASS, etc.)
- the retention policy
- the real action – validation class
- the value (or the values) that can/should be passed with the annotation
- the default message that will be returned in case of unsuccessful validation
- etc.
The validator implementation class
The validator implementation class, which usually by convention has a similar to the interface name, and should implement the Jakarta Bean Validation ConstraintValidator interface.
The ConstraintValidator interface accepts 2 parameters: the annotation interface and the type (object) of the field or the parameter that it should attached to.
The implementation of the ConstraintValidator interface includes the implementation of the 2 default methods it defines: the initialize() and the isValid() methods that should be overridden. The last one is this that does the real job, it returns a boolean, and it should always return: true (for successful validation) or false (for unsuccessful).
If you want to go deeper on creating custom constraints, you can visit the official link here.
Now it’s time to proceed to our implementation cases.
In this part (Part 1), we will see an example (Case 1) of how to create a custom validation with fixed/static data. We will actually, validate an integer, which should be one of the values in a set of predefined integer values (in an array of integers).
In the next part (Part 2), we will proceed with an example (Case 2) creating a custom validation for a group (a combination) of 2 JSON fields (“master-details”). But this time we will use “dynamic data” provided by database tables (MariaDB) via a simple repository. Note that, we will use just raw SQL and JDBC, via the JdbcTemplate, without using any ORMs (no JPA/Hibernate, etc).
Case 1 – integer custom validation, that should match one of the values in a given array
The problem
Suppose, you want to control and validate a specific integer value, neither using the @Range, nor with @Min / @Max built-n Hibernate constraint validators. But what you want is to allow only one, that can be any of the integers in an array of yours. For instance, you want to check if an integer passed in a JSON field value, is one of the integers in the array: {2, 17, 33, 5, 28}.
The project repo
You can always use a Spring Boot project of yours, but for your convenience, you can use a GitHub repo of mine. So, go to the GitHub and grab/clone my starting repo or download the .zip file, and then use it here.
This is nothing but a very simple REST API exposing just 1 endpoint named “api/items” with all commonly used CRUD operations: GET, POST, PUT, DELETE. The project comprises of just a single Controller, an Item class and the Data Transfer Object (DTO): ItemDTO class.
The folder structure is given bellow:
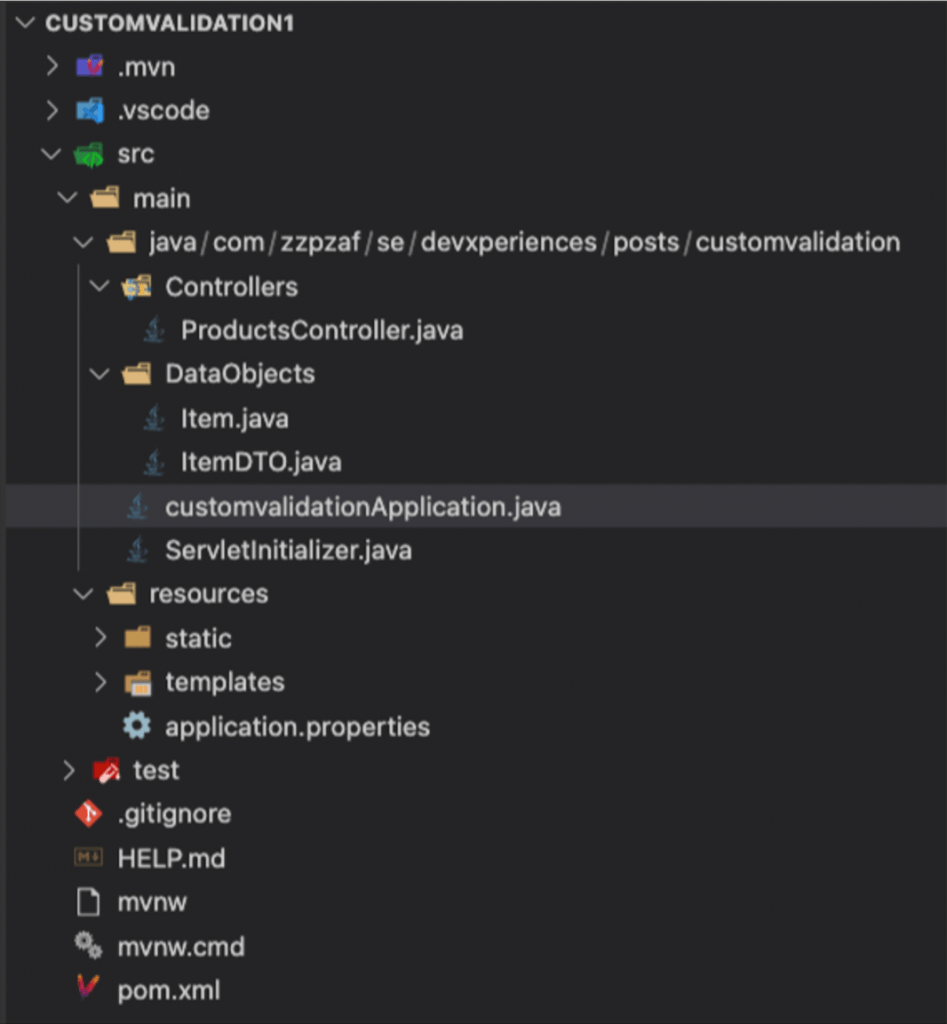
For demonstration purposes, we have a pre-defined list (ArrayList) of Item objects just inside the Controller. For simplicity, we don’t use a separate Service or Repository, neither a persistent database.
We will keep using the ItemDTO class to validate its properties/fields using our custom validation for this case.
An Item object consists of few properties/fields and the ItemDTO has all of them except the itemId. You can navigate the simple code in the above classes on your own.
As you can see below, we have already used some of the built-in validation constraints.

These are:
@NotNull, @Range, and @Positive and @Digits for the properties itemName, itemModelYear, and itemListPrice respectively. Note, that Hibernate provides default messages for each annotation, however above, we use our own.
Then, we can use the @Valid annotation in any request we wish to force the Spring to validate them. Below, we use it for handling a POST request in the ProductsController:

Test the so-far validations
Using the Postman, we can try to send a POST Request with an empty JSON body,

and see that we get all the error messages, like below:
Note, that the response structure of messages, is the one that it is provided by default since we don’t use any custom error handling here.
Implementation of the Custom Validation
The only property/field for which we don’t use any constraint validation yet is the itemVendorId, and as you guess, this is our target for the custom validation here.
Let’s name our custom annotation ‘OneOfIntegers’. Since we want to keep our project well structured, we can create a new project folder/package, name it ‘Validators’ and create inside it the ‘OneOfIntegers’ annotation interface.
The ‘OneOfIntegers’ constraint annotation interface is given below:
The interface can be annotated with a number of meta-annotations. Below is a short explanation of what we are using here:
- The @Target meta-annotation defines the type of elements that our annotation targets (is going to be used with). In our case, our intention for this annotation is to be used with fields (e.g. with fields or properties of a DTOs) and/or parameters (string query parameters passed via endpoint URL).
- The @Retention meta-annotation defines that our annotation will be available at runtime by the means of reflection
- The presence of the @Documented meta-annotation defines that our annotation will be contained in the JavaDoc of elements annotated with it.
- And the @Constraint(validatedBy…) meta-annotation defines the class that should be used to carry out the real job of the validation. In our case, this is the OneOfIntegersValidator class (Below, you will see, that one of its methods is the ‘isValid’ boolean method, which returns true or false).
Besides the above, we have to provide the following 3 mandatory attributes:
- The Message attribute, which returns the string provided as the default error message. As you can see, this message here is “The Integer value is invalid”. Note that we can also provide, a custom message among the annotation on the field, that can be applied the same way we have done with the built-in constraint validations with the itemName, itemModelYear, and itemListPrice fields. (We will see it a bit later on).
- The Group attribute, which we can define in case the annotation belongs to a group of annotations. The default should be an empty array of type Class<?>
- The Payload attribute, which we can be used for defining custom payload objects for our constraint. The default should be also an empty array of type Class<?>
The ‘OneOfIntegersValidator’ constraint validator class is also given below:
The constraint validator should implement the ConstraintValidator interface, and pass in to it, as parameters, the constraint annotation interface (which here is the ‘OneOfIntegeres’), as well as the type of the field or parameter on which the constraint will be applied (in our case this is an integer).
What -at least- we have to do is to override/implement the isValid() method which returns a boolean value – true for successful validation, or false for unsuccessful.
What else we have to do is to use an integer array to hold our acceptable values, which in our example case is {2, 17, 33, 5, 28} as we have already said before. Finally, we check if the integer value passed in is contained or not in that array, and return true or false. Finally, we are ready to annotate the itemVendorId field in our DTO class (itemDTO.java):

That’s it! Let’s test it via Postman. This time we use a JSON body object, in a POST request, in which the vendorId has a value of 3 (so we expect that the validation will be unsuccessful).
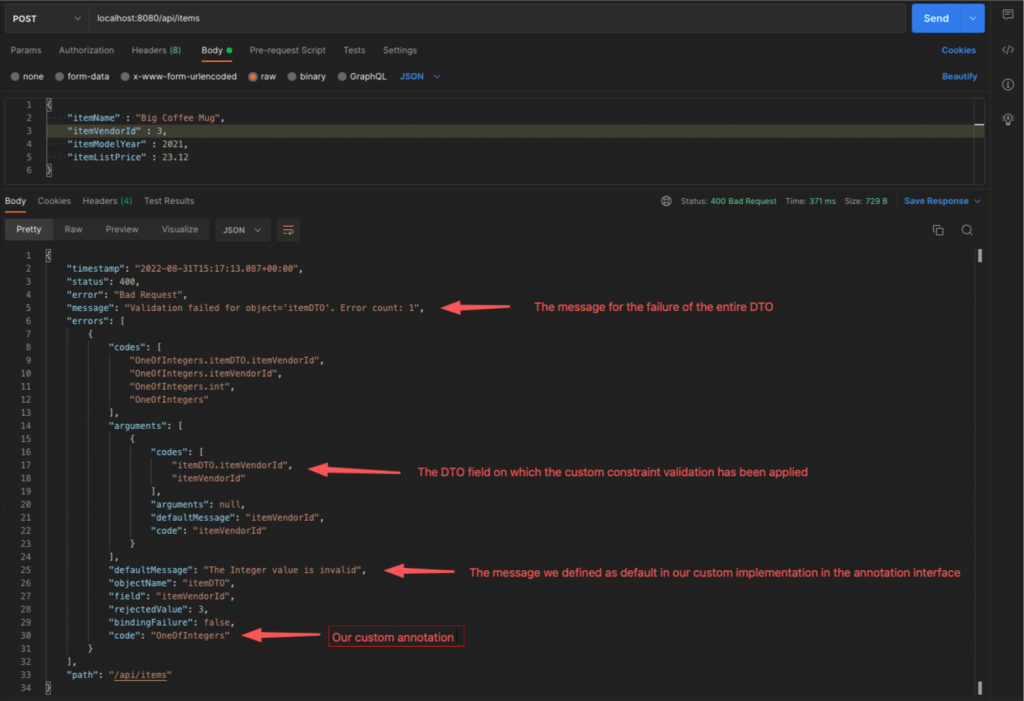
And as you can see, it is unsuccessful, as we expected.
Improvements
So far so good. However, using a fixed array inside our custom validator, does not seem a good approach, since we validate any other field in any DTO, always against the same array. Fortunately, we can fix it asap.
First, we have to inform our custom validation interface of the fact that we are going to use an array of integer values with our custom annotation. We do that by simply defining a property named Values, as an array of integers.
Below, is how our custom annotation interface, becomes:
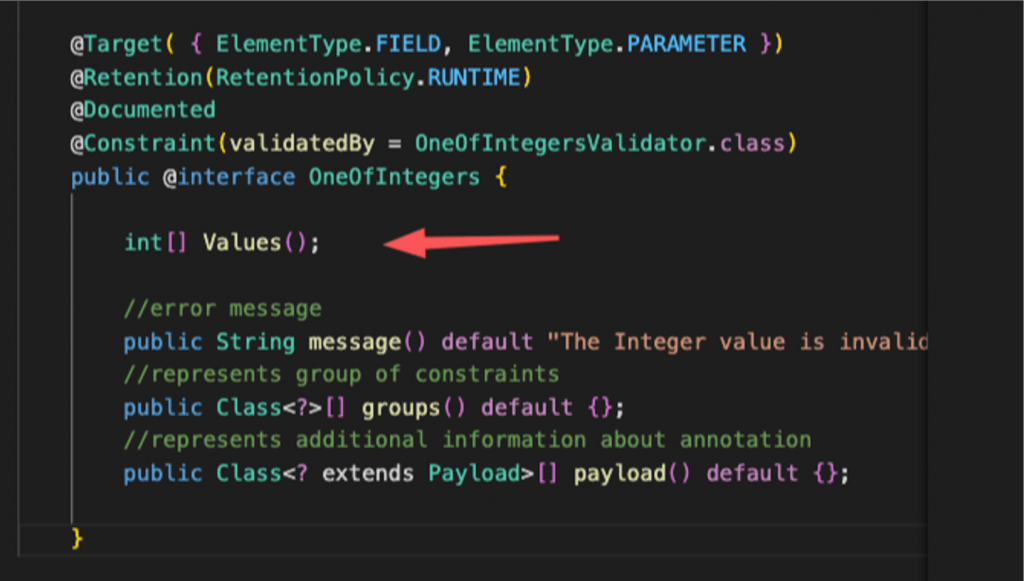
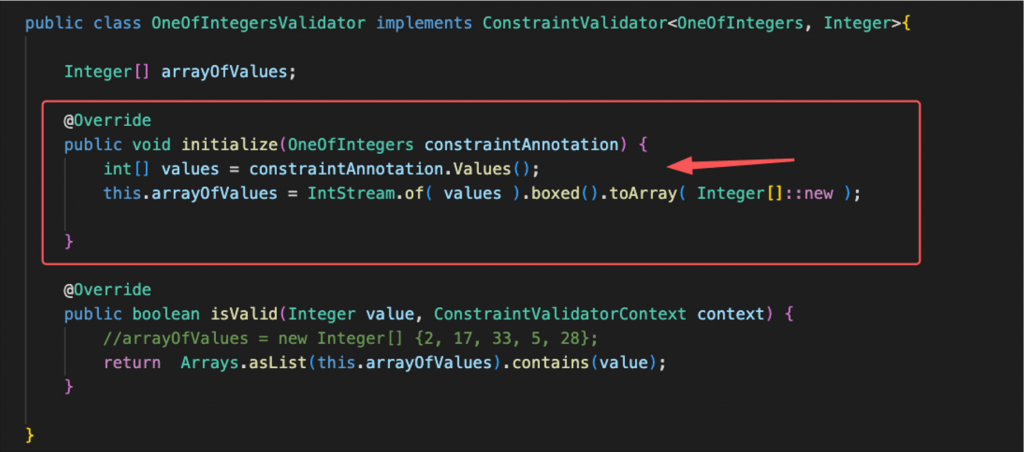
After that, we have to get the integer array with the values into our custom validator. For that purpose we have to override/implement the initialize() method of the ConstraintValidator interface. This method takes as parameter the annotation interface, and that way we have access to the values (the integer array) passed in.
The custom validator becomes:
Well done! Now we can use the example integer array (or any other array we want) with our custom annotation on the itemVendorId field of the ItemDTO, like that:

After that you can test it with Postman:
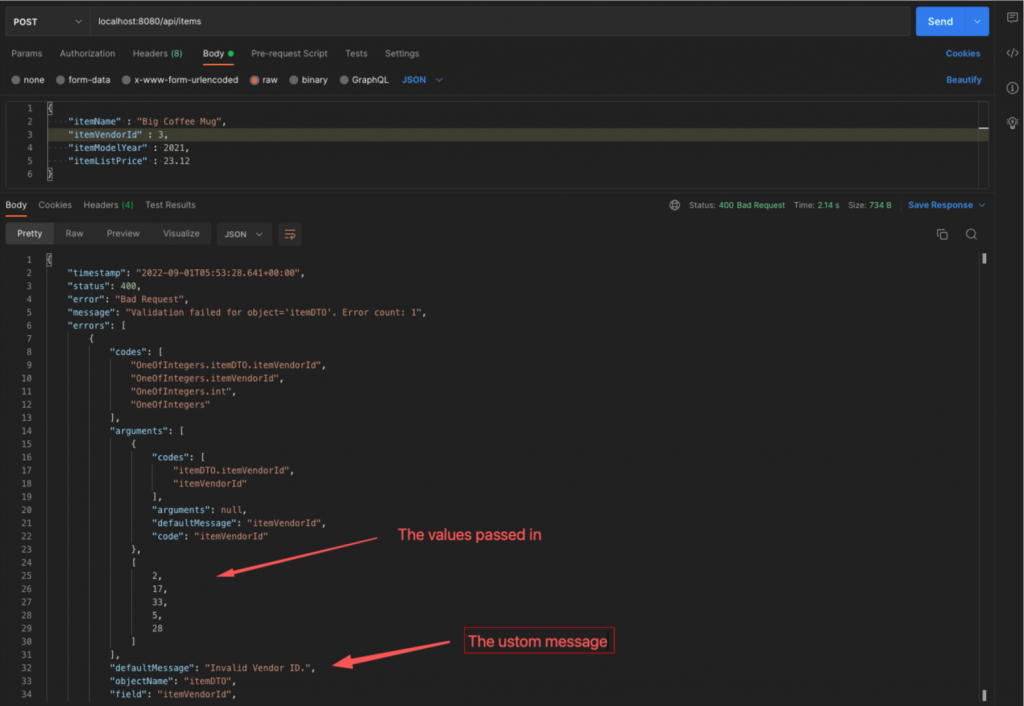
One last ‘enhancement’ that we can do, is to use the message interpolation possibilities offered by Hibernate, and show the array values within our custom message:

And this is what we get (via Postman):
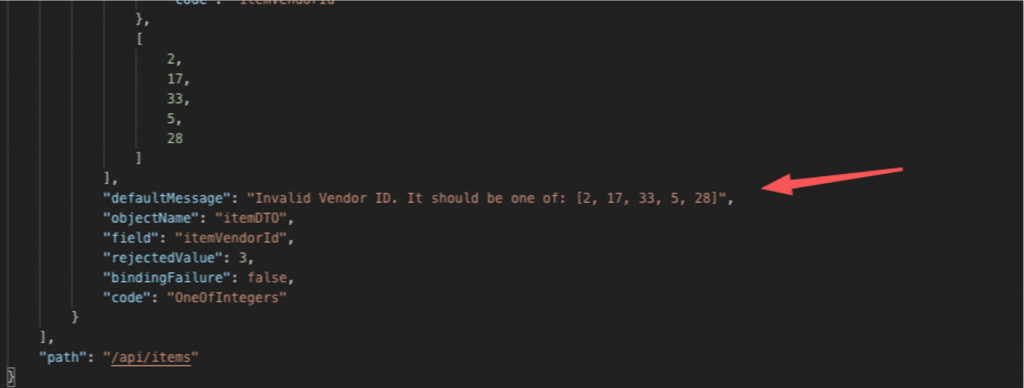
This might be quite useful when you decide to have a custom error message handling in place.
? That’s it! You can download the final code of this example here.
Thnx for reading!!! ?
You can find the Part 2, below:
