
Custom Validation in Spring Boot best explained – Part 2

Case 2 – A database based implementation for a “Master-Details” Custom Validation in Spring Boot
Intro
This is the 2nd part (the 2nd case example) of how to implement a custom validation in Spring Boot. So, for your better understanding, it would be fine if you had previously gone through Case 1:
Now, we are ready to proceed with the implementation of a “master-details” custom validation example, as we’ve mentioned at the beginning.
The problem
“Matured” guys like me? are probably familiar with the term (or concept) “master-details” (even from the “ancient times” when we used to work with the MS-DOS, – Clipper – Funcky – DB III Plus “stack”), and when for example, we had to bring the items (or products): the “details”, for a given order (or invoice): the “master”.
So, suppose, you want to control the sales POST requests, and you want to limit the sales, only to items of specific categories (“details”) for a given vendor (“master”). For example, let’s say you want to limit all or some of the vendors to sell items belonging only to specific categories (specific to a given vendor).
For instance, for vendor with vendorId = 2, it is allowed to post items with a categoryId any one of: {2, 17, 33, 5, 28}. The vendor with vendorId = 7 is allowed to post items having categoryId: {3, 12, 41, 28}, and so on.
Initially, you might be thinking that this can be achieved if we work a bit more on the previous case. Perhaps you are right, but you should have to put some more effort to define a custom validation using a group of 2 fields: vendor and categories. You can either try it on your own, or you can follow the example case below.
Data preparation
As we have already said, here we will implement a database-based solution. This allows us to define our example case logic inside the database layer, making our code independent of fixed data values.
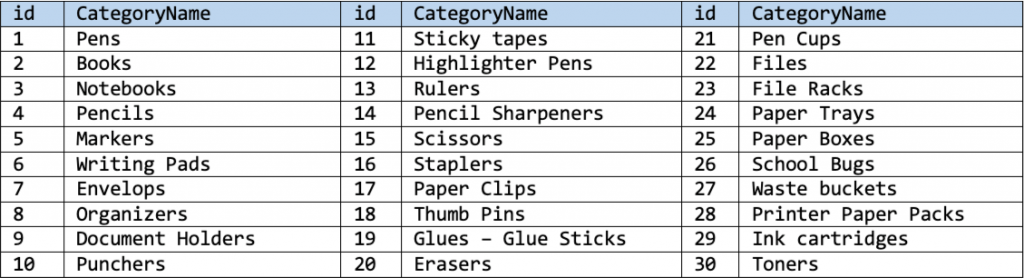
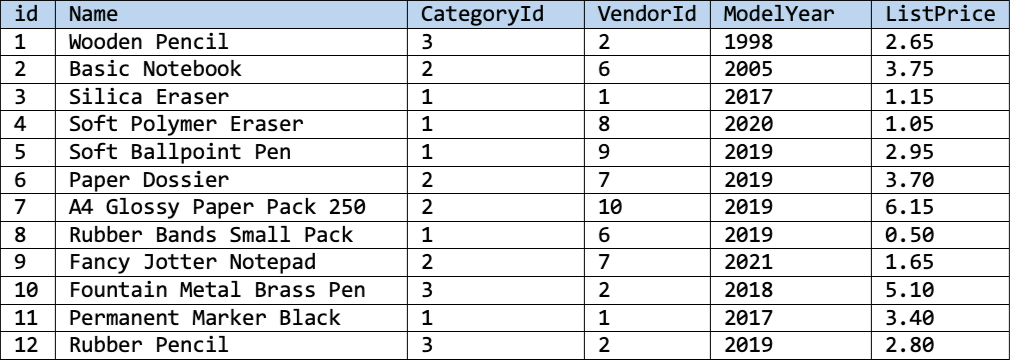
For the simplicity of our example, we have to define 3 main database tables and last one many-to-many table:
- CATEGORIES – for Items Categories
- VENDORS – for vendors, brands, etc.,
- ITEMS – for items
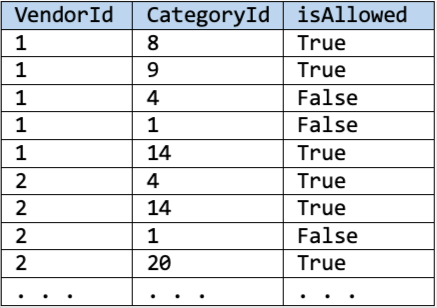
- VENDORCATEGORIES – for matching a vendorId with allowed categoryIds
The 3 main tables are self-explanatory:
CATEGORIES
VENDORS

ITEMS
VENDORCATEGORIES
Finally, for our logic, we have also to define one many-to-many table, the VENDORCATEGORIES table. The VENDORCATEGORIES table is used to match a vendorId with the categoryIds that he is allowed to send post requests for sales of items. The approach here, is to use one more column – Boolean column (0 or 1) that signifies if a particular category is allowed or not for the specific vendor. Switching true to false and vice-versa, allows for rapid allow/disallow of a category (without adding or deleting entries). Defining just 2 vendors will be enough for the purposes of our example, here.
Database
As a database, we are going to use MariaDB. MariaDB an open-source (binary) replacement of MySQL. If you haven’t yet installed it on your machine, you can do that, by choosing, for instance, one of the following 2 options in my posts:
If you want to see how you can connect your REST API project to MariaDB, what is the Maven MariaDB dependency that has to be added to the project’s pom.xml, and start working with the MariaDB database, take a look here, at my post below:
Friend link:
Now it’s time to start working with your MariaDB database to create the tables and add the sampling data above. You can do that either by using your terminal and the mysql CLI, or by using a GUI, such as MySQL Workbench or the web-based phpMyAdmin (or any other tool allowing you to work with MariaDB/MySQL databases).
For your convenience, find below the SQL scripts that can be used to generate the tables and add the sampling data into them:
Note: The .sql file with the above scripts is also included in the starting repo below.
The project starting repo
So far, so good. Now it’s the time to start the implementation of our ‘master-details’ custom validation. Our starting point will be this repo (the .zip file here). The repo is a simple REST API Application for a “Bookstore”, dealing with data tables from a MariaDB database we’ve previously seen.
It exposes 3 main endpoints for the 3 main tables(entities):

The repo provides all the standard CRUD operations for each one of the above entities/endpoints.
The project structure
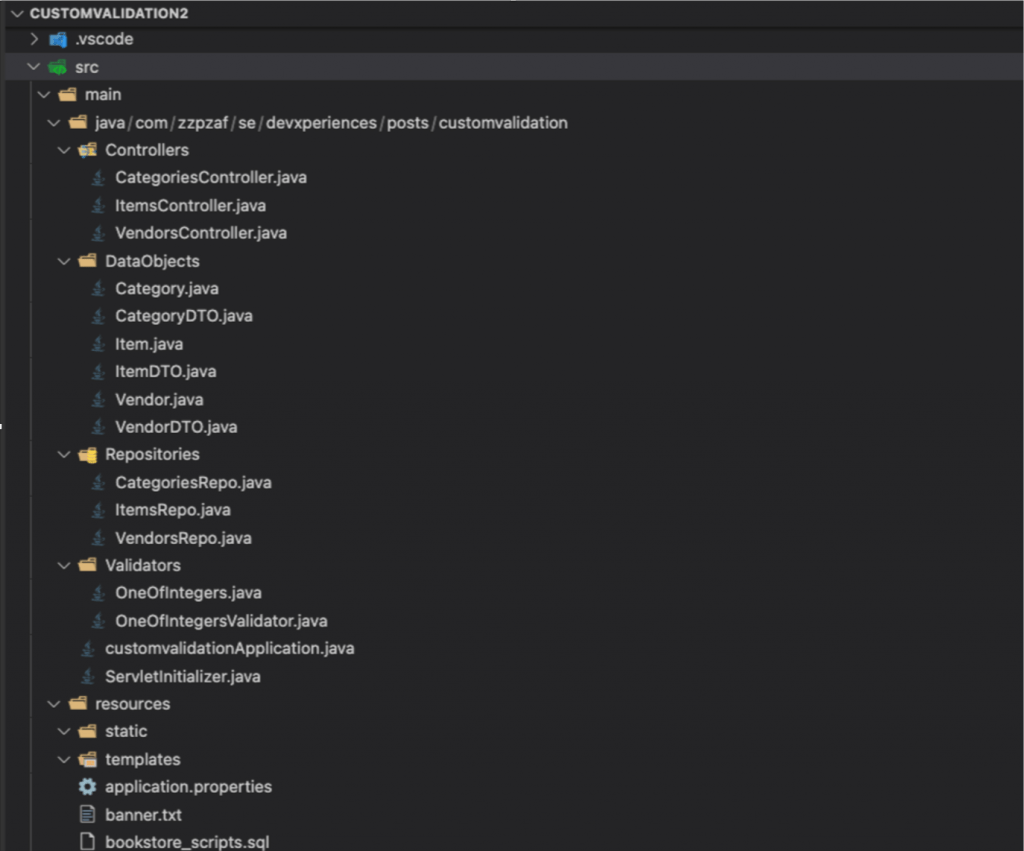
As you can see, there are all the “standard” packages (project folders):
– Controllers serving the endpoints,
– DataObjects for Data classes and Data Transfer Objects (DTOs), as well as
– Repositories for accessing the database date via JDBCTemplate and raw SQL queries.
Please pay attention, that we have left the “OneOfIntegers” custom validation files in the Validators folder package, just for any case you want to use that constraint from our previous case/example. However, we have removed (actually we’ve commented it out) this custom constraint annotation for the itemVendorId field in the itemDTO.java file.
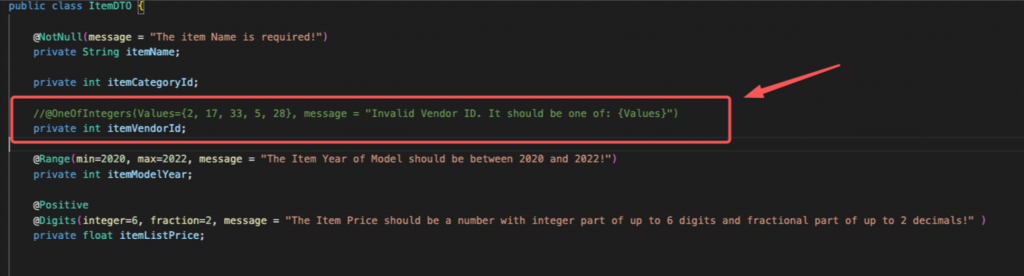
This is because we are going to implement our “master-details” custom validation for the combination of the fields itemVendorId and itemCategoryId.
Finally note, that as we have said, we are not going to use the JPA/Hibernate or any other ORM, and that we have also avoided having separate Service classes.
The Maven/pom.xml dependencies
The dependencies added for MariaDB and core JDBC functionality (JDBCTemplate), into our pom.xml are given below:
MariaDB Connection parameters
Below, are also the connection parameters added into the application.properties file (in the resources ):
Implementation of the “Master-Details” Custom Validation
What we have to do, is quite similar to what we did in the previous case. First, let’s name our new custom annotation ‘DBMasterDetails’.
After that, we have to create the DBMasterDetails validation interface, as well as the DBMasterDetailsValidator class. Both of them reside inside the Validators folder/package.
The initial version of the ‘DBMasterDetails’ constraint annotation interface is given below:
Comparing it, to the previous case ‘OneOfIntegers’ constraint annotation interface, we can distinguish some changes:
- First, we have limited our target, to only Field types (no Parameters here). This is because the “master-details custom validator shall be applied only, to fields in a class (dto) level, as we are going to see soon.
- Second, we have to define the 2 fields that will participate in combination for our “master-details” custom validation. Here, we use 2 String variables, named, fieldName1 and fieldName2, respectively.
- Finally, (and most important), we also use an “inner” annotation interface, which will deal with the 2 fields of the Itemdto we will use in combination (the itemVendorId and itemCategoryId, as we’ve mentioned before). Actually, we use a List (an array) of annotation interfaces of the same type (DBMasterDetails), and we name this list “value”.
Now let’s proceed with the DBMasterDetailsIDsValidator class.
First, we have to get the 2 fields previously defined (in the annotation interface). Similarly with the previous case (the one with the ‘OneOfIntegersValidator’), we do so, by overriding the initialize() method.
After that we can read their values and perform our first check inside the isValid() method by checking if they are not null (otherwise, we can return an early “false”.
The initial “DBMasterDetailsIDsValidator” class is given below:
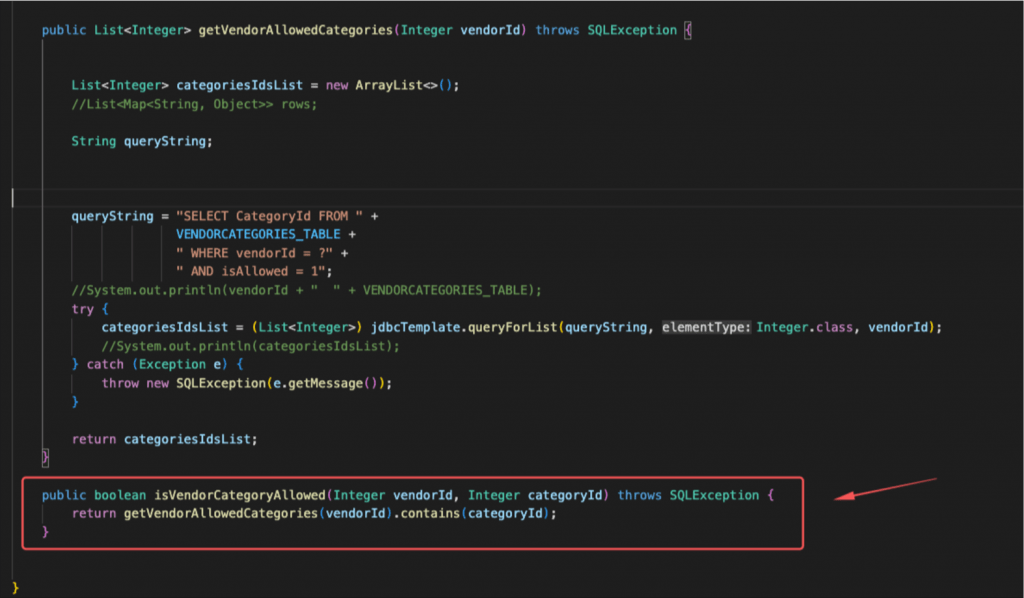
Now we can continue building the “DBMasterDetailsIDsValidator” class, by dealing with data from our repo(s). For the purpose, we are going to add a method (we name it “getVendorAllowedCategories()”) in ours VendorsRepo which should be used to fetch only the allowed categories Ids (for a given vendorId) from the vendorcategories table.
The “getVendorAllowedCategories()” (inside the VendorsRepo.java) is shown below:
The method actually takes the vendorId as parameter and returns a list of integers with all categories Ids enabled (allowed) for the specific vendorId.
Now, we access the ItemsRepo class, by ‘autowiring’ it into the “DBMasterDetailsIDsValidator” class. The, in the isValid() method we call the repo’s “getVendorAllowedCategories()” method passing it the vendorId value obtained there. Finally, we check if the returned list of category Ids integers contains the categoryId obtained also there. If the list contains it the validation is successful, otherwise it fails.
You can see the updated version of the “DBMasterDetailsIDsValidator” class below:
The final step here is to prepare our ItemsDTO.jave by updating it -at class level- with our DBMasterDetails validation constraint. The annotation should be at the class level since it deals with a combination (a list) of fields. What actually we have to do is to pass the field names concerned, and if we wish, a message we prefer better than the one defined in the validation annotation interface. This is how simple is this:
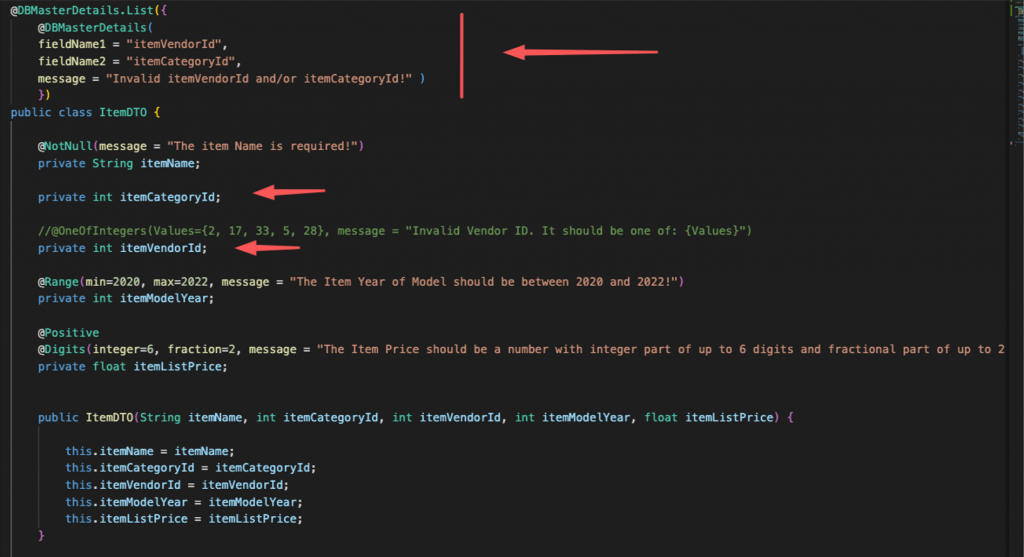
Note, that we don’t add any validation to the fields concerned. (However, you can add any validation constraint annotation, your application and/or your business logic requires).
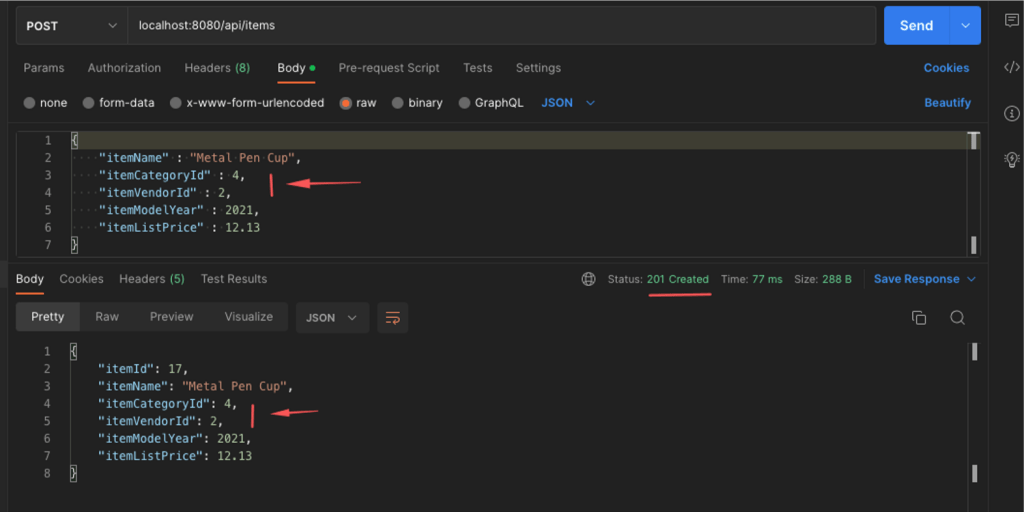
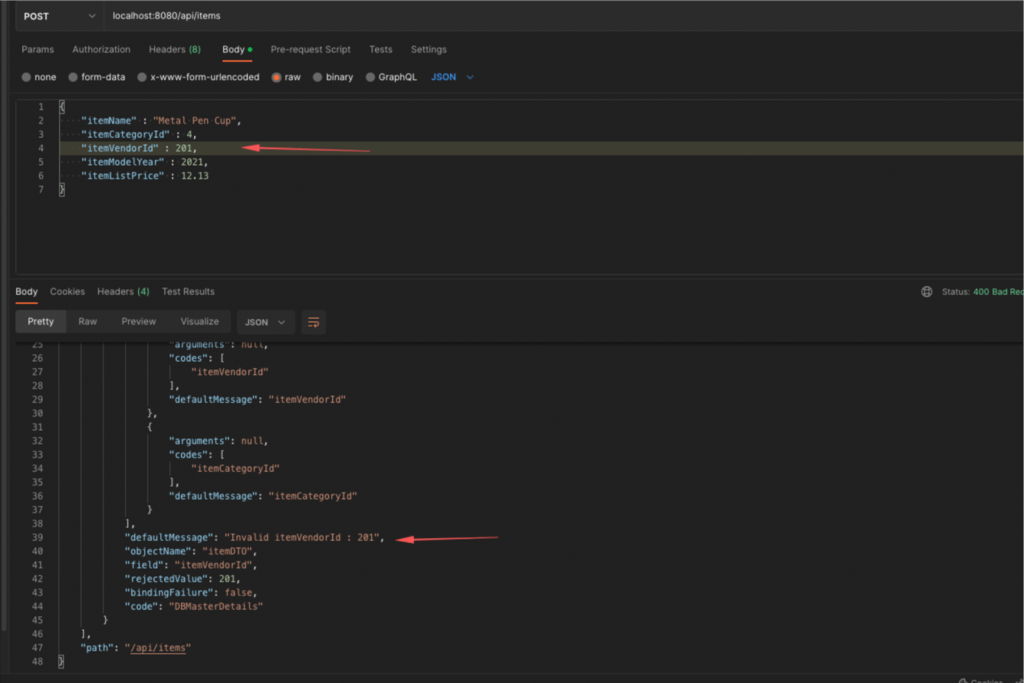
Now, it’s time for testing! (using Postman). Below, we use a JSON body object, in a POST request, in which the vendorId has a value of 2 and the categoryId 1 (so we expect that the validation will fail).

And as you can see, it is unsuccessful (403 Bad Request), as we expected.
Trying then, with values vendorId=2 and categoryId=4 the POST is successful and a new item is added to the items table.
?You can download the full repo with the code we’ve seen so far, here!
Improvements
So far, so good! However, there is some room for making our code better.
Delegate the full check to the repo
A minor yet quick upgrade could be to delegate the checking of the existence of the categoryId field value in the list of the returned categories Ids, to the functionality of the VendorsRepo. This can be done, for instance, by adding a method to that repo, as you can see below:
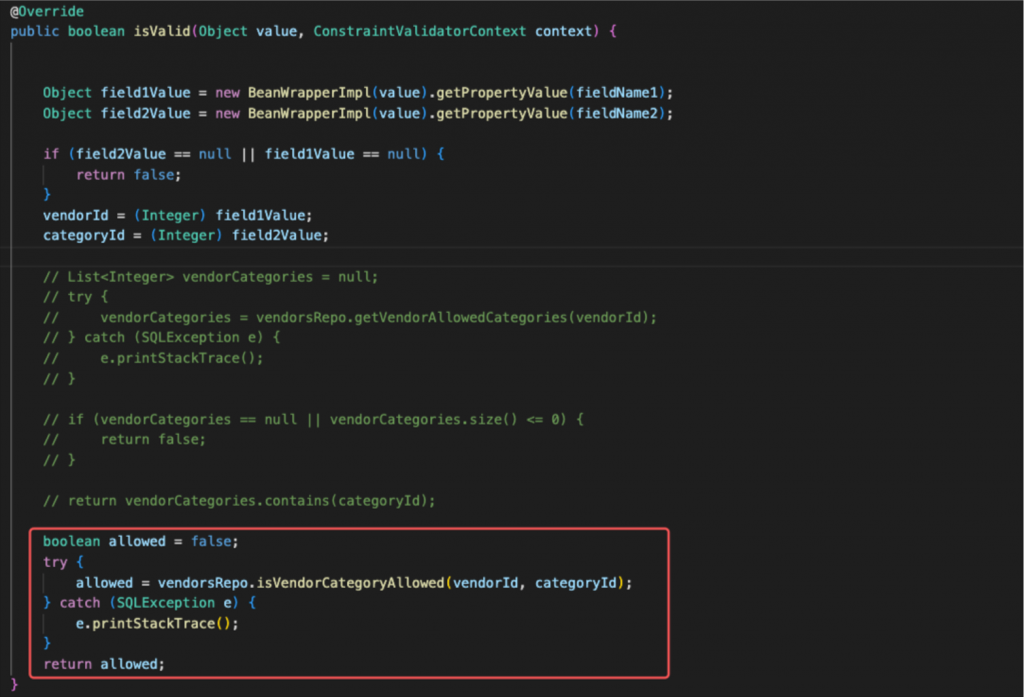
Then we can use it in the “DBMasterDetailsValidator”:
Passing specific messages into the validation context
This is OK, however, is not that important. Most important is to give better information response information in the case of an unsuccessful validation (403 Bad Request). So far, we used just one generic message (the default or a preferred one together with field definitions of the annotation at the class level) e.g.: “Invalid itemVendorId and/or itemCategoryId!” concerning both of the fields. A better approach is to provide a more specific message informing about the field which really caused the failure.
We can distinguish a number of different cases, but for demonstration purposes, we can stay on the following ones:
- Invalid Vendor Id
- Category is not allowed for this Vendor
We can achieve that by suppressing the default validation context and by re-building it, passing the field that caused the failure, as well as the desired message. Below, you can see the method that we can add to our “DBMasterDetailsValidator” class:

Then we can check those cases in the isValid() method and build the validation context accordingly.
The updated version of the “DBMasterDetailsIDsValidator” class is given below:
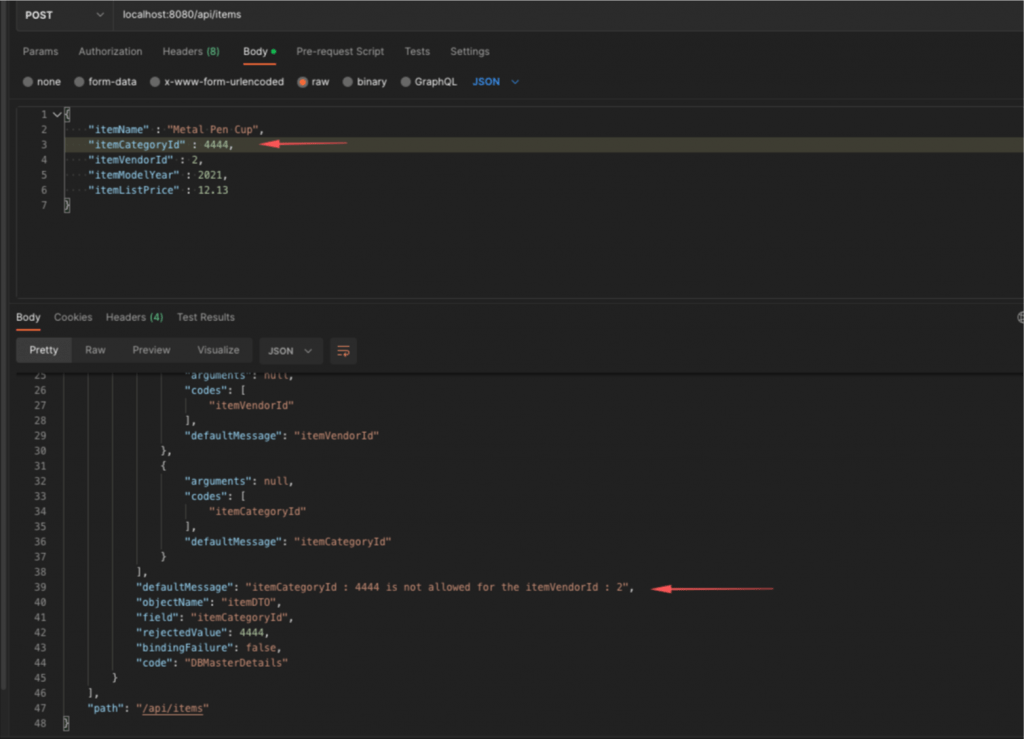
Finally, you can test it via Postman and see the specific messages:
Or:
Of course, you can make any other custom inner checks and return much more detailed failure messages (e.g.: check if the category Id resides within the categoryIds range from the CategoriesRepo), but now you know better how to do this!
That’s it!
You can find the final version of the whole repo here. Download the last commit (final implementation) .zip file, here. Use it for diving deeper into Spring and Spring Boot adventures!
I hope you enjoyed this post!
Thnx for reading!!! ?