
Angular: Update the frontend project and add HTML content support for your blog site

241016-27
Intro
This is the 4th sequel of a series of posts on developing a blog site based on Angular, Spring Boot, and MariaDB. The previous posts are listed below:
1. Angular: Use Tiles to implement a Holy-Grail layout for your blog
2. Angular: Add dynamic data to your blog using a Spring Boot backend and MariaDB
3. Containerize and automate the deployment of a 3-tier full-stack project
The initial project repo
If you checked out my last post below:

you likely know that this is a 3-tier project. You can find the frontend and backend repositories from that post linked here and here respectively.
👉 In this post, we’re going to focus on updating the Angular frontend. To make things easier for you, I’ve set up the first commit of the new repository, which you can find here.
Update the layout to handle no-posts content
You may have observed that in my first post of this series, titled “Angular: Use Tiles to implement a Holy-Grail layout for your blog” the ‘holy-grail’ layout includes six sections: Header, Navigation row, left pane, main content area, right pane, and Footer. Each of these sections has its own dynamic component: ‘HeaderComponent’, ‘NavrowComponent’, ‘LeftpaneComponent’, ‘MainComponent’, ‘RightpaneComponent’, and ‘FooterComponent’. We use the ‘AddCompDynDirective’ to load these components dynamically. The header, navigation row, and footer stretch across the entire width of the viewport, while the left pane, main area, and right pane create a three-column layout in the center. The left or right pane can be used for navigating posts or providing additional information, while the main area typically displays the content of the posts.
This layout works really well for blog sites. However, there are times when we want the “middle” section to take up the full width of the viewport. This is especially useful when we want to show content that isn’t related to a specific post, like an “about” or “contact” page.
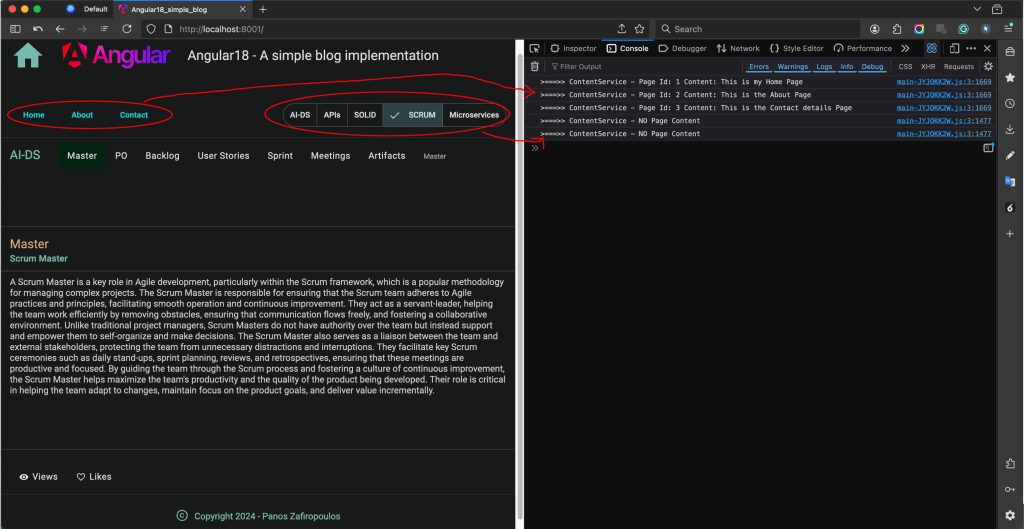
In the NavrowComponent, you might have noticed that we have two groups of menu items: the first group includes ‘Home’, ‘About’, and ‘Contact’, while the second group focuses on post categories. It’s clear that the first menu group is meant to provide information related to those items. Since we haven’t utilized them yet, now is the perfect time to do so.
The logic, and the code updates
We will begin with some updates regarding the NavrowComponent. Here’s a brief overview of our logic:
- When a user clicks on an item from the first group, a signal will be updated to reflect this action. This signal will include the ID of the clicked item.
- Similarly, if a user selects a posts-category from the second menu group, the same signal will be updated as well, but this time it will be set to zero (indicating no page).
- We will keep using the ContentService as our ‘signals store’, and we plan to create and manage two new signals within the ContentService, called ‘noPostsPageNr’ and ‘pageContent’. The new public method ‘signalPageContent’ in the ContentService will be triggered to update the signals when a user clicks on a menu item in the NavrowComponent.
- To enhance the clarity of our code, we will change the name of the ‘ISiteMenu’ interface to ‘IPage’ in the ‘blogObjects.ts’ file. Additionally, we will transfer the constant for the array of items from ‘navMenuItems1’ in NavrowComponent to ‘blogObjects.ts’, renaming it as the ‘Pages’ constant.
- Furthermore, in NavrowComponent, the method ‘itemSiteMenuClicked()’ will be renamed to ‘pageClicked()’, and ‘itemCategoryClicked()’ will now be called ‘postCategoryClicked()’. The code will be updated accordingly.
The added objects in the ‘blogObjects.ts’ file:
The code that has been added to the ContentService:
The NavrowComponent becomes:
and its template:
The logic seems working OK, as you can see in the console output, below:
👉 Find the so-far updates in this commit of the repo.
Now, it’s time to refresh our code so that the “middle” section covers the entire width of the viewport, and the page content will be displayed in the MainComponent.
You might recall that the ‘holy-grail’ layout features dynamic components. It’s actually built on responsive mat-card tiles that we define in the AppComponent, organized as arrays of dynamic components for the three main viewport sizes: Small, Medium, and Large. This means we can also create an additional array to set up the layout for the ‘middle’ section, which currently lacks the left and right panes:
Next, we can utilize the AppComponent constructor, and within the effect() block, we can keep an eye on changes in the $noPostsPageNr signal from the ContentService. When this value is not zero, we can activate the ‘middle’ area (’tilesNoPosts’); otherwise, it will continue to respond only to changes in the viewport, just like before.
So, the AppComponent has been updated like this:
As you probably noticed the ‘Tile’ and ‘DynLayOutComponentsType’ interfaces, along with the ‘DynLayOutComponents’ constant, are missing. This is because we’ve relocated them to the ‘blogObjects.ts’ file, where we’ll eventually compile all the interfaces and constants for our application.
To properly show the ‘middle’ layout, we also need to make some adjustments in the ‘AddCompDynDirective‘ helper directive. A key change is that we need to clear the ‘viewContainerRef’ before adding the next component. This step is crucial because not all components stay loaded, and if we don’t clear it, the new component will just replace the old one.
So, the AddCompDynDirective will look like this:
Currently, the MainComponent only shows the content of an article (post). The final adjustments we need to make involve updating the MainComponent to also show the page ‘content’. To do this, we just need to retrieve the $noPostsPageNr and $pageContent signals from the ContentService within the effect() block in the constructor. By checking the value of the $noPostsPageNr() signal, we can decide whether to display the page content or the article content. Below are the code changes for the MainComponent class and its template.
The MainComponent class:
The MainComponent template:
And the result is as it is expected:
👉 Find the so-far updates in this commit of the repo.
More layout changes and UI improvements
Everything is OK up to this point. Still, I believe that a few additional adjustments could enhance our user interface. These adjustments relate to the HeaderComponent and NavrowComponent, so let’s take a closer look at them.
The first change is related to the post-categories sub-menu (i.e.: navMenuItems2) in the NavrowComponent. We fetch our categories from the backend and display them horizontally, using a respective number of ‘mat-button-toggle’ buttons in the template. Until now, the number of categories remains relatively small: 5.

But, if we wish to add more and more categories in the future, then we probably will have issues displaying horizontally a large number of categories inside the limited width of the NavrowComponent. One solution is to make a vertical menu instead.
However, what we will do here is to keep this sub-menu horizontal, by making it a ‘carousel’-like sub-menu. The ‘carousel’ sub-menu will consist of a pre-specified number of categories (e.g.: 4), and use ‘mat-raised-button’ buttons. In order to scroll forward and backward we will use 2 extra arrow (> and <) buttons.

The second change is about sub-menu positions. We will switch their positions in the NavrowComponent, by setting the sub-menu of Posts on the left, and the sub-menu of Pages on the right.
The final update is taking off the Home-page from the Pages sub-menu and using it as the page that is displayed when the user clicks on the Home-icon on the Header (HeaderComponent).

Below, you can find the updated components.
The updated class of the NavrowComponent:
You can see above that mainly, 3 new methods have been added: the ‘setInitialSubMenuItemCats()’, the ‘FButtonClicked()’, and the ‘RButtonClicked()’. The ‘setInitialSubMenuItemCats()’ is responsible for forming the initial 4 categories from all those fetched from the backend. The rest 2, ‘FButtonClicked()’ and ‘RButtonClicked()’, are those that are fired from the < and the > button respectively. They are responsible for going back or forward by 1 category, till the first or the last category is fetched, correspondingly.
The updated template of the NavrowComponent:
There is nothing special requiring more clarification.
The class of the HeaderComponent:
Apart from the fact that we have injected the ContentService for accessing the content of the Home-page, when a user clicks on the Home-icon, there is nothing more to be added.
The template of the HeaderComponent:
The only update to the above template is the addition of the function to be called for the (click) event on the Home icon.
You can also take a look at the result, below:
So, that’s it all, about the UI updates and improvements.
👉 Find the last updates included in this commit of the repo.
However, the probably, most interesting part of this post, follows now.
Add HTML-content support
It’s clear that showing plain, unformatted text in a blog, isn’t really acceptable. It’s time to make a change. Typically, there are two main methods for presenting formatted text. As you might guess, one way is to use HTML formatting, and the other is to use Markdown. Below, we’ll explore how to work with HTML-formatted text.
However, the first update to our code is to be able to load the text from external files. A common approach is to use the project’s ‘src/assets’ folder to store our files, but you can use any other accessible folder if you wish. Remember to prevent external users from directly accessing such a folder in production.
For our case, you can create three files in the ‘src/assets’ folder for our project. Name them ‘Home.html’, ‘About.html’, and ‘Contact.html’. Each file will serve as a separate page for the ones we’ve already defined into the ‘blogObjects.ts’ file via the constant: ‘Pages’. Then, insert some text you like, into each file, relative to the page.
Next, we can update our code to obtain the text from those files. We are going to update the ContentService, DataService, and the constant: ‘Pages’ in the blogObjects.ts’ file.
In the DataService class, we will define another (relative) path for our ‘/assets’ folder and we will use a new method ‘getPage()’ returning an Observable with the content text. E.g.:
The updated code inserted into the DataService class:
Next, we can update the method ‘signalPageContent()’ in our ContentService for obtaining the content from the Observable.,
The updated code in the ContentService class:
Finally, we can also update the ‘IPage’ interface and constant: ‘Pages’ into the blogObjects.ts’ file by removing the ‘PageContent’ property.
The updated code into the ‘blogObjects.ts’ file:
Now, if you run the app, you probably will not see any difference. The content fetched from the pages remains pure unformatted text, even in the case you have tried to use some HTML code.
In order to see HTML content it is necessary to use the ‘innerHTML’ property. The ‘innerHTML’ is an HTML DOM (Document Object Model) property. It represents the HTML content inside an element as a string, allowing us to get or set the HTML markup within an element. So, in our case, we have slightly to update the template of the MainComponent, like this:
If you experiment with some HTML content, you’ll notice that the outcome is quite impressive! But, if you examine it more closely, you’ll realize that in-line styles, like those for color and font, aren’t displayed/rendered. This happens due to Angular’s encapsulation and security mechanisms. This is generally known as sanitization, and Angular -by default- sanitizes dynamic HTML by stripping out in-line styles to prevent security risks like XSS (Cross-Site Scripting).
This feature isn’t really necessary for us because we own the HTML content and know it’s completely safe to display. There are a few other ways to properly render HTML content, but the best approach is to use Angular’s ‘DomSanitizer‘ service.
In our situation, we can inject the DomSanitizer service into the MainComponent. This allows us to bypass security measures since we trust the HTML content. We can use the DomSanitizer’s built-in function ‘bypassSecurityTrustHtml()‘ to get SafeHtml content, which we can then use in our template. The updated code is shown below.
Here’s the updated MainComponent class:
And here’s the updated MainComponent template:
Additionally, it’s worth mentioning that we can also include and display images in our HTML content, as long as the image source resides in a secure and accessible folder. In this case, we will use a subfolder called ‘/images’ within the ‘/assets’ folder.
I’ve included some very basic HTML content to give you an idea of what it looks like. You can see the outcome below:
👉 Find the last updates in this commit of the repo.
Storing HTML content into the database
What to store
Up to this point, we’ve seen how to fetch and display HTML content (fragments) from external .html files. However, it’s pretty common to store HTML code in a database like MariaDB for dynamic web applications, including blogs and content management systems (CMS). It’s important to remember that we should generally steer clear of saving entire HTML pages (like those with `<html>`, `<head>`, and `<body>` tags). Instead, we should only keep the parts that need to change dynamically, such as blog entries or specific sections of a page (HTML fragments). Our Angular app will take care of everything else, including the overall page layout through the templates of the components.
Database column data types, sizing, character encoding and escaping
One important point to consider is the data type of the table column you plan to use. In MariaDB (and MySQL), some commonly used column types are ‘TEXT‘ (which can hold up to 65,535 characters), ‘MEDIUMTEXT‘ (with a maximum length of 16MB), and ‘LONGTEXT‘ (which can store up to 4GB). The choice of which type to use really depends on your estimates of the average length of the HTML content you intend to store, as well as the overall storage capacity of your database.
You can opt for the ‘VARCHAR‘ type, which allows you to set a variable length but has also a maximum limit of 65,535 characters. One advantage of using ‘VARCHAR’ is that you can create an index on a ‘VARCHAR’ column, unlike the other types mentioned earlier. However, it’s uncommon to index a column that contains HTML content. Instead, it’s more typical to use other columns that hold metadata, such as titles, slugs, and dates, for indexing purposes.
It’s important to understand that when you use `TEXT-types` in MariaDB, it doesn’t necessarily take up the full amount of space available. The storage for `TEXT-types` columns is flexible, which means it only uses the space needed for the actual length of the string you store, along with a little extra for overhead. Our choice here is the ‘MEDIUMTEXT’.
Additionally, it’s crucial to ensure that the HTML content is saved with the right character encoding, like UTF-8, to properly handle special characters and various types of content, including languages other than English. Just keep in mind that using multi-byte characters can impact the actual length of the HTML content you’re storing. However, you can always consider compressing the data (e.g., via gzip) before storing it in the database, and then decompressing it upon retrieval.
Escaping
If you’re going to manually update the HTML content in the database, especially when using SQL commands like INSERT or UPDATE, it’s really important to escape special HTML characters like `<`, `>`, and `&`. If you don’t, your SQL statement could fail. Escaping these characters is also crucial when rendering to prevent any issues with other HTML in your app.
For your convenience, I’ve prepared a Bash script that escapes necessary HTML characters (such as `<`, `>`, `&`, `”`, and `’`) so the resulting content can be safely used in an `UPDATE` or `INSERT` SQL statement for MariaDB. This script reads the HTML content from an ‘input’ file, escapes the characters, and outputs the escaped string to the ‘output’ file.
Here is a Bash script:
The script takes care of certain special characters that could create problems when using an INSERT or UPDATE SQL command to save HTML text in a database column. It changes these special characters as follows:
- the ‘ with \’
- the \ with \\
- the ” with \”
You need to provide two parameters: the input file and the output file. Once you run it, you can easily copy the output text for use in your INSERT or UPDATE SQL command.
Here’s an example that shows how to use the escaped result from the script above. It updates the ‘articleContent’ for the article with ‘articleId’ = 7 in our database table ‘testarticles’:
The result is pretty good:
👉 Find the final commit of the repo here.
Note that, some additional refactoring and code enhancements are included in the last commit, like keeping the last displayed article when the following content is a page rather than another article.
Before wrapping up this post, there’s one more important point to be mentioned. Up until now, we’ve only looked at HTML content (fragments) that would normally go inside the <body> tags, instead of a full HTML page. If you want to load an entire HTML page, you can use the <iframe> tags in the component’s template and directly specify the page location with the [src] attribute, (instead of going through the DataService).
<iframe [src]="<pageUrl>" width="100%" height="600px" style="border:none;"></iframe>For example, you could modify the MainComponent like this:
and its template can be updated accordingly, e.g. similarly to:
The result looks like this:
Finally, keep in mind that not all websites permit their pages to be displayed using <iframe> tags. For instance, if you try to set a Medium page as the source, you’ll encounter an error that looks something like this:
Refused to frame ‘https://blog.stackademic.com/’ because an ancestor violates the following Content Security Policy directive: “frame-ancestors ‘self’ https://medium.com”.
So, that’s all for now. We made it!
Thank you for taking the time to read!
Keep an eye out! Our next post in this series will cover how to use Markdown on our blog site!