Salts & UUIDs with MongoDB & ATLAS Triggers

221030
A case of a practical implementation of UUIDs and Salts when working MongoDB and ATLAS cluster Triggers.
Intro
This post is a case of practical implementations of UUIDs and Salts when working MongoDB-ATLAS cluster. The topics that will be discussed are:
- The MongoDB _id key/field
- Using standard UUIDs – the MongoDB uuid() function
- Using a MongoDB ATLAS Trigger
- Using the npm external dependencies (uuid and bcrypt) with ATLAS trigger function
- Hashing and salting with bcrypt with a MongoDB ATLAS trigger function
Prerequisites
It is supposed that you understand the basic database concepts, UUIDs, and password salting and hashing. The previous post of mine gives some grasp on those subjects.

Also, you should have enough familiarity with the MongoDB, a No-SQL document-based database.
Moreover, in order to follow the examples of this post, you must have access to a running MongoDB instance and the CLI tool mongosh. [ Here you can find how you can install it in your system as a stand-alone tool]. If you wish you can take a look at my post below on how to create and start using a MongoDB Docker container.

https://medium.com/@zzpzaf.se/mongodb-in-docker-bfa77346b389
Alternatively, you can have access to a MongoDB ATLAS database cluster. For this purpose, you can also use one of my other posts of mine, on how fast you can create a Free Shared Database Cluster:
For those who are coming from the RDBMS world, it is worth mentioning, that a MongoDB database object is similar to an RDBMS schema or database, containing tables, views, and other RDBMS objects. Respectively, a MongoDB collection is analogous to a table, and a MongoDB document can be considered a table row. So, a MongoDB database can group together collections, a collection holds documents, and finally, a document consists of a number of objects of key-value pairs, and/or even other documents.
Now it’s time to start by first looking at how MongoDB deals with unique ids.
The MongoDB _id key/field
MongoDB automatically generates a special (_id) property/key/field each time a new document is inserted into a collection. You have the option to use your own _id value when you insert a new document, but in most cases, we leave MongoDB to auto-generate it.
The _id is a special data type for MongoDB. It is actually a MongoDB object (ObjectID) of BSON type with a 12-byte size. The 12-byte _id consists of the following:
- 4 bytes representing the seconds since the Unix epoch
- 3 bytes specific to the host — a machine identifier
- 2 bytes of the process id, and
- 3 bytes representing a counter, starting with a random value
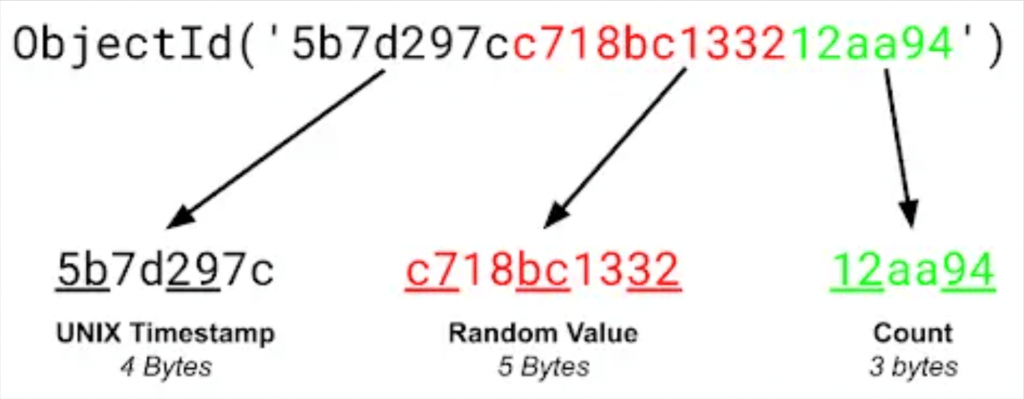
The _id fields can be considered unique. They are ordered (because of the counter at the end), and they are used -by default- as the ‘primary keys’ of MongoDB collections.
When you create a new collection by initially inserting a couple of documents as we do with the command below,
db.demousers.insertOne({"username": "panos","password":"panospassw1"})
db.demousers.insertOne({"username": "panos2","password":"panospassw2"})
the _ids are automatically generated as insertedId:
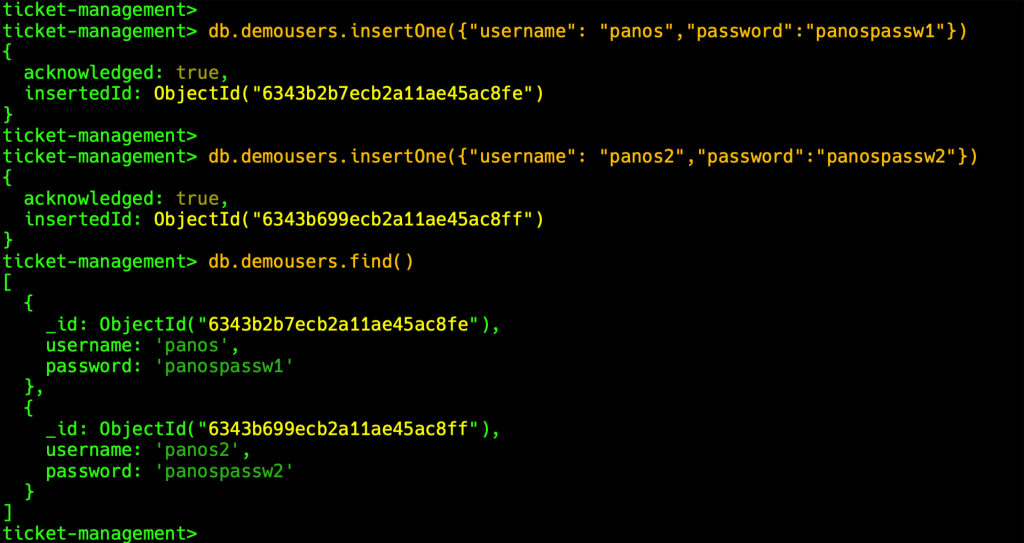
As you can see above the auto-create _ids have sequential values:

Using standard UUIDs – the MongoDB uuid() function
However, as you can understand, they actually are not standard UUIDs. Thus, if you wish to use real UUIDs in your collection, MongoDB offers us the UUID() built-in function. The UUID() function is quite flexible, allowing us for using it either with or without an optional UUID string (e.g. previously generated by the backend/middleware). In case we use it without any optional parameter, MongoDB generates a random UUID in RFC 4122 v4 format.
Lets’ see how it works:
db.demousers.insertMany([{"id": UUID(),"username": "panos","password":"panospassw1"}, {"id": UUID(),"username": "panos2","password":"panospassw2"}])
Alternatively, if you don’t wish to use a separate field (e.g. id), you can use the UUID() function to pass a real UUID value to the MongoDB (_id) field, like that:
db.demousers.insertOne({"username": "panos","password":"panospassw1"})
db.demousers.insertOne({"username": "panos2","password":"panospassw2"})
Using a MongoDB ATLAS Trigger
Using an ATLAS database cluster
So far, so good! But how we can make MongoDB do it automatically? e.g. without using the UUID() function as the value of a field when a new document is being inserted in a collection?
Well, there is no way to do that within a simple MongoDB stand-alone version. One can think that it might be possible, to manage to do that, using somehow a set of appropriate schema validation rules in combination with a BSON type. However, unfortunately, this is not supported. At least till the time this post was written, MongoDB JSON schema
validation rules omitted some of the standard features and keywords of draft 4 of JSON Schema. Amongst them, is the $default keyword which might have could do the job.
Do we have alternatives? Well, we have some options. One option is to use our backend/middleware layer (without, or with an ORM/ODM, such as the mongoose in NodeJS applications). This is OK and we can do that. However, if we wish to automate and separate the process, we can assign this task to the data tier, using a trigger.
The stand-alone Mongo DB version does not yet support triggers. However, the cloud services of the MongoDB ATLAS, support them. Note that triggers (Database, Authentication, and Scheduled triggers) are available in MongoDB Atlas clusters, running MongoDB version 3.6 or later. For our case, we will need a Database trigger to be fired upon new document insertion.
First of all, if you haven’t yet done so, go to the registration page of MongoDB Atlas and register yourself for a Free Shared Database Cluster. You can see this post of mine (I’ve also mentioned it before) for a quick guide.
After you have created your Free Shared Database Cluster, you can use your locally installed mongosh CLI to test it. [Note: you can see here how you can install just mongosh in your system, without installing the MongoDB].
You can connect using a script similar to:
~$ mongosh "mongodb+srv://cluster0.hrqghnf.mongodb.net/ticket-management" --apiVersion 1 --username user1 --password u1passw1
Now we are ready to create our first Trigger. Here, we are going to create a Database trigger. At the official site, you can find quite useful info for Database Triggers, a comprehensive guide also about Database Triggers, and furthermore about how to Configure Database Triggers.
MongoDB Atlas Database triggers should be powered by a function written in JavaScript. Database triggers are fired upon the following 4 types of events: Insert, Update, Delete, and Replace. Here, what actually we need, is to fire the trigger upon an insert event.
So, go back to the MongoDB ATLAS management console and click the Triggers link on the left pane. Since we haven’t yet created ant trigger so far, you will be prompted to add a new one:
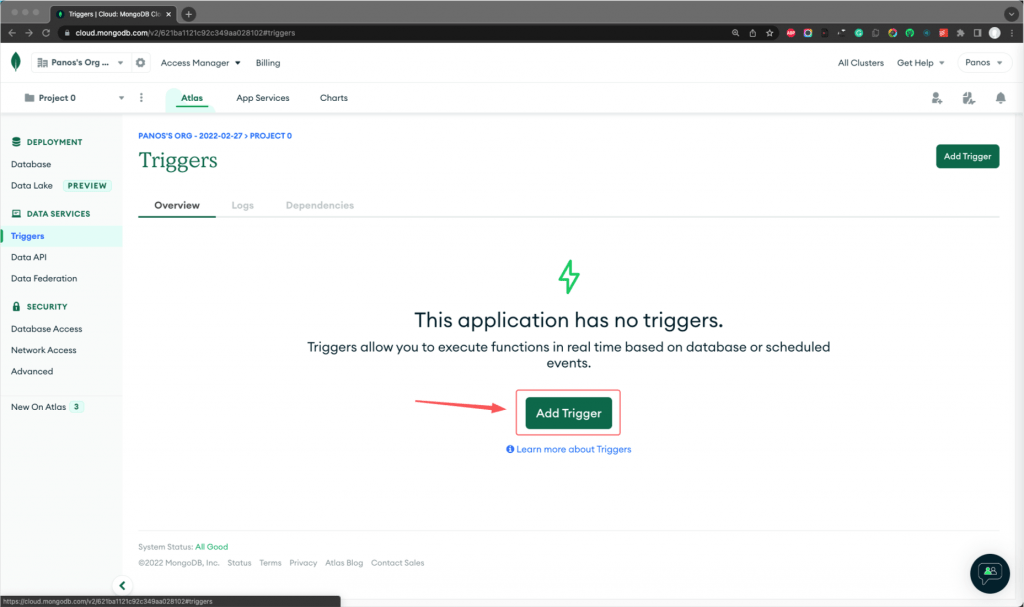
Then, select the options for your trigger, such as trigger name, if it should be enabled, if you will follow the Events order (in case you have defined multiple triggers), your cluster(s), your data sources/database names, if the trigger will deal with a full document, the operation (event) type, etc. You can find details about database trigger configuration in the official documentation, here.
The important part is located at the bottom of the screen. This is the editing window, where we can define the trigger function.
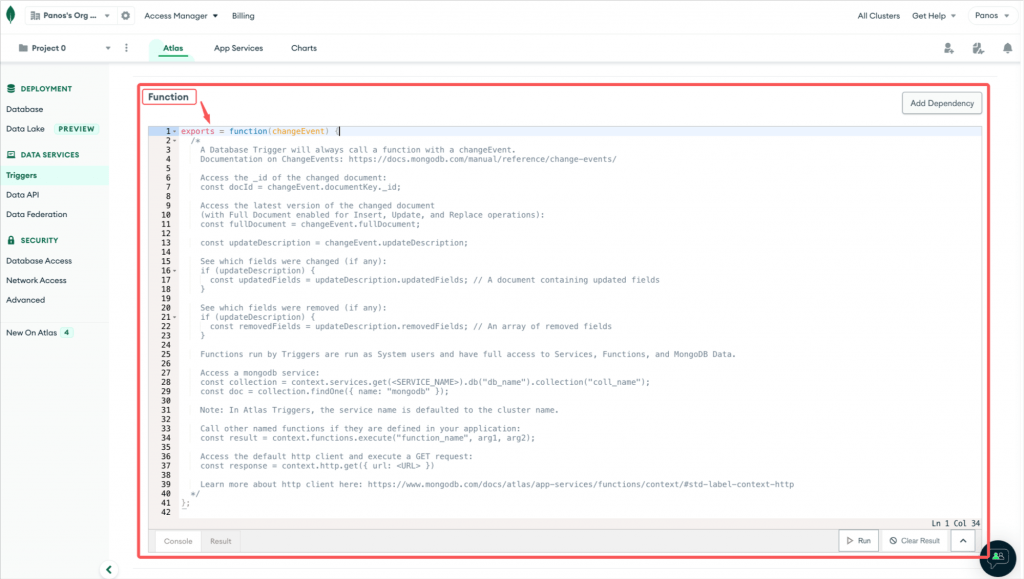
This is the function that will be fired for our trigger event (here it is about the Insert event). As we’ve said, we should use just plain JavaScript to define that function. As you can see above, the ATLAS passes the “changeEvent” object as the only parameter into the trigger function.
The “changeEvent” object offers us all the related info about the newly inserted document (_id, fileds, timestamp, etc.). The object has a similar role as the “NEW.<field/column>” keyword used in RDBMS triggers (e.g. in MySQL and Oracle), to indicate the value of the field/column that has just been inserted into a new row, and can be changed by the trigger.
The Database change event objects have the following general form:
So, here we are! Recall that what we want is to create a trigger function that will set an automatically generated UUID value to an id field. So, suppose, we want to have the “uid” field of a document to be set with such UUID value, upon insertion of any new document in our collection.
One can think that you can use the MongoDB uuid() function we have seen before. However, I don’t think so. I can’t see how we can access a database function, like the MongoDB uuid() function, from within a trigger function. What we can access is just the “changeEvent” object, and its fields. So, an initial option we have is to use built-in JavaScript functions, such as Date and Math functions. Then adding some regex ‘alchemy’, we can have a UUID-compatible value. Below, you can find such implementation with JavaScript code that can do the job:
After that, you can check that our trigger works correctly by inserting a new document (e.g. by using mongosh):
db.demousers.insertOne({"username": "panos1","password":"passw1"})
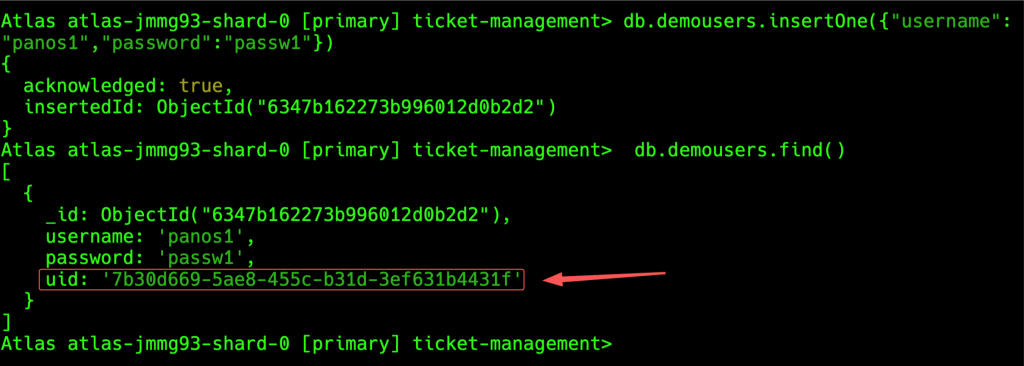
Also, you can see below the difference, between the embedded MongoDB uuid() function and the trigger action:
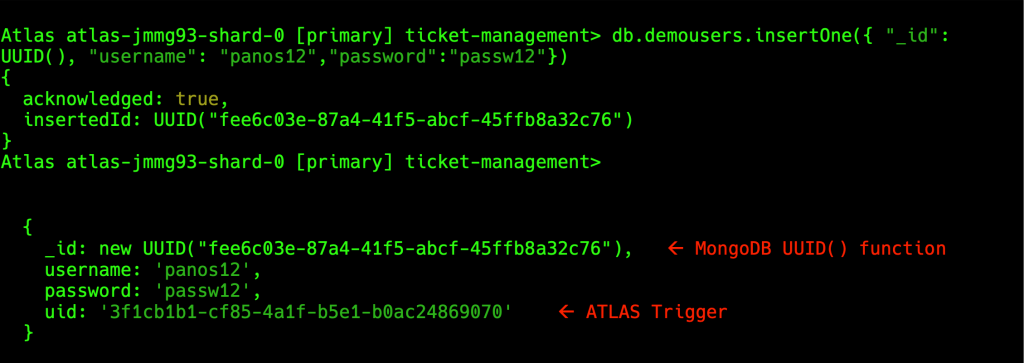
This works OK. But, can we use the existing “_id” field, instead of the new one “uid”? The answer is NO.
Trying to update/change the _id field, eg. { $set: { _id: myUUID() } } you get an error. See it using the Triggers Logs:
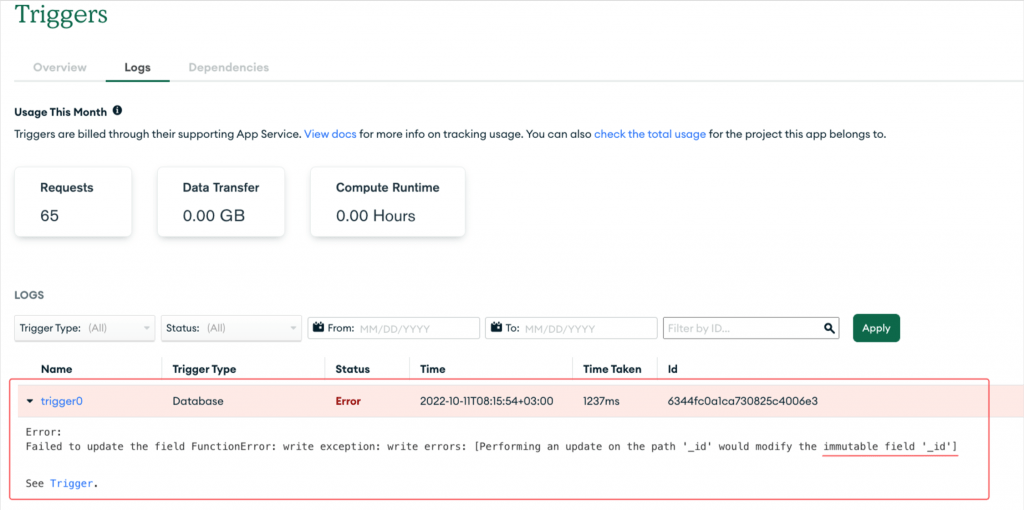
So, as you can see there is no way. Let’s proceed with some improvement.
So far so good. However, a better approach is to avoid using the regex string ‘alchemy’ drawbacks and use a standard UUID value. This for example can be done by using a standard npm package, such as the npm uuid() module. How we can do that?
Using the npm modules as external dependencies (uuid and bcrypt)
MongoDB ATLAS supports external dependencies, such as standard npm packages. So, we can add our preferable dependencies and use them with our trigger function. (Read more at the official documentation). Generally, there are 2 options for installing npm modules as dependencies of Atlas triggers. One option is to use Atlas GUI and add them one-by-one using the name of the module found in npm repository. However, if there is a no-nonsense number of dependencies to be used, then a better approach is to install them locally and then upload them as a compressed .tar.qz file. Here, we will just see the basic steps for how we can do that, using real case examples.
Our case dependencies
The uuid package supports RFC4122 version 1, 3, 4, and 5 UUIDs, so, it might be really a good option for our purpose. Furthermore, since we are going, a bit later on, to deal with password hashing and salting, the bcrypt.js (or here) module is our preferred choice here, mainly because it has zero dependencies. So, we will also add the bcrypt.js module together with uuid module.
So, let’s start adding those packages. You have to use your local computer.
First, create a folder for your dependencies (e.g. name it “atlasup”). Then, install the dependencies uuid and bcrypt (and/or any other module you wish). We will install them using the standard npm package manager.
npm i uuid
npm i bcrypt.js
After the installation of the packages locally, create a compressed (.tar.qz) file for the whole node_modules subfolder:

That’s it. The final step is to upload the create .tar.qz file via the ATLAS Manager console. The following screenshots demonstrate how you can do that:

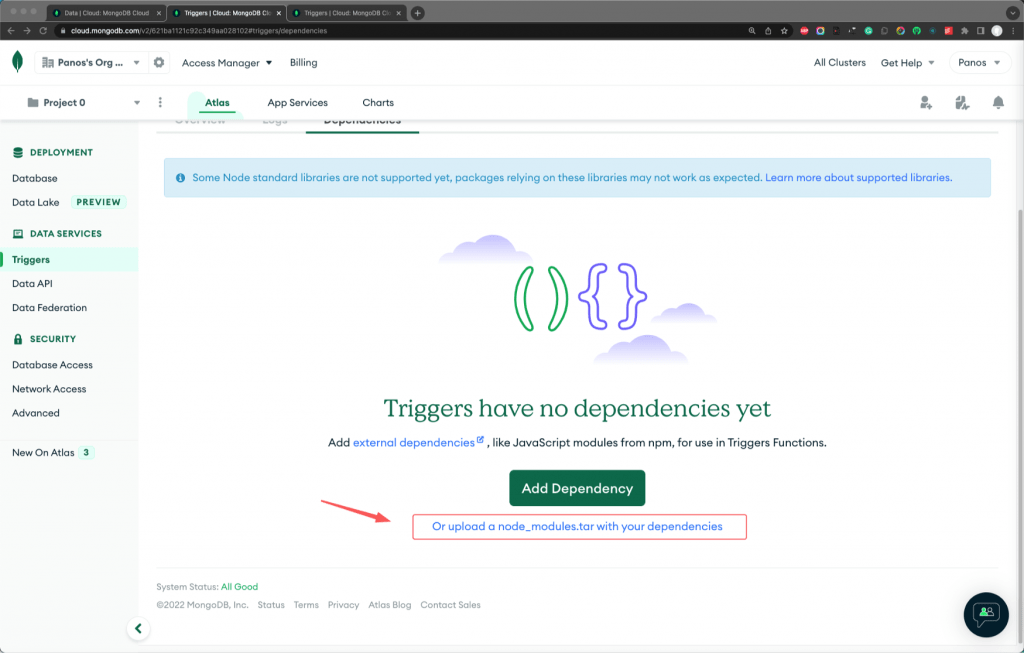


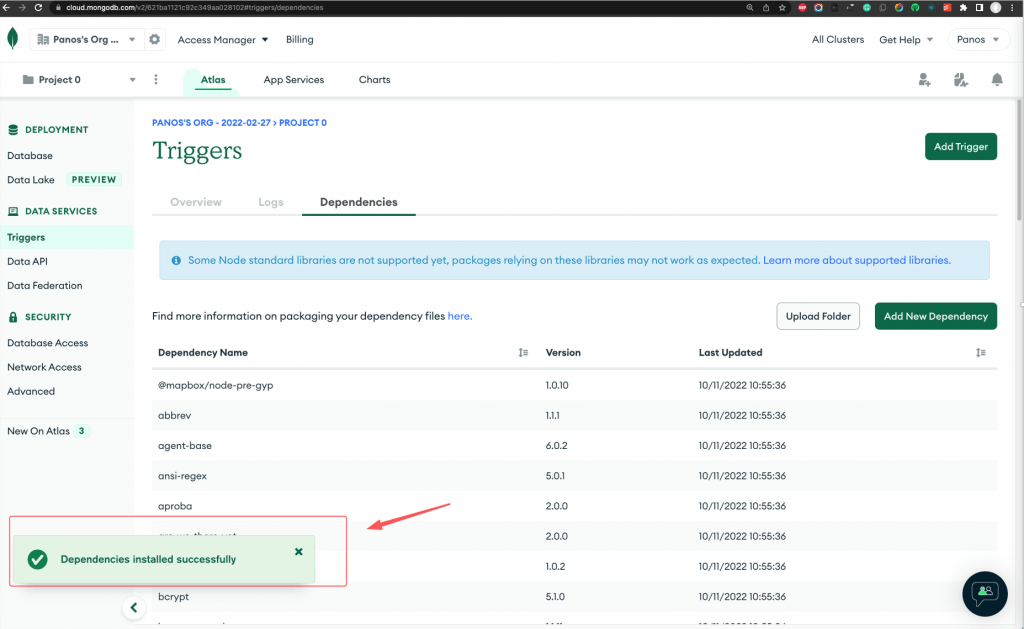
After the upload, you can see all the dependencies of the node_modules packages in the ATLAS Dependencies window. That’s it! Now, we are ready to use them.
However, before using them, you should be aware of the following 2 limitation points of ATLAS App Services:
- ES6 (import) syntax is not supported so far, so you have to use the CommonJS (“require”) syntax.
- Global scope with the trigger function editor window is also not supported. You have to place “require” statements inside a function scope.
That said, let’s see how our trigger function can be written for using the uuid dependency package.
That’s all! Now we can test it, by inserting a new document in our collection:
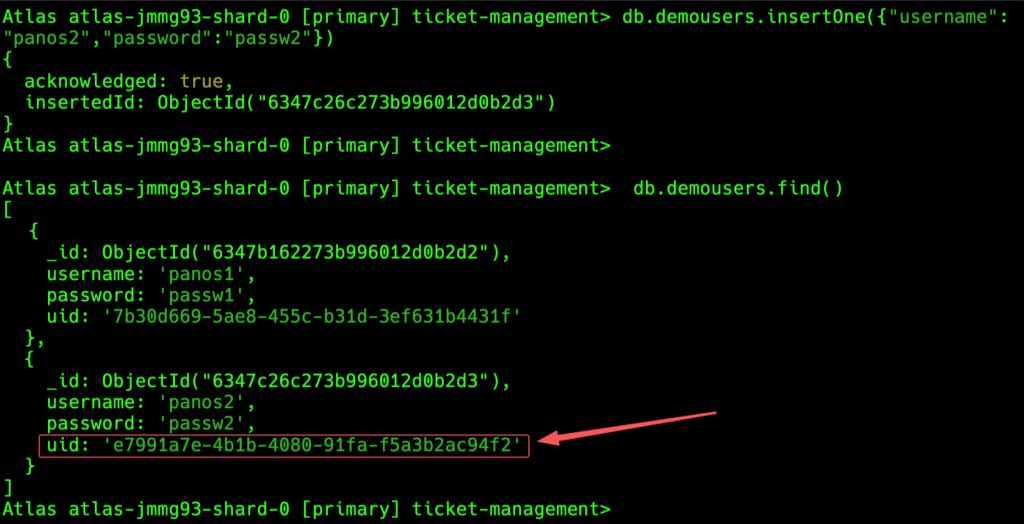
Cool! It works as we expected. No more UUIDs. Time for salting and hashing!
Hashing and salting with bcrypt with a MongoDB ATLAS trigger function
As we’ve said we are going to use the bcrypt.js dependency. For our purpose, we can either create a new trigger and function, or to modify our existing trigger. Here, we are going to modify the existing Trigger and its function. So, click on it, or select “Edit Trigger” by pressing the 3-dots button at the Action column (right end).

First, we will rename the existing trigger ‘trigger_uid’ to ‘insert_trigger_uid_and_passw_hash1’ to make some sense of what it does. After that ensure about its settings:
- Name: insert_trigger_uid_and_passw_hash1
- Enabled: should be Switched-On
- Skip Events on Re-Enable: We don’t care right now, leave it Switched-Off
- Event Ordering: Also, we don’t care right now, since we have just 1 trigger for just Insert event.
- Link Data Source(s): Leave it empty – We don’t have/use external links
- Cluster Name: Cluster0
- Database Name: ticket-management
- Collection name: demousers
- Operation type: Only Insert should be ticked
- Full Document: Should be switched-On (we need to access the document fields before to modify them – actually we need the password value provided by the user
- Document Preimage: Leave it switched-Off, because we use just an Insert Trigger.
- Select An Event Type: Of course the Function should be selected.
Lastly, we can proceed to update its function. Not much to do. We have just to use the “require” syntax to import the bcrypt library. Then we can use the fullDocument object provided by the changeEvent object, and get the plain password. Then we use the bcrypt to create a default salted hash value. Using bcrypt.js we can first create a salt create via the bcrypt.genSaltSync() function or we can directly create the hash value with an auto-generated and added salt via the function bcrypt.hashSync() -which is what we will do here.
Finally, we update (set) the values of uid and password fields. The whole function is given below:
That’s it. Let’s test it, by adding a new user to our demousers collection.
Access your terminal and use the mongosh to connect to your ATLAS Cluster and ticket-management database. Then use the insertOne() function, as it is seen below:

It seems that it always takes some noticeable time to trigger action.– You cannot detect immediately the trigger effect. So, as you can see above, the first time you query your collection, you will see no results.
The trigger’s entry in ATLAS Logs, means the trigger finished his job.

So, after re-querying the collection, you can see the results:

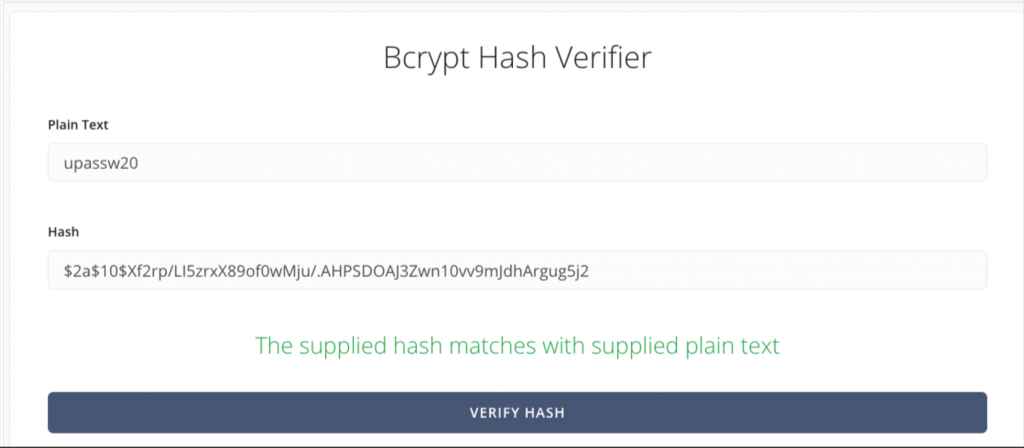
Cool! It works. You can use any bcrypt online verifier to check it, for instance:
That’s it for now! I hope you enjoyed it!
Thanks for reading ? and stay tuned!
