
JWT and Passport JWT Strategy for your NestJS REST API Project

220319
A step-by-step and detailed implementation
Building blocks – Short Intro
When it comes to apps authentication (e.g., users’ authentication), the JSON Web Tokens (JWT) based Authentication is one of the most widely spread options, amongst other choices such as browser Cookies and Session Authentication, OAuth/OAuth2, and OpenID Connect.
Anyone can adopt and implement JWT in any project. For instance, NestJS offers us the solo @nestjs/jwt module that allows us to integrate JWT in our project. However, it requires a lot of boilerplate. Thus, using an external tool/package, specialized in authentication, might be the preferred solution.
The Passport package is a massively used NodeJS library, whose “sole purpose is to authenticate requests, which it does through an extensible set of plugins known as strategies. Till the time this post was been writing, the Passport arsenal was consisted of about 537 strategies! Especially, for the JWT based Authentication, the Passport, of course, offers us the respective JWT strategy.
Since the Passport is the most popular NodeJS authentication library, NestJS offers its own @nestjs/passport module which allows straightforward integration of the Passport to any NestJS application. And this post aims to give you a hand on how to implement it. Actually, we are going to see how we can easily protect some of our routes (endpoints) using JWT and Passport’s JWT strategy. Safeguarding routes (endpoints and even entire Controller routes) is pretty straightforward using the AuthGuard() function provided by the Passport package.
NestJS documentation provides a quite similar example, and it is presumed that you have already taken some of the steps described there. However, here we will go through 2 steps.
- First, we will use JSON Web Tokens for users’ authentication, and
- then will continue to protect our routes (basic endpoints) using the Passport package and apply the JWT Strategy.
A base Repository
For your convenience (with respect to your time), you can use an example GitHub repo of mine. The repo’s key points are summarized with the following bullets:
- The repo (as in the NestJS Documentation) already includes both the AuthModule and the UsersModule respectively, as well as their Controller and Service classes.
- Instead of using the UsersService for the basic CRUD operations, the repo uses a separate solo @injectable class, the DbRepo. It serves both the AuthService and the UsersService. [You can read how to use a solo @injectable class as a singleton Provider at my post at DevGenius at MEDIUM or at my site]
- The DbRepo obtains some users in an array who have been pre-set in the UserDB class.
- class-validator and class-transformer packages are installed. DTOs and entities are defined in the src/dataObjects folder, and they are decorated accordingly. [See more at my post at MEDIUM or at my site]
- The repo uses externally defined variables, so the @nestjs/config package is already installed, and it is declared globally in AppModule. The external variables are defined in the src/config/.env.dev file. [See more at my post at Better Programming (at MEDIUM) or at my site]
- Also, the repo uses the Joi schema validation tool (which is also is being used in NestJS Documentation for object schema validation). Moreover, a JSON object schema validator has been defined and decorated (using the appropriate Joi property decorators) in the src/config/config.schema.ts file. It is being used for the externally defined variables in the src/config/.env.dev file.
- The repo has defined and uses (via AuthController and UsersController) the following endpoints
- auth/signup
- auth/signin
- users/
- users?
- users/:id/
It also uses the /tickets Global Prefix, so for accessing users, you have to use:
http://localhost:3000/tickets/users
Get the repo in your machine
In your machine, change the current working directory to the location/folder where you want to clone the repo.
e.g. use the following command in a terminal window:
git clone https://github.com/zzpzaf/nest-external-config-env.git
This creates a new folder named ‘nest-external-config-env’ with all repo’s folders and files. Jump in it and get all the node packages required for the project:
cd nest-external-config-env
npm i
Now, you are ready to grab your code editor/IDE. (I use the VS Code) and open the ‘nest-external-config-env’ folder. If you wish, you can run the app In a terminal window:
npm run start:dev
Moreover, you can use the Postman tool and check some of the endpoints. e.g.:
http://localhost:3000/tickets/users
etc.
That’s it! Now, we are ready to start. So, let’s go!
The @nestjs/jwt package
The @nestjs/jwt is the JWT utilities module for NestJS (it is based on the jsonwebtoken package). It allows us to use JSON Web Token – JWT for authenticating a user.
Installation
npm i @nestjs/jwt
Implementation
The package actually offers us a Module, the JwtModule, which in its turn exposes a service, the JwtService.
The JwtModule
The first step is to import the JwtModule in the imports array section of any of our project modules. So, since we want to use it for user tokens authentication, in our case, we have to import it into our AuthModule. Furthermore, we have also to configure it using its register() method. A fundamental configuration can just include a symmetric secret (a code), and the expiration time of a generated token, e.g., in seconds. For instance, we can use it like that:
Of course, the package also offers some other configuration options, e.g., using asymmetric algorithms for encryption/decryption of tokens. If you want to go through them, then, the official documentation is a good source for that.
However, since using passwords or secret codes as string literals inside our source is not a good idea, a better solution is to define them externally, in a .env configuration file that is kept securely. Note, that we have already done it, in the .env.dev provided with our cloned repo. Actually, this is the .env.dev file provided with the repo:
APP_PORT=3000
APP_GLOBAL_PREFIX=tickets
JWT_SECRET=abcdABCD1234554321
JWT_EXP_H=3600s
JWT_EXP_D=1d
Also note, that you should never expose publicly your passwords or secret codes. Even more, you have to include in your .gitignore any file with such sensitive information. However, this is not true in this case here, for demonstration purposes of this post.
So, we can register the JwtModule using the externally provided parameters, through the ConfigService, like that:
Note: As it is previously mentioned, you can see more about externally defined parameters at my post at Better Programming (at MEDIUM) or at my site.
As you can see in the above code, we use the asynchronous version of the register() function, the registerAsync(), which is a more appropriate approach, since we have to load the parameters asynchronously because the .env.def file is an external file.
Moreover, we provide those parameters dynamically, using the useFactory syntax, and via injecting the ConfigService. For that purpose we have defined the jwtFactory constant, which returns an async function object with JwtModuleAsyncOptions, that in its turn, it is needed to pass it in, in the registerAsync() method and register the JwtModule. However, alternatively, we can also do that inside the imports array section, without defining the jwtFactory constant, like that:
The coding style is up to you.
[You can always keep reading the official documentation, for more about: dynamic modules and the useFactory()]
The JwtService
Next, the JwtService, that is being exposed from the JwtModule, should be injected into the AuthService (via the AuthService constructor), like that:
What we actually want to do here, is to accept the user credentials (username and plain-text password) provided in the request body of the ‘Sign In’ process, and then validate them just once. After only a successful validation, we can ask the JwtService to provide us with a token, which should be returned back to the user as a response. In an unsuccessful validation (wrong username or user does not exist or wrong password) we can inform the user accordingly.
JWT Payload
One more thing, that we have to stay a bit, is to define a payload. This is generally, a JSON object, that is needed in order to create a JWT. [Read more at: https://jwt.io/introduction/] Defining a payload depends of your own business logic and your specific needs. But in any case, avoid having a too simple payload, e.g., consisting just from username.
Here we are going to use a 2 properties JSON object as our example payload. It should consist of username and typeid. So, apart from the validity of username and password, the user has to have the appropriate typeid in order to be able to access the APIs endpoints.
Furthermore, a good practice is to define our own interface for our payload object regardless if it is simple or not. This is mainly for consistency and extensibility purposes and can help us avoid some related errors.
Note that in our cloned repo, we use a separate sub-folder (the datObjects folder) that holds all data types objects of our project. So, create a new typescript file, name it ‘user-jwt-payload.interface.ts’, and put the following example code in it:
Create and return a JWT
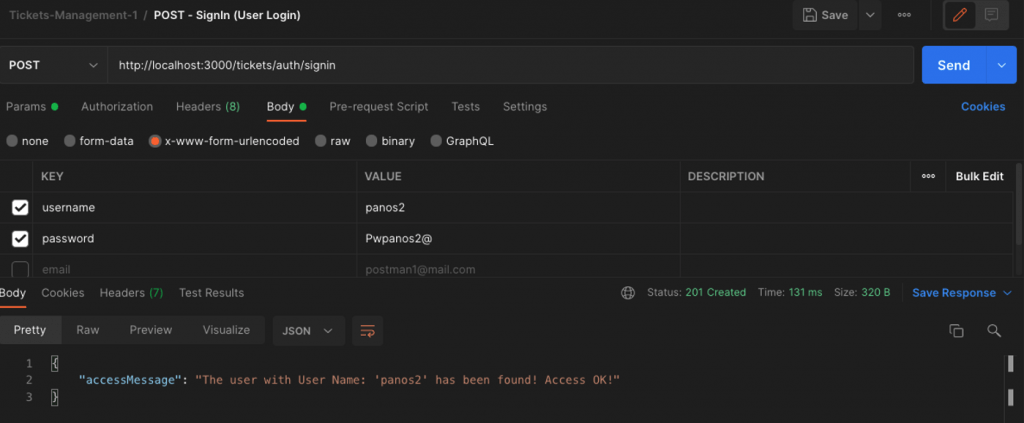
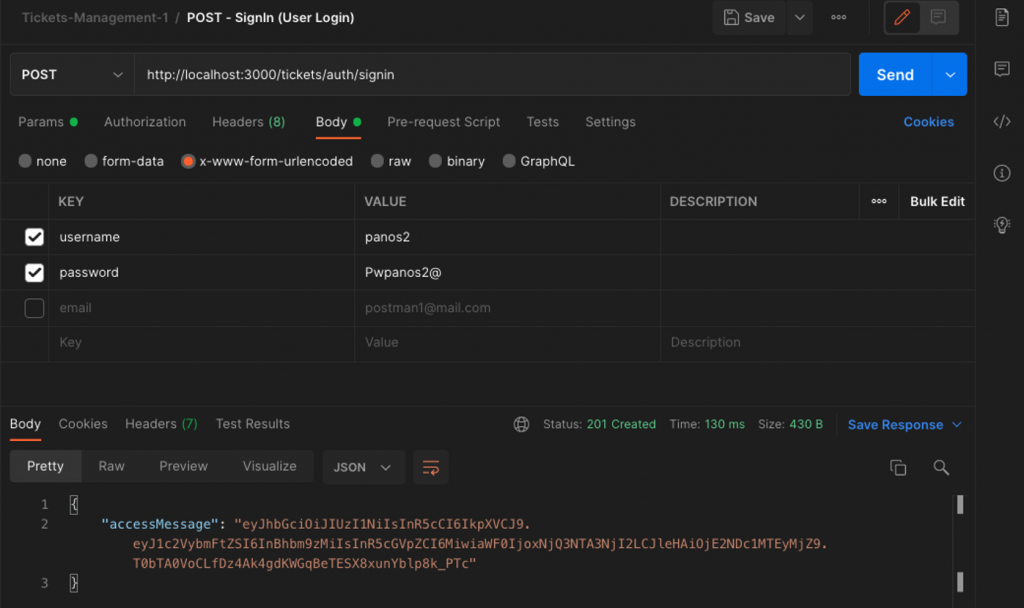
Now, we are ready to validate (or not) a user and if the validation is OK we can return a token to him/her. We can do that, easily enough, by using the JwtService in the signin() method in the AuthService, like that:
As you can see, we have used just used the built-in JwtService function sign() by passing in it the payload object. The function returns us the token which then is sent back to the user as a response object. It is so simple! Isn’t it? You can use the Postman to test it. For instance:
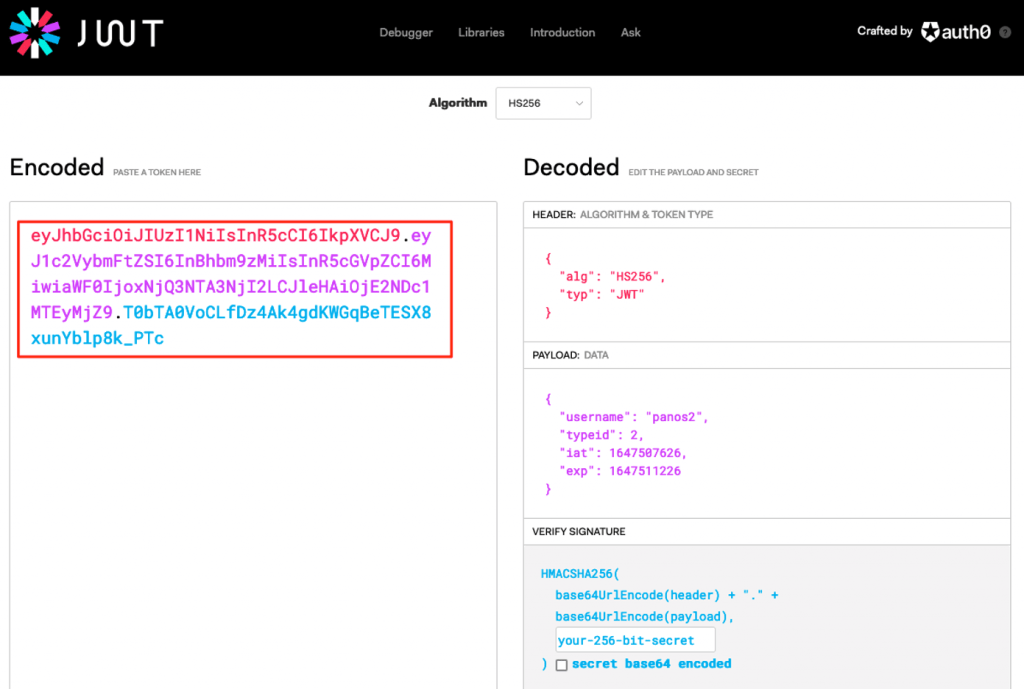
Moreover, you can also check online the generated token, at https://jwt.io/ . e.g.:
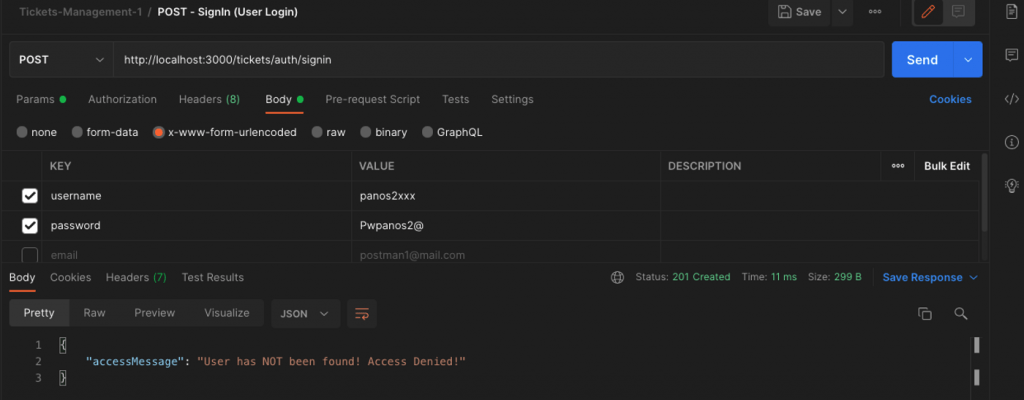
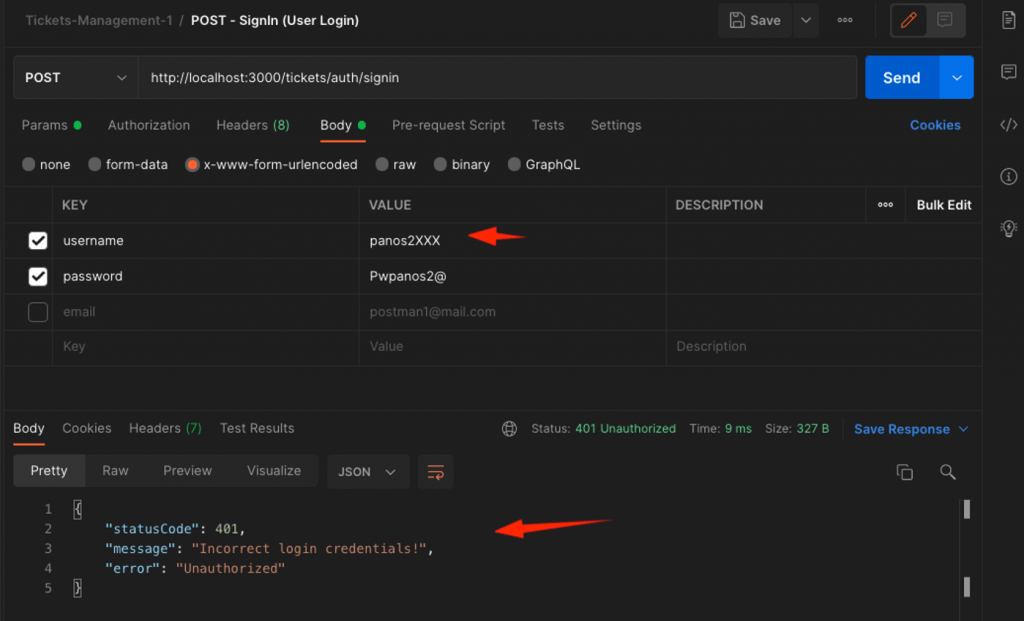
You can also test for invalid credentials:
Note: In order to make clear that the return object is a token (a JWT) and not just a message (a string), please rename the ‘accessMessage’ to ‘accessToken’, in both the AutService and AuthController.
Validation through a JWT
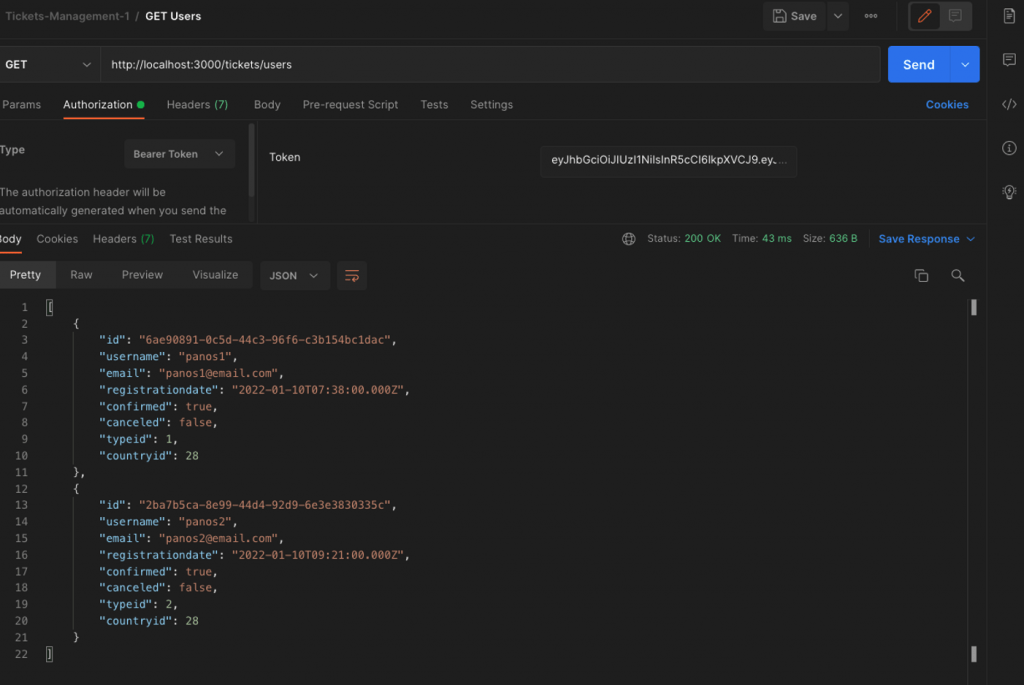
Now, each time we want to check a request from a user in an endpoint, we will check the validity, only of the token provided (a JWT provided as Bearer Token in the Authorization header of the request). No usernames and password anymore! The JwtService, via its built-in function verifyAsync(), will do the job! Let’s see how can do that for a specific endpoint, e.g.: for users/ endpoint. However, first we have to extract the Bearer token provided in the authorization header (well, if any). We can do that for example, for the @Get() getUsers() handler method in the UsersController. We will use the @Headers decorator to obtain all the headers passed in, and then we will extract the Bearer token from the ‘authorization’ header property. We can do something like that:
Next, we can define and call a private method to check the validity of the obtained bearer token using the verifyAsync(), mentioned above.
Since we will need both the JwtService, and the ConfigService (for obtaining the secret key which should be also provided in the verifyAsync() function) we have to deal with 2-3 code adjustments, before we proceed.
In the cloned repo’s UsersModule, you can see that we have already taken care to import the AuthModule, however in order to be able to use/inject the JwtService, we have to export the JwtModule from the AuthModule. So, add the exports property array in it and add the JwtModule. The AuthModule should look like this:
Now, we are ready to inject the JwtService in our UsersController.
As we have said, we will also need to inject the ConfigService as well. But since it is globally enabled in AppModule (isGlobal: true), there is nothing to do more. We are ready to inject it into the UsersController, as well.
So, let’s inject both of them. The UsersController constructor will be similar to:
Finally, we can create a private method to check the validity of the obtained bearer. We can name it ‘isTokenValid’:
As you can easily understand, we pass into the jwtService.verifyAsync() function 2 parameters: the bearer token and the JWT secret. If the bearer token is invalid the method throws an HttpException, else it returns an object with the full payload decrypted. The payload object consist of: username, typeid (which are defined by us when the token was created) and the iat and exp properties which are automatically added by the JwtService. iat represents the creation and the exp, the expiration time of the token (the difference is as expected 3600 seconds).
What we actually need from the payload object returned, is just the ‘username’ and the ‘typeid’.
‘username’ is necessary to check if a user with ‘username’ is still existing. Because, there is always a chance, the user to have been deleted, after the token has been generated. So, we have to check the user existence, and then decide if the token is valid. Thus, we use the ‘username’ to check if the user exists in our DbRepo.
After that, we check the typeid. For our case, a token is considered as valid, only for users with typeid 1 and 2. If this is true, then the IsTokenValid() returns true. Note, that, we remain ‘stuck’ with the typeid value obtained from the payload, (not from the user.typeid property from the user found), so any typeid value changes are ignored.
So, let’s call it from the getUsers() handler.
The handler becomes similar to:
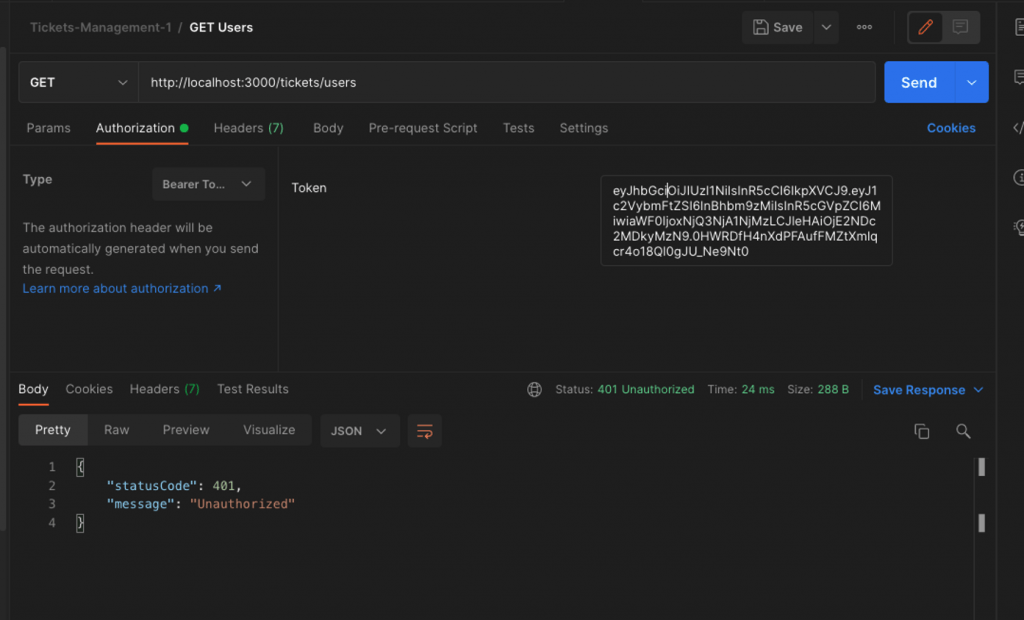
That’s it. We can now use the Postman and test it a bit.
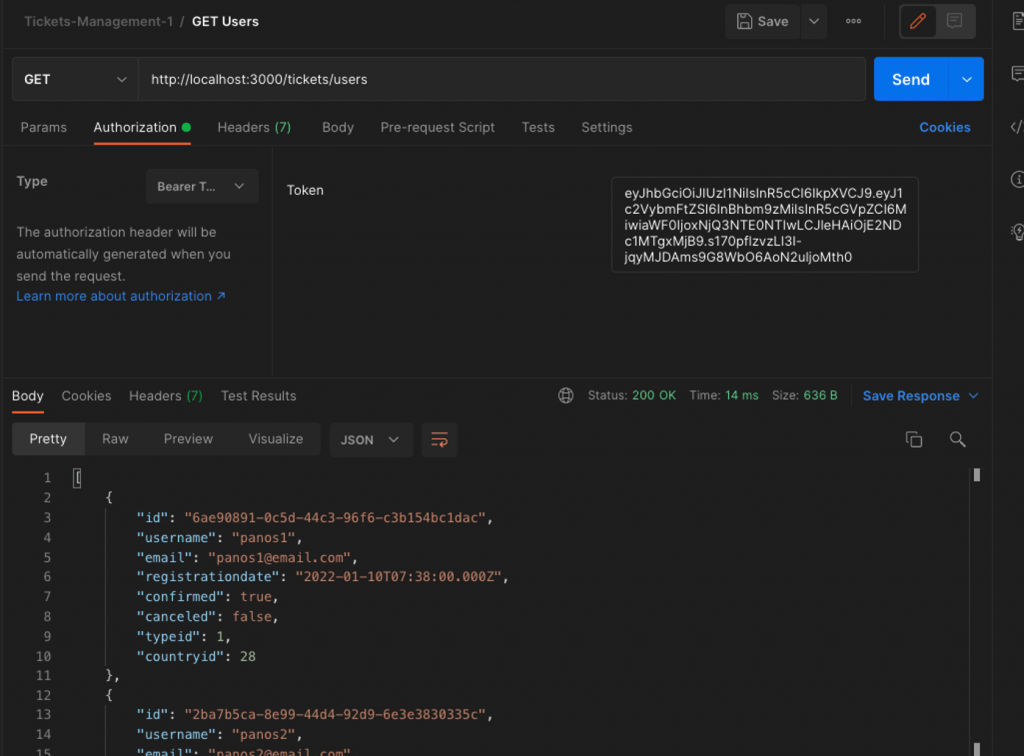
This is the response with a valid bearer token:
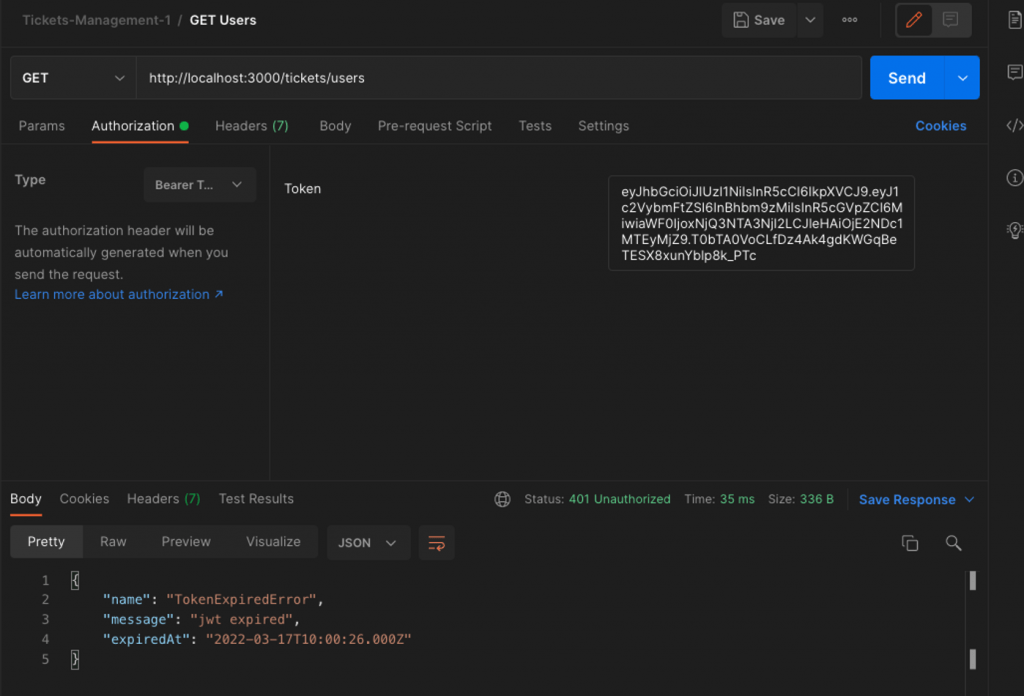
And this is an invalid token example (time has been expired):
It seems OK. So, what we can do next? We can repeat calling the isTokenValid() for the other endpoints and CRUD operations as well. But as you can understand, this is “not compliant with the DRY principle”. It requires a lot of boilerplate code, and thus it is not easily maintainable. Can you imagine what does it mean if later on, we decide to add more endpoints and use many other modules?
No, this is not what we will do. We will use the Passport package instead.
Before proceeding, and if you wish, make a commit. Alternatively, you can download or clone a clean repo with what we have described so far about the @nestjs/jwt implementation for your own reference. Here it is https://github.com/zzpzaf/nest-external-config-env-jwt Note, that we are going to delete parts of the code used above.
Note, that we are going to delete parts of the code used above.
The Passport package(s)
Installation
npm i passport @nestjs/passport passport-jwt
npm i --save-dev @types/passport-jwt
Implementation
Import it in AuthModule
We start, importing the PassportModule in the imports array section in our AuthModule, in a similar way we did it before for the JwtModule. Here again, we have to use the register() built-in method provided by Passport, to register a strategy as the default strategy of our project. As you probably guess the default strategy is the JWT Strategy. So, our AuthModule becomes:
As you can, we added just one line of code:
PassportModule.register({ defaultStrategy: 'jwt' }),
Implement a passport Strategy
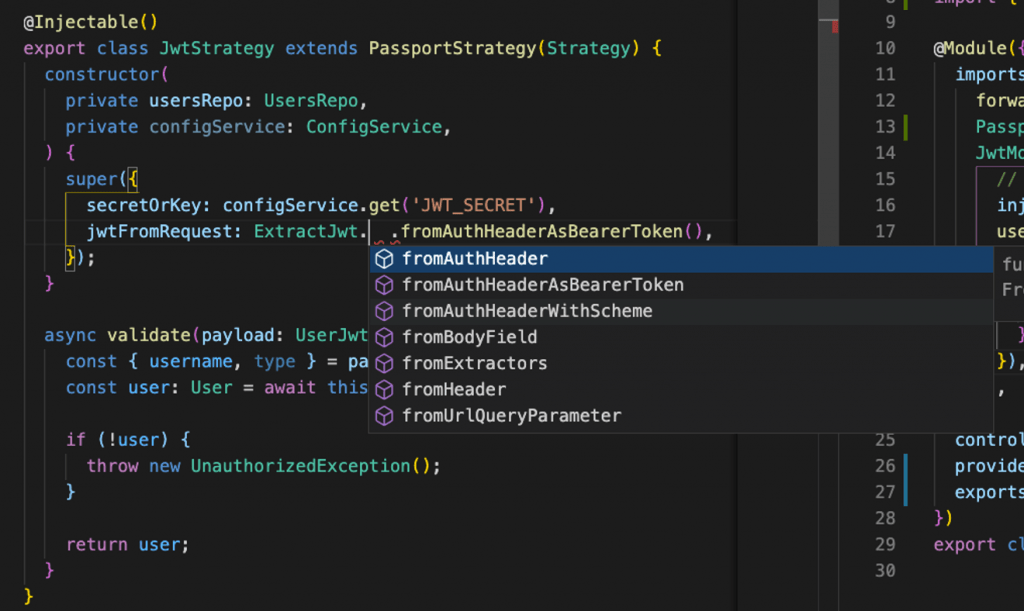
The next step is to implement such a JWT Strategy in our very own way. Actually, our own ‘strategy’ should be implemented via an @injectable decorated class, which in its turn should extend the Passport package PassportStrategy(Strategy) class. We will use a separate file for that class. We will name the file jwt.strategy.ts and the class JwtStrategy. We can put this file inside the src/auth folder of our project:
The constructor – Call the parent: super()
In order to use it, we have to pass an object with at least 2 parameters in its constructor. And more precisely, since this is a derived class (from the PassportStrategy(Strategy) class) we have also to call the super (parent) class from within the Constructor to the parent’s class constructor – so we have to do it in super({}) of this class. The super() method requires 2 parameters:
constructor(){super({param1: value1, param2: value2})}
The 1st parameter.
jwtFromRequest (REQUIRED) – This parameter is necessary, because we have to extract the JWT Bearer token (the payload) from the header of the request, similarly to what we did before ‘manually’. It is actually, a function that accepts a request as the only parameter and returns either the JWT as a string or null. See Extracting the JWT from the request for more details. We can use the options provided through the ExtractJwt enumerations. In our case we have to choose ‘fromAuthHeaderAsBearerToken()’:
The 2nd parameter ( It is necessary for the 1st one).
secretOrKey – This is a string or buffer containing the secret (symmetric) or PEM-encoded public key (asymmetric) for verifying the token’s signature. Here we will use our secret we’ve also used before. Of course, in our case, we have to obtain it from the ConfigService., so we have also to inject the ConfigService in the class constructor. So, calling the super constructor should look like this:
The validate() method
The validate() method should be part of a PassportStrategy implementation class. For every strategy, Passport calls by default the jwt verify function. In NestJS, this function is implemented with a validate() method.
If this method is omitted, we get an exception error:
ERROR [ExceptionsHandler] this.validate is not a function

We use a validate() function, -which should be a Promise-, just to return back something, after we have implemented our own validation logic. For instance, we can return always true (for validating everything):
The validate() function is called after the Passport has verified and found that a token is valid (valid signature, not expired, etc.). If the token is valid, then it decodes and extracts the payload as a JSON object and make it available, so we can use it in the validate() function.
In our case, we use the validate() function, to return back a user object. In order to get back a user object, we have to have access to the DbRepo and its methods. So, we have to inject the DbRepo in the JwTStrategy constructor. Our JwtStrategy should be similar to:
After we have defined our JwtStrategy, the next step is to add this strategy, to the providers property array in the AuthModule. Then, we also add it to the exports property array, together with the passport module. Thus, we make them available elsewhere and to other modules:
That’s it! Now we are ready for the last step and use the Passport to validate the JWT tokens without doing it ‘manually’ as we have done it (in the UsersController).
The next step is to guard our routes – endpoints using Passport’s built-in method: AuthGuard().
Short intro to Guards mechanism in Nest.js
Before to proceed, we have to mention that, the NestJS framework provides its ‘native’ functionality of Guards. Generally, we can define/implement our own AuthGuard class (which implements the NestJS CanActivate interface), and customize the canActivate() function for it. Then, we can apply (bind) it using the @UseGuards decorator. A Guard can be bind in 2 ways in NestJS:
- Protect an entire Controller Route.
- Protect specific handler (in a Controller)
For example, we can create and protect a specific @Post handler. For instance in our auth.controller.ts we can add this:
However, Passport provides us with the ready, built-in AuthGuard() function. So, we can easily bind it to our routes and endpoints.
Above, we’ve used the NestJS @UseGuards decorator, and we’ve just passed it the custom AuthGuard class, to protect just the /test endpoint POST handler.
But we also can protect the entire route at the Controller level. And this is like a piece of cake using the Passport’s Authguard(). This is our case here. We can protect the whole UsersController route by just adding the:
@UseGuards(AuthGuard())
e.g.:
Now, there is no way for a request to /users route, to be handled without authentication, i.e. without a valid JWT token. The AuthGuard() automatically checks the validity of a JWT token via our define JwtStrategy, and the accepts a request to any of UsersController HTTP method handlers, or rejects it.
The final step is to clean the UsersController getUsers() method handler from the code we have previously created for ‘manual’ JWT token validation. Below, we have just commended it out, so later you can remove it entirely:
As you can understand, this can also be done for any future Controller you think to add later on, in your project.
You can access the ready clean repo at: https://github.com/zzpzaf/nest-external-config-env-jwt-passport.git
That’s it!
I hope you enjoyed it, even it was a bit long post! Happy coding! … and stay tuned!