NestJS REST API: class-validator & class-transformer

220314
Summary
Nest.Js is an awesome Node.Js framework to work with for your backend REST API. If you have already used Angular before, you will get familiarized with it, almost immediately.
It is supposed that you are familiar with the NestJS basic building blocks like Modules, Providers, Controllers, Routers, etc.
In this short post, we will try to focus on how to start implementing the class-validator and class-transformer libraries. Both of them are widely used tools for validating REST API Requests’ data and/or transforming your API Responses before sending them back to the client.
Short Intro to Pipes and Interceptors
Before starting implementing the class-validator and class-transformer libraries, it is necessary to have obtained some grasp of how Pipes and Interceptors can be used with NestJS. The NetJS Pipes and Interceptors Documentation is the best source of truth about the subject. However, below we provide a very short intro implementing Pipes and Interceptors.
Pipes
- Pipes are classes annotated with the @Injectable() decorator (you can think that they are similar to Providers).
- Pipes implement the PipeTransform generic interface. Therefore, every pipe must have a transform() method. This method will be called by NestJS to process the arguments.
- The transform() method accepts two parameters :
- value: the value of the processed argument.
- metadata (optional): an object containing metadata about the argument.
- Whatever is returned from the transform() method will be passed on to the route handler. Exceptions will be sent back to the client.
e.g.
Pipes can be consumed, mainly, in the following 3 different ways.
Parameter-level pipes that are defined at the parameter level. Only the specific parameter for which the pipe has been specified will be processed.
If you want just to quickly control a parameter this is your choice.
Method/Handler-level pipes that are defined at the handler level (in a Controller), via the @UsePipes() decorator. Such pipe will process all parameters for the incoming requests.
This could be a preferred choice if you want to control a set of parameters of a request and this could be used for instance, in conjunction with a DTO.
Global-level pipes that are defined at the application level and will be applied to any incoming request.
This could be a one-off selection for you, especially, for a relatively simple project. And, this is what we will use here, in this Post, as an example.
Interceptors
Similarly, to Pipes, Interceptors are classes annotated with the @Injectable() decorator.
Interceptors are usually stand in the middle, between a request and a response. Thus, they can be used to transform incoming requests before they are handled by handlers, or transform the outgoing results before they are sent back to the user. So, they are quite useful for adding extra business logic, if, for instance, specific conditions are met.
In NestJS, Interceptors should implement the NestInterceptor interface. This means that they also have to implement the intercept() method, which in its turn takes 2 parameters: an ExecutionContext instance and a CallHandler method, returning an Observable.
A Nest.Js Interceptor (like in many other packages and frameworks, e.g., in Angular) can be applied in one of the levels:
- Global (application) level,
- Controller level, or
- Method/Handler level (e.g., a handling method of an endpoint in a Controller)
(As we saw before, this is also similar to how Pipes can be applied).
When we want to apply an interceptor at class (Controller) level or method/handler level we have to use the @UseInterceptors() decorator.
For instance, this is how we can implement (bind) an interceptor name ‘ClassSerializerInterceptor’ in a Controller:
Any endpoint handler inside the UsersController will use the ‘ClassSerializerInterceptor’.
Furthermore, we can also use the same @UseInterceptors() decorator to bind an interceptor (e.g. the ‘MethodSerializerInterceptor’) to a specific endpoint method/handler like that:
Later in this Post, we will use a Global-level interceptor as an example.
Now, let’s go further.
class-validator and class-transformer packages
Installation
Nothing special. e.g., via npm:
npm i --save class-validator class-transformer
class-validator
This is a package that allows us to use decorator (and non-decorator) based validations. Internally uses validator.js to perform validation. Class-validator works on both browser and node.js platforms. The package offers a wide range of decorators that are applicable to any kind of property in an entity (e.g. of a DTO class). For example, this is the importing of some of the validators offered by that package:
A Global-level ValidationPipe example
A Validation Pipe allows us to automatically validate incoming requests.
Now, let’s see a very fundamental example of a validation ‘rule’ using the @IsNotEmpty decorator with a DTO. (This decorator actually checks if a given value passed in with a request is not empty: !== ” , !== null , !== undefined )
Lets’ now decorate the properties of an example DTO (named ‘CreateMovieDto’) like that:
We can apply it in a POST endpoint in a Controller, like that:
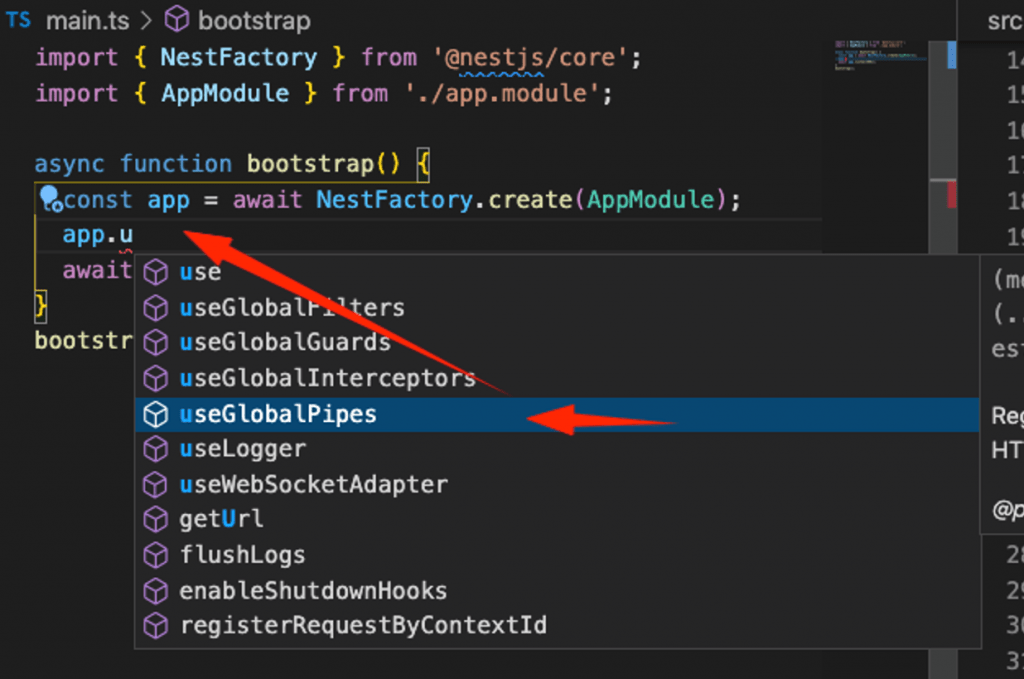
Then, we can use a Global-level pipe (that we have mentioned before)that will validate any passed-in value for any controller handler for any validator decorator finds. We have to do this in bootstrapping code inside our app’s entry point in main.ts file:
app.useGlobalPipes(new ValidationPipe());

Note that, above, we actually use the NestJ built-in ValidationPipe, and not a custom-defined pipe. The NestJS built-in ValidationPipe uses both, the class-validator and the class-transformer libraries.
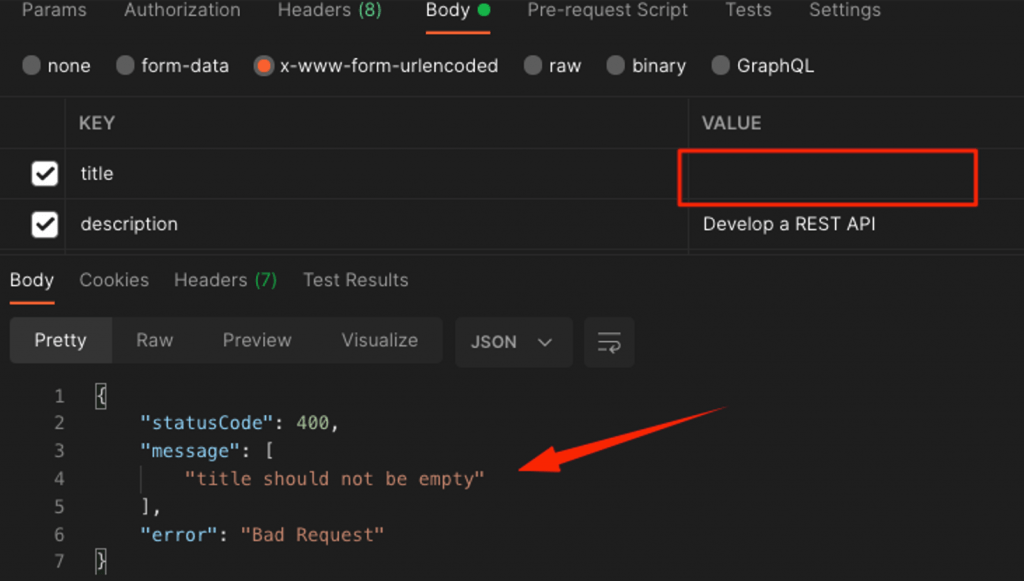
Finally, we can test it via Postman, trying to send a POST request with empty title:

As you can see above, it throws It throws a 400 error – Bad request.
class-transformer
The class-transformer package allows us to make some cool data transformations of our data. It can translate a plain request object to some instance of class and versa. Also, it allows to serialize / deserialize object based on criteria. When you use Postman, you probably have noticed that when we get back a response, the values of an object returned from an endpoint, are plain text values. However, using the class-transformer decorators, we can transform them to the preferred data types. For instance:
Before
{
. . .
    "canceled": "true",
    "typeId": "28",
. . .
}
After
{
. . .
    "canceled": true,
    "typeId": 28,
. . .
}
Now, let’s see another example using built-in transformation decorators applied in an entity/class named ‘User’:
The ‘User’ entity class
The @Expose() and @Exclude() decorators allow us to include or exclude the properties of our entity-class that are decorated respectively when for example return back a ‘User’ object as a response to a request. The @Exclude() decorator is especially useful when we don’t want to expose some of our sensitive properties. For instance, from the security point of view, it is a bad approach to expose a password, and the class-transformer decorator @Exclude(), allows us to prevent this.
Next, we can make our custom interceptor. We can name it ‘TransformInterceptor’.
The custom Interceptor
This interceptor actually works whenever de-serialization of data takes place (when data are going to be presented as plain text). This happens because of the instanceToPlain() method.
Now, as we’ve said, we will use an example of a Global-level (application-level) Interceptor. So, one more step is needed, and this is to declare our custom ‘TransformInterceptor’ interceptor, in the app’s entry- point, the main.ts.
In main.ts
Thus, our interceptor will be used for any case of de-serialization of any object using class-transform capabilities, like our User entity class we saw above.
Takeaways
As you have probably understood, the aim of the above short intro can be clearly summarized to:
- For a class-validator or a class-transformer class use the class decorator @Injectable
- For a class-validator use Pipe(s)
- For a class-transformer use Interceptor(s)
- For binding, use bind decorators: @UsePipes and @UseInterceptors, respectively
- For applying a class-validator or a class-transformer at Global (application) level, declare your Pipe and/or Interceptor in main.ts.
That’s it!
Thank you for reading and happy coding!
