
NestJS challenge: take the steps developing a REST API

220320
Your Blueprint to a NestJS REST API project
Intro and Prerequisites
NestJS Modules are Singletons by default. Their Providers are also singletons when they are provided from within the same
If you think that it is time to take the challenge and start developing a NestJS REST API, then this post might be useful as a stepping stone.
The post just presents the fundamental steps required to start such a project. It actually will guide you to the point you will think that the next phase is to add some persistence to the project using a database, like MongoDB, PostgreSQL, MySQL/MariaDB, Oracle, MS SQL Server, etc.
Users authentication, i.e., users access restriction, is a key part of almost any REST API backend project. So, what this post actually does, is present you with the basic steps required to create a project for users’ authentication.
Don’t take it wrongly. In this post, you are not going to be provided with any example commands for packages installation and/or creating the project, or the project modules. This is your challenge. However, your prize will be a repository with an example code as the result of the steps given below.
So, it is assumed that you have already obtained enough familiarity with NodeJS and the NestJS framework as well as with its CLI.
Moreover, if you are not yet familiar with the NestJS basic building blocks like Modules, Providers, Controllers, Routers, etc. please take some time and do it, otherwise, you should do it gradually, following the steps below. Also, you should be ready to deal with some key subjects related to developing a simple REST API such as CRUD operations, DTO, JSON, and JSON like objects, authentication and authorization, password hashing, JWT tokens, and the Passport package. Finally, you will have also to deal with some other concepts and packages, such as for example, how to use decorators, data validation and transformation, how to define and use externally defined parameters for your NestJS project, etc.
So, prepare yourself and start following the steps below. Happy coding!
A. The Basics
- Create a new Nest.Js Project. The NestJS CLI will be your tool.
- Create core Database entities
- Identify and start creating main Entities (Classes), and/or Interfaces. At least, define and create a fundamental Users entity class with its properties. e.g.:
- id: string;
- username: string;
- password: string;
- email: string;
- registrationdate: Date;
- confirmed: boolean;
- canceled: boolean;
- typeid: number;
- countryid: number;
- Later, you will add other objects such as Data Transfer Objects — DTOs, Repos, etc.
- You can think to use a separate folder (e.g., ‘dataObjects’) and put there all of your entities and DTOs.
- Identify and start creating main Entities (Classes), and/or Interfaces. At least, define and create a fundamental Users entity class with its properties. e.g.:
- Define your main REST API Endpoints. For instance, start with a similar table:
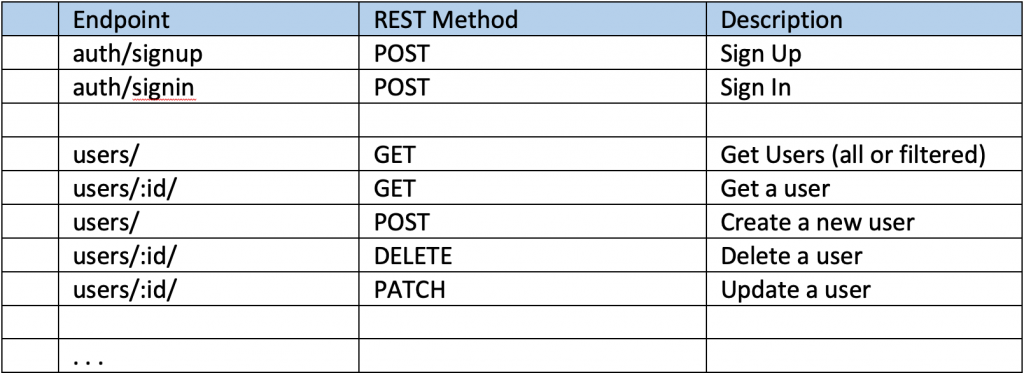
- Think about using a Global Prefix for your REST API Endpoints (e.g., ‘tickets’).
- Later on, you can think to add API versioning approaches and/or routing and sub-routing per module
- Create main/core Modules, Controllers, and Services
- The first fundamental approach is to create one module per Endpoint. For instance, for the above endpoints /auth and /users create the AuthModule and UsersModule, respectively. (If there is no other particular reason, you can delete the app.controller.ts and the app.service.ts – which are being created by default because of the default app.module.ts)
- For each module create a Controller and a Service (e.g., UsersController, UsersService and AuthController, AuthService).
- For each Controller create the necessary REST API Handlers (functions decorated with @Get, @Post, @Delete, @Patch, etc.)
- For the Service (which matches to a specific controller) create the functions (function handlers) which correspond to specific REST API Handler(s).
- Enable the Git versioning for your project and perform your 1st Commit
- Create a Repository, e.g. the DbRepo.
- Such a repo can host all the functions are necessary to support both: the AuthService and UsersService. It actually will provide the real responses to the API requests from the Controllers and Services.
- Note1: For the same purpose, we could of course use separately the AuthService and the UsersServiice. However, such an approach would result in to reuse of some similar -if not identical- functions, and moreover to get in trouble deciding in which of the Services should put some other helping function. This is especially true if later on, we decide to add more modules for other endpoints dealing with also other entities.
- Note2: We can also use a separate DbModule and the DbService (or the same name: DbRepo) as the Service of the DbModule. But such an approach would have put us in a position trying to solve Circular Dependency issues. (You can see a post of mine related to such an issue at Avoiding Circular Dependency Issues in Nest.js). So, using a solo repository acting as a Provider seems to be a better approach, allowing us to avoid a lot of ‘DRY’ code.
- Use logging. Instead of console.log use the NestJS Logger for your classes. Use it for testing purposes, debugging, errors, etc.
- Start performing initial tests using Postman and/or browser e.g., test the main REST API endpoints.
- Commit changes.
B. Enhancements, refinements, validators, and transformers
- Refine and enhance the capabilities of endpoints, e.g., Add parameter(s) for getting user by id, search and return a user object, etc.
- Handle searching and filtering – search for username, search for email, etc. (for example: users?status=statusId&page=1&pageSize=10)
- Add Patch/Update based on a DTO with optional parameters
- For specific endpoints and REST API (e.g., some of the CRUD) actions, think to create some specific DTOs, e.g., use DTO for searching/filtering
- Improve Post/Patch if a property entry already exists, (a user with the same name and/or email), etc.
- Commit
- Validation and Transformation of classes/entities
- Install and use class-validator and class-transformer libraries – These allow us to use decorators with our DTOs, as well as data transformation capabilities for requests and responses of our API endpoints.
- Configure and use the Nest.js ValidationPipe with DTOs.
- Apply validation rules for incoming client parametrized requests providing data (payloads) – Use NestJS pipe validators – Decorate accordingly the DTOs you wish
- Implement class transformation for serializable classes/objects.
- Choose an appropriate approach between the following 2 approaches for implementing the transformation of the serialized objects.
- By using the built-in ClassSerializerInterceptor (see the serialization docs). @UseInterceptors(ClassSerializerInterceptor)
- By creating a custom Transformation Interceptor for a more general implementation for our application.
- Decorate the necessary class entities (and/or DTOs) with the appropriate transformation decorators
- Commit changes. Create a new remote git repo and push your commit.
C. Implement externally defined Configuration
- Use an external .env file to define some necessary parameters – for NestJS install the @nestjs/config package (NB: The @nestjs/config package internally uses well known dotenv package).
- In most cases this is necessary since we use some values as well some sensitive information that might be changed in production, e.g.:
- App listening port number
- API global route prefix
- JWT parameters (token secret, token expiration time, e.g., in seconds – see next section – D)
- Database connection parameters (type, host, port, username, password, database)
- etc.,
- Use the ConfigModule globally, and implement it in main.ts and in other modules, as well as dynamically imported modules, e.g. JwtModule
- Exclude the .env file(s) from git (add it/them to .gitignore) – include them if necessary to production deployment e.g. in dist folder
- Use a schema validation pro-tool (Joi is the NestJS suggested/promoted tool) to validate configuration values obtained externally from a .env file.
- Note1: We can also use Joi for DTOs/Class validation instead of class-validator. However, we have to be aware that Joi uses JSON objects with Joi property decorators as schema validators, and thus we have to create such schema objects for each DTO, separately from our DTOs. A possible solution -if we want to use Joi validation- is to use some other helper packages that are beyond the scope of the challenge of this post.
- Note2: For Configuration: Alternatively, we can create and use our very own Configuration Service (based on @nestjs/config/ConfigModule) to handle both environment variables from the OS runtime environment (e.g., export DATABASE_USER=test via the OS shell exports) and those located inside .env files, as well as to use it in different configuration sets for different purposes and in various feature modules (e.g. when we have to deal with different databases and repos). Moreover, be aware, that, we can use custom configuration files using YAML format/syntax (via the js-yaml)
- In most cases this is necessary since we use some values as well some sensitive information that might be changed in production, e.g.:
- Test that your changes are functioning correctly.
- Commit changes and push your commit. [Look at this base repo: https://github.com/zzpzaf/nest-external-config-env]
D. Start implementing fundamental Authentication (Users Authentication) using JWT
- Install the bcrypt and UUID packages/libraries.
- bcrypt is a password-hashing function that gives you the ability to hash and un-hash a plain password.
- UUID provides allows you to create a universally unique identifier (UUID) that can be used as unique values, and thus they can be used as primary keys for the id property in the user entity.
- Note: Later on, when you add a database you can remove them, if the database you choose, offers password hashing and auto-generated UUID capabilities.
- define a new DTO for user credentials and apply some validation rules (username length, email, password requirements with @Matches decorator and regex, etc.)
- Commit changes and push your commit.
- Install the @nestjs/jwt package that gives you the ability to armor your application with signed JSON Web Tokens.
- Implement initial authentication based on JWTs – for NestJS, this is the @nestjs/jwt package. (Later on, we will add the Passport package as well).
- Add/declare the JwtModule in the imports section of an existing module you wish (e.g. in the AthModule) and apply some basic configuration, such as secret and expiration time in seconds.
- Then you can use the JwtService (coming out from the JwtModule) in another class e.g. in the authentication service ‘AuthService’ for creating/returning or validating a JWT.
- Define a payload interface or class (for consistency and maintainability, avoiding errors, etc.).
- We can always obtain the payload object from the body of a request
- Create a new token (JWT) for the Sign-In process (for the /auth/signin endpoint)
- Check JWT in users’ endpoint(s) – We can implement the validation in AuhtService, however, another option is to implement it in our repo (DbRepo).
- Note: We can do that for just one or a few endpoints to see how we can handle it. However, doing it for each endpoint requires a lot of boilerplate code, and thus, it is not easily maintainable. So, later we will use the Passport library which allows us to implement a ‘jwt strategy’ and to guard entire routes (e.g. endpoints) using an AuthGuard object provided by the Passport (the @nestjs/passport actually)– see below).
- Test your changes via Postman
- Commit changes and push your commit. [Look at this repo: https://github.com/zzpzaf/nest-external-config-env-jwt]
E. Enhance the project’s Authentication (Users Authentication) by using the Passport library
- Add Passport package and helper packages: @nestjs/passport which offers integration with the NestJS framework/ecosystem and the passport-jwt which is the passport strategy package for jwt (also we have to add the @types/passport-jwt as devDependency)
- Declare (import) the Passport Module in our AuthModule and register the jwt as default strategy.
- Create a JwtStrategy class (it should extend the PassportStrategy) and define a validate() function
- Use the NestJS Route Guards (using the @UseGuards() decorator with Passport’s AuthGuard() built-in method) in the UsersController or any other controller or endpoint handler.
- Test and Commit changes. Push your commit.
Great! You did it!
Takeaways
So far, so good. If you have taken all of the steps above, you should have obtained awesome knowledge of starting developing a NestJS REST API and using and implementing key concepts and packages. If you haven’t, don’t worry! there is ‘plan-B’. This is a repository that can be used as an example of how a result code could be implemented.
Note, the included code might not be the best one, and for sure, it can be better. But in any case, it works! (well, at least for me :-)).
The project folder structure is given below.
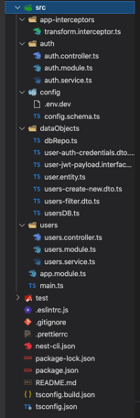
So, get or clone the example repository and try to interpret all the related modules and files, using the above steps as your reference guide. Below are some of other posts of mine that you might find them useful for this challenge.
You can take also a look to some other posts of mine that you might find useful for this challenge.
Below are those posts published in MEDIUM.


Good luck with your coding journey!
That’s it.
Thanks for reading, and stay tuned!