
Containerize and automate the deployment of a 3-tier full-stack project

240927 – 1012
Table of Contents
- Introduction
- Overview of the Building Blocks
- Frontend: NGINX (Angular)
- Backend: Java/Spring Boot
- Database: MariaDB
3. Host Folder Structure
4. Docker Compose Setup
- Dockerfile for Frontend
- Dockerfile for Backend
- Database Configuration
5. Automating Application Updates and Deployment
- Angular Frontend Deployment
- Java/Spring Boot Backend Deployment
6. Starting the Containerized Application
7. Conclusion
Intro
In my previous post, I showed, how you can use an Angular frontend blog application to access the endpoints of a backend Spring Boot API, which provides data fetched from a MariaDB database.
Note:
👉Find here the repo of the frontend Angular application project.
👉Find here the repo of the backend Java/Spring Boot application project.
As you can understand, this is actually a 3-tier full-stack blog application that is a widely used approach when we develop web applications, offering a plethora of benefits like Easier Development, Separation of Concerns, Improved Security, Flexibility, and Scalability, to name only some of them.
In this post we will see how we can containerize and automate our 3-tier full-stack project development. The Angular and Spring Boot projects described at the aforementioned post, will be used here, serving the frontend and backend tier containers as well. Now, let’s start.
Overview of the building blocks
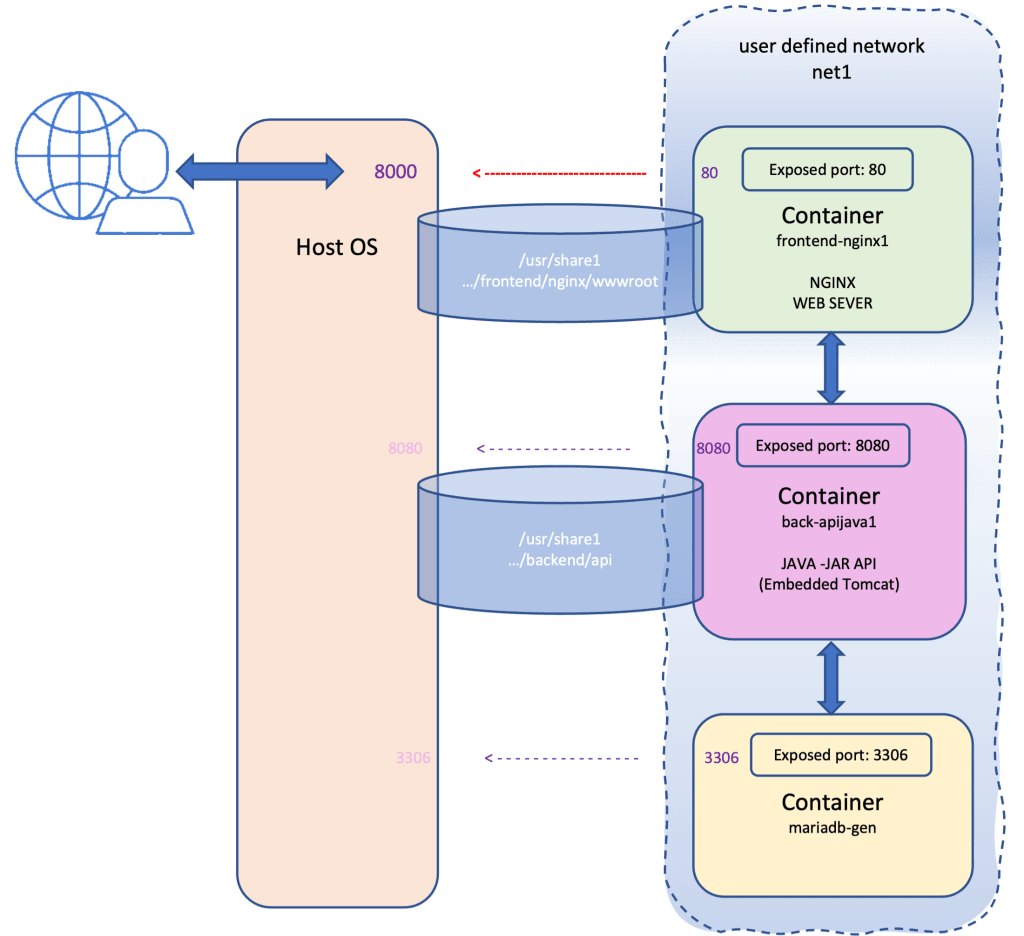
We are going to use 3 separate Docker containers, but all of them will be members of the same custom/user-defined docker network e.g. ‘net1’. This approach also offers us the following advantages:
- We can use the name of a networked container, as a ‘host’ name to access it directly from another networked container. We can even use aliases for the same purpose.
- If we wish (and wish so), we can even avoid mapping the exposed port(s) of a networked container to the real host OS. This keeps almost absolutely isolated the containers from the host system. Of course, we can still use port mapping if we want to access a container using host utilities (e.g.: for test purposes, maintenance, etc.)
The basis of each one of our containers will be:
- 1st Container (the frontend container): An NGINX server that will serve the content of our Angular application.
- 2nd Container (the backend container): A Java-enabled container for running the compiled backend Spring Boot .jar executable.
- 3rd Container: The database MariaDB container.
The following schema shows an overview of our implementation:
We can create the containers separately, one each time, and after that, we can create a docker network and add them to it. However, a better approach is to use docker-compose and manage them all together.
The host folder structure
We will need a dedicated folder in our host system. This folder is where we can put the docker-compose.yaml file, as well as the Dockerfiles that are necessary for the respective container. Since we are going to deploy the Angular and Spring Boot applications and other data, a good approach is to create separate/dedicated subfolders for each of the tier containers. Note that each subfolder can also contain other subfolders. For our case, we can create a folder named e.g., ‘net2’ in our host system and put the docker-compose.yaml file, as well as the subfolders: ‘frontend’, ‘backend’, and ‘database’ like this:
~/DOCKER_SHARE1
              |-- net2
                     |-- backend
                     |-- database
                     |-- docker-compose.yaml
                     `-- frontend
Note that I’ve changed the net2 folder structure under my ‘DOCKER_SHARE1’ folder, but you can put it elsewhere if you wish.
The docker-compose.yaml file
The docker-compose.yaml file is our cornerstone. We use it to define the 3 services for our 3 containers, each related to the respective tier. The frontend and the backend services are based on a corresponding Dockerfile for building the respective container. The database service pulls directly the MariaDB from the Docker Hub. Note that since my host system, is a macOS based on M1 Max CPU, I use the arm64v8 architecture for pulling all the base images from the Docker Hub. Of course, you can ignore or change it according to the architecture of your host system. Below you can find the full docker-compose.yaml file being used:
As we’ve said, the frontend service is a Nginx server, exposing port 8001 to the host.
The backend service runs our Java 17 Spring Boot application. The database service uses MariaDB 11.5.2, with a configuration for automatic upgrades (we will explain this in more detail, later on). All services use the shared (bridge) network net2 and mount specific local directories into the container, enabling data persistence and shared access. It’s worth mentioning here, that we can access the networked containers only via the 8001 port of our host (mapped by port 80 of the frontend container) leaving the rest of the containers exposing the necessary ports only inside the net2 network, so they can communicate between them.
Note that, the information provided in the comments will be useful to you. However, below there are also some more, short explanations for the 3 services:
frontend
build: The frontend container is built from a Dockerfile located in the ./frontend subdirectory (we will see it below).
container_name: The container is named net2-frontend-nginx.The comment suggests that it runs Nginx 1.22.1.
ports: Port 8001 on the host is mapped to port 80 in the container, which is typically the default port for Nginx. Note that by using ports tag we map a port from the container to the host system, so we can access it from the outside container world.
networks: The frontend service is part of the net2 network, which is a user-defined bridge network.
volumes: The local folder ~/DOCKER_SHARE1/net2/frontend is mounted into /usr/share1 inside the container. (You will see later on, that we will use the ‘/nginx/wwwroot’ subfolder inside the shared folder, to deploy our Angular application).
working_dir: The working directory for this service is set to /usr/share1.
backend
build: The backend container is built from a Dockerfile in the ./backend subdirectory (we will see it below).
container_name: The container is named net2-backend-api. The backend runs on Java Version 17.
networks: The backend service is also part of the net2 network.
volumes: The local folder ~/DOCKER_SHARE1/net2/backend is mapped to /usr/share1 in the container. (You will see later on, that we will use the ‘/api’ subfolder inside the shared folder, to deploy our Java/Spring Boot .jar executable).
working_dir: The working directory for this service is set to /usr/share1.
Note: The port 8080 is intended to be exposed via the Dockerfile rather than through docker-compose.yaml.
database
image: The container runs MariaDB 11.5.2 using the arm64v8/mariadb:11.5.2-ubi9 image from Docker Hub.
container_name: The container is named net2-database-mariadb.
environment: MARIADB_AUTO_UPGRADE=”1″: Enables automatic upgrading from MariaDB 10 to 11. MARIADB_INITDB_SKIP_TZINFO=”1″: Skips loading timezone info during database initialization. These environment variables are helpful for upgrading schemas and troubleshooting MariaDB upgrades.
expose: Port 3306 (default MySQL/MariaDB port) is exposed to other containers in the same Docker network but not to the host.
networks: Again, the database service is also part of the same net2 network.
volumes: The local folder ~/DOCKER_SHARE1/net2/database is mapped to /usr/share1 in the container. The database data folder ~/DOCKER_SHARE1/net2/database/data/mysql is mapped to /var/lib/mysql in the container. This allows persistent storage of MariaDB data between container restarts.
working_dir: The working directory for this service is set to /usr/share1.
networks
net2: A bridge network named net2 is defined for use by all the services, ensuring that they can communicate with each other within the same network.
The frontend
In the frontend subfolder (under net2) we have put 2 files: the Dockerfile and the my_default file:
|-- net2
       |-- docker-compose.yaml
       `-- frontend
                  |-- Dockerfile
                  `-- my-default
The frontend Dockerfile
Building a container (via the docker-compose.yaml file) using a dedicated Dockerfile, gives us some more flexibility, for instance, when we want to build the container based on a specific Linux distro, as we do here. (If we wish, we can also add some more Linux commands and utilities, using another step with the Linux package manager, e.g. apt/apt-get). See below our frontend Dockerfile:
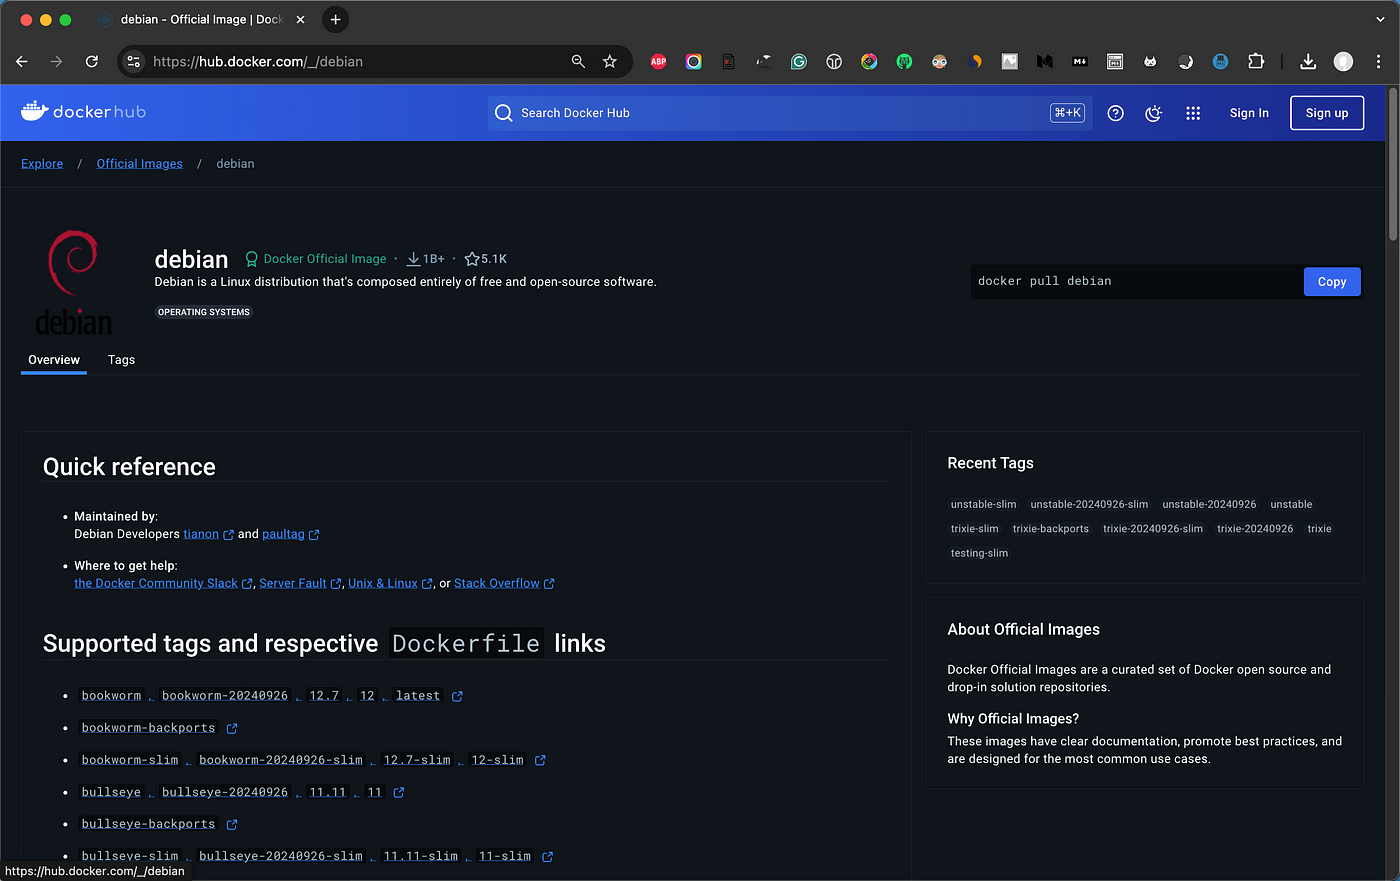
As you can see, first we pull the latest (on 2024–09–28) version of the official Debian distro (‘bookworm’),
Then, we install the NGINX server via the apt-get package manager. In our case, the NGINX server installed is the ‘nginx/1.22.1’.
After that, we copy the ‘my-default’ file (which is our NGINX default site configuration file) as the ‘default’ file into the container folder ‘/etc/nginx/sites-available’, which is the default place for the NGINX server to put site-configuration files.
Finally, we use the CMD to run the NGINX server, whenever the container starts.
The my-default file
As we’ve said, the ‘my-default’ file, actually provides the configuration for the default site for the NGINX server. See below the ‘my_default’ file:
As you can see, the settings are well-illuminated via the comments provided. However, there are a couple of settings that I want to clarify further.
The first important setting in this file is the place we define as the root folder for the NGINX server. As you can see, we have set it to the ‘/usr/share1/nginx/wwwroot’ container folder. Since, in our docker-compose.yaml file we have mapped the container folder: ‘/usr/share1’ to the host folder: ‘~/DOCKER_SHARE1/net2/frontend’, this means that we have to place (aka to deploy) our compiled Angular application into the ‘nginx/wwwroot’ subfolder, under the host ‘~/DOCKER_SHARE1/net2/frontend’ folder. Then, whenever the NIGINX server starts, looks for any index file in that folder and fires it, i.e.: it runs our Angular application by loading its ‘index.html’ file.
The second interesting point, in this configuration file, is the proxy location-block settings. This block actually, forwards any request concerns our backend application. The location ‘blogapi’ defines a part of the URL path reaching the frontend NGINX server. For instance, when a request, like the ’http://localhost:8001/blogapi/’ arrives, the NGINX senses the ‘blogapi’ location and forwards the request to the back-end server. In this case, the/blogapi/ path acts as a route on the front end that triggers the reverse proxy, redirecting the request to the backend server.
The ’net2-backend-api’ is the hostname of the backend container within the Docker network net2. NGINX uses this internal container name to resolve the backend service, and the 8080 specifies the port number on which the backend Java API service is listening. In our setup, the backend service is running on port 8080 inside the container. The /blogapi/ is the path on the backend API that corresponds to the frontend path /blogapi/. Any request made to http://<frontend-server-name>/blogapi/ will be forwarded to http://net2-backend-api:8080/blogapi/ inside the Docker network.
But wait a minute! Do we also have a 2nd, backend server running inside the backend container? Actually, YES. But be patient, we will see it a bit later on.
Below you can find the explanations of the rest of the settings of this proxy location block:
proxy_set_header Host $host;
This header sets the value of the Host HTTP header to the value of $host, which is the domain name or IP address that the client originally requested. This ensures that the backend server sees the original host used by the client instead of the backend service’s internal hostname.
Example: If a client requests http://example.com/blogapi/, the Host header will be set to example.com in the request that NGINX forwards to the backend server.
proxy_set_header X-Real-IP $remote_addr;
This header forwards the client’s real IP address to the backend server.
$remote_addr: The variable that holds the IP address of the client that made the original request.
Without this, the backend would only see the IP address of the NGINX proxy, not the actual client IP. This is especially important for logging, authentication, or rate-limiting purposes.
proxy_set_header X-Forwarded-For $proxy_add_x_forwarded_for;
X-Forwarded-For is a common header used in proxy setups to track the original client’s IP address as requests pass through multiple proxies or load balancers.
$proxy_add_x_forwarded_for: This variable appends the client’s IP address to the X-Forwarded-For header. If the header already exists, it adds the current client IP to the list, preserving the chain of forwarded addresses.
This is useful for tracking users across multiple proxies.
proxy_set_header X-Forwarded-Proto $scheme;
This header sends the protocol (HTTP or HTTPS) that the client originally used when making the request.
$scheme: This variable holds the scheme (http or https) based on how the client connected to the NGINX server.
This is particularly useful for backend services that need to know whether the client’s original connection was secure (HTTPS). Some applications may generate absolute URLs and need to know if they should use http or https.
Finally, note that we will also see how we generally can access the backend API application from the frontend, based on the location proxy setting we’ve just seen, later on at the end of the backend section below.
The backend
In the backend subfolder (under net2) we have put 3 files: the Dockerfile, the ‘supervisord.conf’ configuration file, and the ‘run_jar.sh’ bash script file:
|-- net2
       |-- docker-compose.yaml
       |-- backend
       |          |-- Dockerfile
       |          |-- supervisord.conf
       |          `-- run_jar.sh
       `-- frontend
                  |-- Dockerfile
                  `-- my_default
Let’s see them one by one.
The backend Dockerfile
We also use a dedicated Dockerfile to build the backend container, as we did with the frontend, since this gives us some more flexibility. It actually builds our backend container that runs a Java application managed by the Supervisor process control system.
As you can see, we also use the latest stable (on 2024–09–28) version of the official Debian distro (‘bookworm’), as the base image of our backend container.
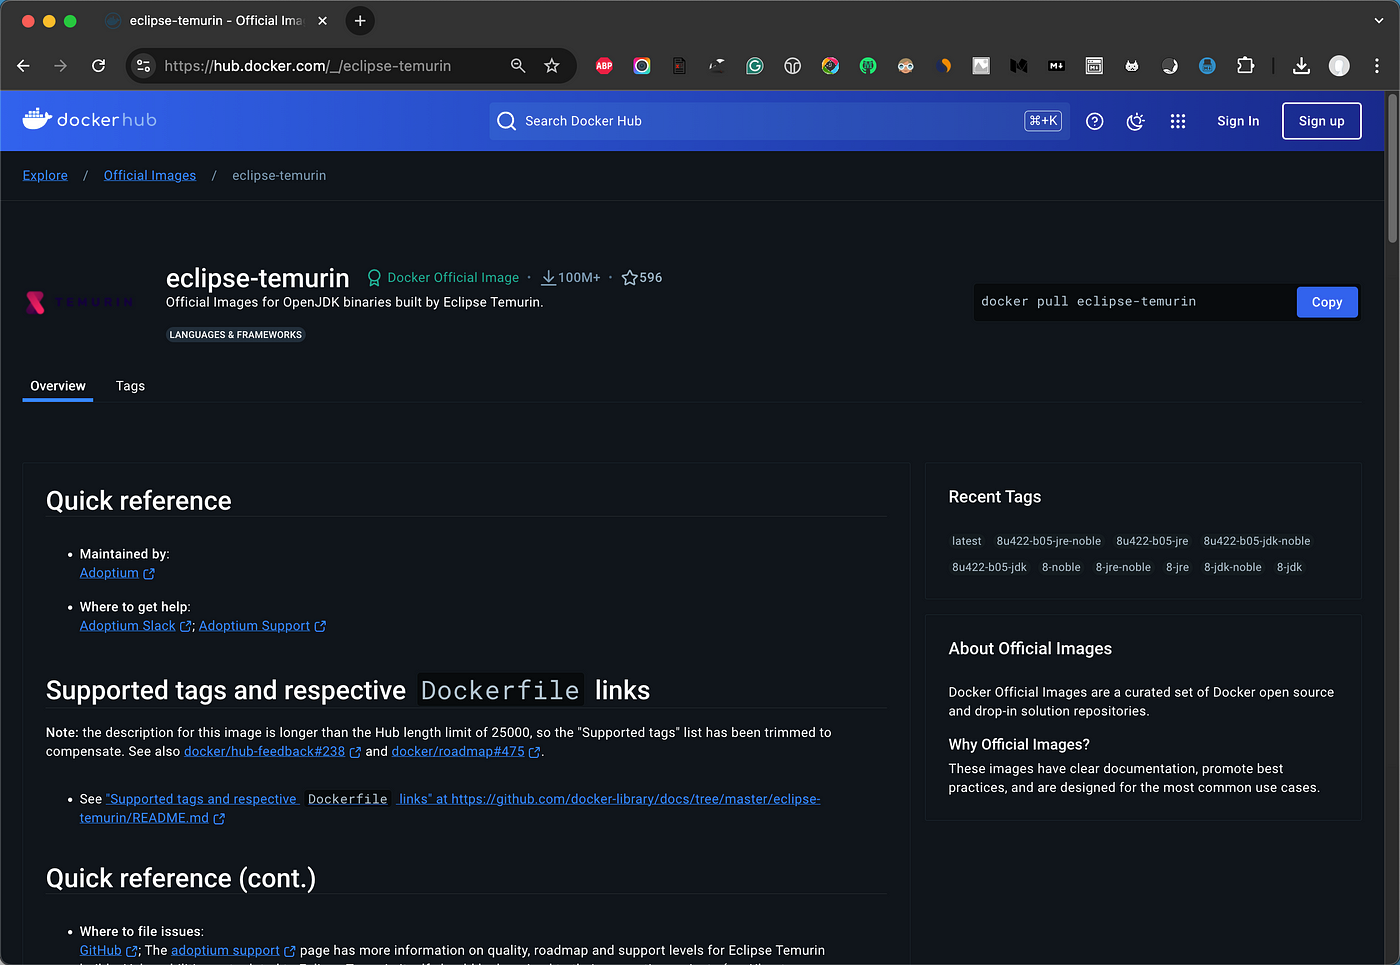
Next, we setup the Java by copying the installation necessary files from another image (in this case, eclipse-temurin:17) into the current image. The eclipse-temurin:17 image is the base image that contains the OpenJDK 17.
The next is the important part in our Dockerfile and it is the installation of the Supervisor. The Supervisor is a client/server system that allows us to monitor and control multiple processes on UNIX-like operating systems. We intend to use it here to manage our backend Spring Boot application within the container. Actually, we will pass (we copy) a configuration file, -the supervisord.conf file-, from our local build context (the same directory as the Dockerfile) into the container’s file system at /etc/supervisor/conf.d/supervisord.conf.
This configuration file (supervisord.conf) tells the Supervisor which processes to monitor and manage, our running Java/Spring Boot application. We will see this file a bit later on.
Next, we also copy the run_jar.sh shell script to the container /usr/local/bin/ folder and make it executable. This script (run_jar.sh) is intended to handle the automation logic of our Java/Spring Boot .jar file, and we will also see it after a while.
After that, we expose the default Spring Boot app 8080 port, so our backend container will listen to it for incoming network traffic. This is a network-only port, meaning that other containers in the same Docker network can connect to this port, but it won’t be exposed to the host system unless explicitly mapped during the container run (e.g., -p 8080:8080).
Finally, we define the default command to run when the container starts. In our case, it starts Supervisor by executing supervisord daemon, the main process for managing services. As we’ve said the Supervisor will use the configuration file (supervisord.conf) to manage the .jar executable through the run_jar.sh script.
The backend supervisord.conf configuration file
This ‘supervisord.conf’ file is the configuration for the Supervisor daemon, In our case, we mainly use it to manage our Java/Spring Boot application that is actually launched via the ‘run_jar.sh’ shell script. Note that setting the nodaemon to true instructs Supervisor not to run it in the background (not as a daemon). Instead, it runs in the foreground, since it, normally, runs as a background service (daemon mode). Running it in the foreground is useful in Docker containers, as it ensures that the container process stays alive. If the Supervisor exits (as it would in daemon mode), the container would stop running, since Docker containers terminate when their main process exits.
The key part here concerns the [program:blogapp] section. With this, we define a program block for the Supervisor, which it will manage the lifecycle of a specific process, which in our case is named ‘blogapp’. Let’s see the settings in this section:
command=/usr/local/bin/run_jar.sh:
This specifies the command the Supervisor will run to start the program. In this case, it’s executing the script run_jar.sh, located at /usr/local/bin/. The script (run_jar.sh) is responsible for running the most recent JAR file inside the container. The command will be executed when the Supervisor service starts.
autostart=true:
This ensures that the program (in this case, the run_jar.sh script) will automatically start as soon as the Supervisor starts. When the container starts, the Supervisor will immediately run this script without manual intervention.
autorestart=true:
This tells the Supervisor to automatically restart the blogapp program if it exits or crashes. This is useful to ensure that if the JAR file process crashes or exits for any reason, it will be automatically restarted without manual involvement, ensuring high availability of the application.
stdout_logfile=/var/log/supervisor/blogapp.log:
This specifies the log file where the Supervisor will store the standard output (stdout) of the program (run_jar.sh). All the regular output from the ‘run_jar.sh’ script, such as print statements or logs generated by the running Java application, will be written to this log file. The log file is located at /var/log/supervisor/blogapp.log.
stderr_logfile=/var/log/supervisor/blogapp_err.log:
This specifies the log file where the Supervisor will store the standard error (stderr) output of the program. Any error messages or exceptions are thrown by the run_jar.sh script (or the Java application it runs) will be captured in this log file. The log file is located at /var/log/supervisor/blogapp_err.log.
The backend run_jar.sh bash script file
We can always start manually a .jar application running in the container, e.g.:
docker exec -it net2-backend-api java -jar /usr/share1/api/blogbackdemo2-0.0.1-SNAPSHOT.jarHowever, here our approach is to make it run automatically.
The ‘run_jar.sh’ script actually, automates the process of running and re-running the executable .jar file in the backend container. You can find the ‘run_jar.sh’ below:
As you can see the comments provided explain well how the script works, but I want to underline the key points of our approach which are as follows:
· The .jar application folder within the container is the ‘/usr/share1/api’. Recall, that the respective setting in the docker-compose.yaml file, which we’ve seen before, matches the ‘/user/share1’ container folder to the ‘~/DOCKER_SHARE1/net2/backend’ of the host system. So, the place where our backend .jar executable (when it is compiled and released), should be deployed is the ‘~/DOCKER_SHARE1/net2/backend/api’.
· For the sake of simplicity, any .jar file (with any file name) is appropriate to be run. If there are no .jar files found then, as it is obvious, no backend app runs.
· Whenever a new release (a new version) of the executable is released and copied to the shared container folder, it is sensed and it is run automatically. If there is already a previously running instance, it is stopped in favor of the running of the newer release. We use the ‘run_jar()’ function for this purpose, which runs every 10 seconds.
Of course, you can always make any changes that are preferable for your own case.
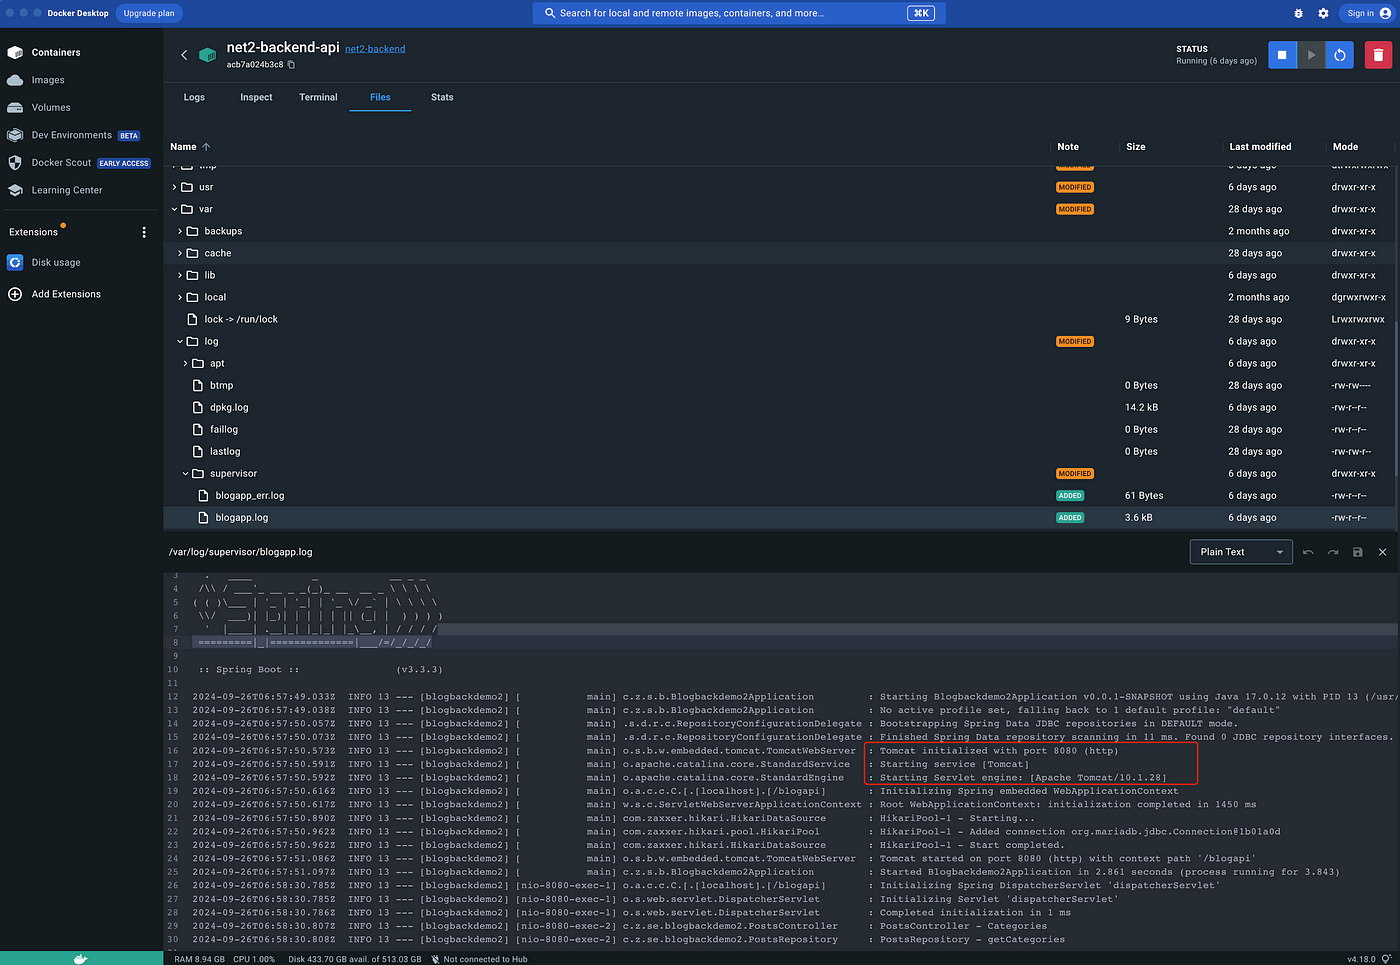
To clarify the mention of the second backend server we referred to earlier (in the frontend section): If you’re not familiar with Java/Spring Boot and are wondering where this second backend server is, the answer is straightforward. It’s embedded within the .jar file package itself, and, as you might expect, it’s an Apache Tomcat application server. If you are also wondering about its version, this is version 10.1.28 as you can see in the log file of the running application.
If you have noticed in the ‘supervisord.conf’ file we have defined the log files using the following 2 lines:
stdout_logfile=/var/log/supervisor/blogapp.log
stderr_logfile=/var/log/supervisor/blogapp_err.log
So, you can access this container file, either using a tail command from your host terminal, e.g.:
docker exec -it net2-backend-api tail -n100 -F /var/log/supervisor/blogapp.logor even you can do the same by accessing the docker desktop GUI (if you have installed it), e.g.:
Accessing the backend API application from the frontend and the proxy redirection
A final word here is how we access the backend running application from the frontend when a request is redirected from the frontend NGINX server. This actually happens because of the location proxy settings which we’ve already seen in the ‘my-default’ configuration file.
General considerations accessing one container (e.g. ‘backend-api’) from another (e.g. ‘frontend-nginx’) when both belong to the same custom docker network (e.g. ‘net2’)
When we use a user-defined Docker network, we can access a container network member -from within another container- by using just the container name instead of the container network IP. For instance, the following setting in the application.properties file works OK when in a container providing a Spring Boot API endpoints, we use just the container name in a connection string, e.g.:
spring.datasource.url=jdbc:mariadb://database-mariadb:3306/testblog2where, ‘database-mariadb’ is the other networked container providing the database (i.e.: MariaDB).
However, when we try to access the backend API container from the frontend container using its name with the URL endpoint, e.g.:
http:// backend-api:8080/blogapi/categoriesor
backend-api:8080/blogapi/categoriesthe requests fail!
In the 1st case, we face an error like: “net::ERR_NAME_NOT_RESOLVED” or “NS_ERROR_UNKNOWN_HOST” which means that the hostname is unknown. In the 2nd case we get an error containing something like: “Access to XMLHttpRequest at ‘backend-api:8080/blogapi/…. from origin ‘http://localhost:8000′ has been blocked by CORS policy: Cross origin requests are only supported for protocol schemes: chrome, chrome-extension, chrome-untrusted, data, http, https, isolated-app.” or “Cross-Origin Request Blocked: … Reason: CORS request not http”, which mean that we request a resource without using the http/https protocol.
A known solution is to map the exposed port to the localhost, but this is not a good approach, especially for production-running containers. So, the recommended solution is to configure the Nginx web server to act as a reverse proxy so that requests from the Angular app to “/blogapi/…” endpoints go through Nginx, and then Nginx forwards them to the Java container (backend-api). And this exactly what we have done -as we have seen before- by the location proxy block for /blogapi/ requests in our (‘my-default’) NGINX configuration file, and more precisely with the proxy_pass setting:
proxy_pass http://net2-backend-api:8080/blogapi/;By doing so, we just use the network container name: ‘net2-backend-api’ as a hostname.
The database
The last tier of our full-stack docker containerization concerns the database container (tier). If you take a look at our ‘docker-compose.yaml’ file, you will see that the database container is the only container that it is pulled from the official Docker Hub MariaDB image. This is because we only want to expose our data via the default port used by MariaDB (3306).
|-- net2
       |-- docker-compose.yaml
       |-- database
       |
       |-- backend
       |          |-- Dockerfile
       |          |-- supervisord.conf
       |          `-- run_jar.sh
       `-- frontend
                  |-- Dockerfile
                  `-- my_default
We actually, pull the image: arm64v8/mariadb:11.5.2-ubi9 which was the ‘latest’ on 2024 Sep 15.
Apart from exposing the default MariaDB 3306 port to other networked containers, we again, map the host ‘~/DOCKER_SHARE1/net2/database’ folder to the container folder: ‘/usr/share1’, and we also set it as the default working directory.
However, you can pay a bit more attention to the following settings of the database service section inside the ‘docker-compose.yaml’ file:
….
    environment:                            # Env variables for auto-upgrade from 10 to 11 if we want to use the older version schemas see more at: https://github.com/docker-library/docs/issues/2164 and  https://docs.photoprism.app/getting-started/troubleshooting/mariadb/#auto-upgrade
      MARIADB_AUTO_UPGRADE: "1"
      MARIADB_INITDB_SKIP_TZINFO: "1"
…..
    networks:
…..
    volumes:
….
      - ~/DOCKER_SHARE1/net2/database/data/mysql:/var/lib/mysql # Map the old container data-folder to the 'standard' folder /var/lib/mysql in the container
….
As you might have noticed by the comments provided, we have defined the above 2 specific variables, because -in our case- we have to use (transfer) the existing data from another MariaDB container that actually has an older MariaDB version (version 10.x.x). So those 2 environment variables inform the new MariaDB version (11.5.2) that the data in the datafiles are coming from an older version. (Well, this is because of my laziness — I didn’t want to use export/import commands for transferring the existing data, but you can do it if you wish).
The mapping of the container folder ‘/var/lib/mysql’ to the host folder ‘~/DOCKER_SHARE1/net2/database/data/mysql’ allows us to transfer the old data files to the new container.
Transferring old data
Perhaps you are not aware of the fact that Docker by default creates a new Docker Volume for keeping the database files accessible from the host system. To find the volume used by the container you can use the following command from your host terminal:
docker inspect -f ‘{{ .Mounts }}’ <container0id>
However, you must know that the volume (and its contents) is not directly accessible from a macOS host. Nevertheless, you can use the macOS docker desktop to enter, inspect, and access the container files. For instance, you can see the following screenshots that might be useful to you:

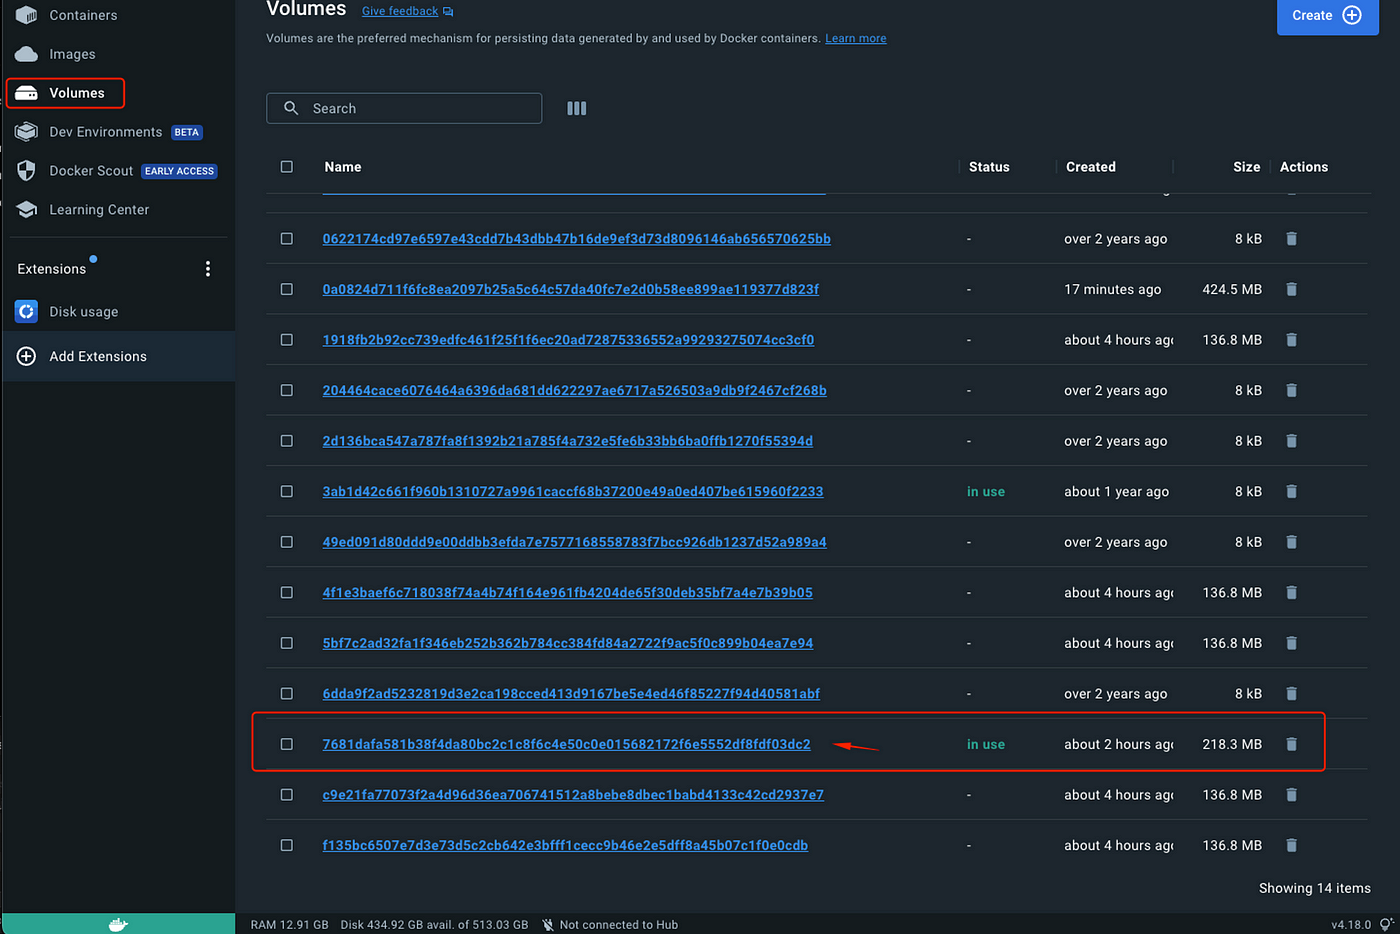
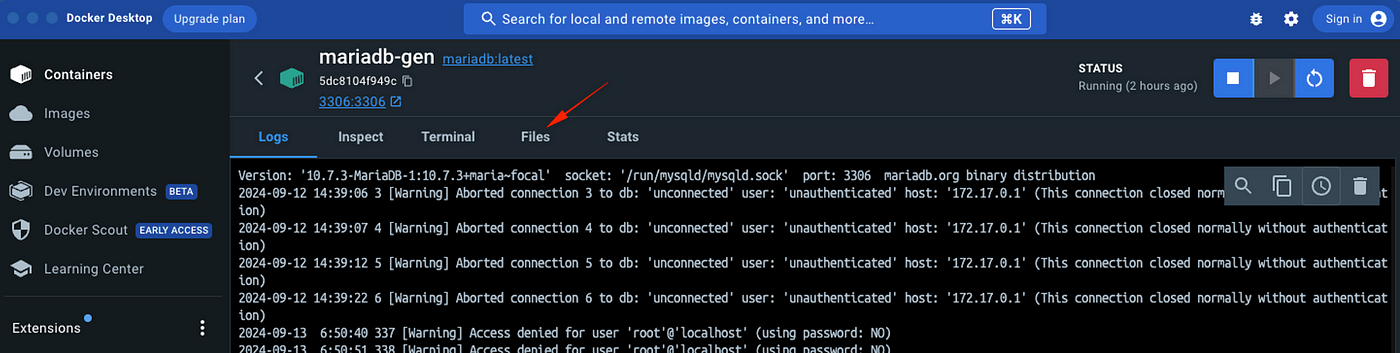
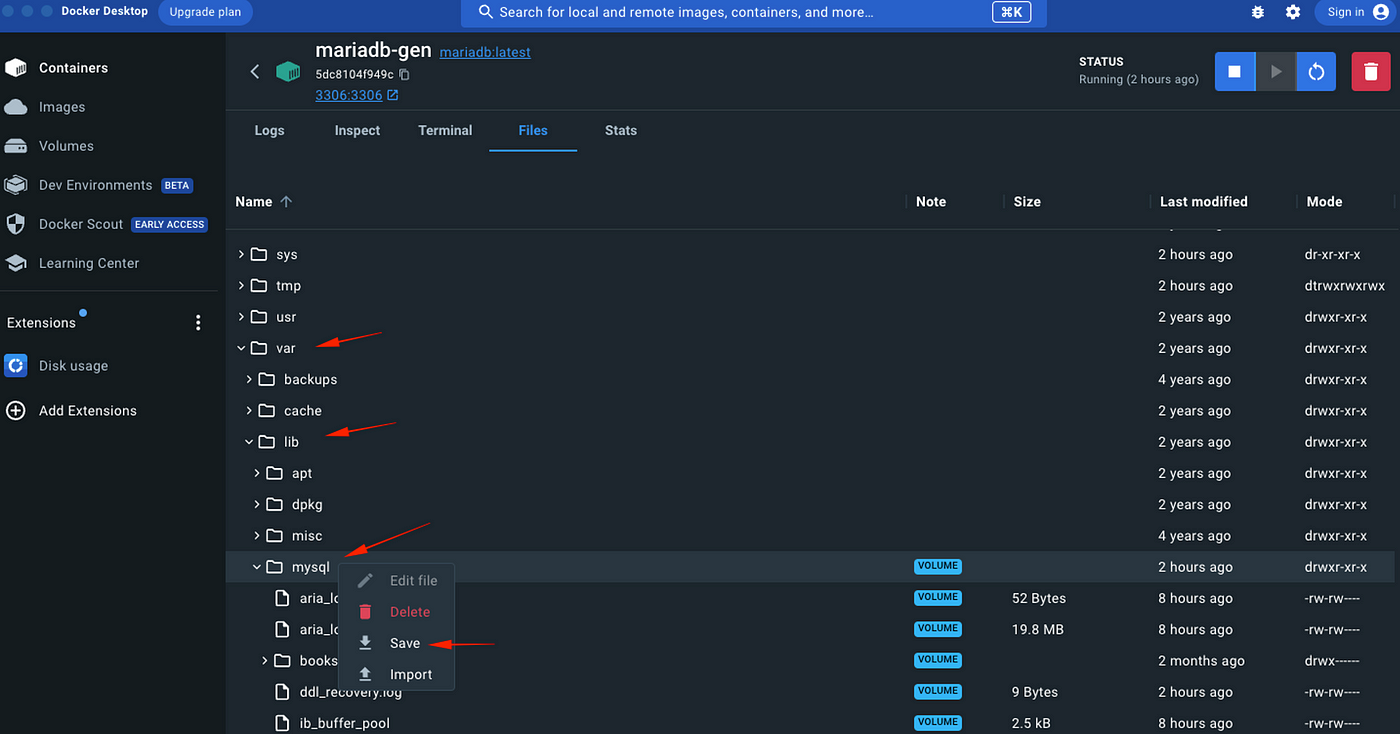
Thus, we can easily (and lazily) save the old MariaDB datafolder ‘/var/lib/mysql’, and then transfer the content into the new container. (In our case we do this via the shared host folder ‘~/DOCKER_SHARE1/net2/database/data/mysql’)
The final net2 folder structure of our stack
After you have created and updated our ‘docker-compose.yaml’, as well as all the rest of the files we’ve seen and are necessary for each of the containers, your net2 folder should look like something like the following tree structure:
|
|-- net2
|   |-- backend
|   |   |-- Dockerfile
|   |   |-- api
|   |   |-- run_jar.sh
|   |   |-- supervisord.conf
|   |-- database
|   |   `-- data
|   |-- docker-compose.yaml
|   `-- frontend
|       |-- Dockerfile
|       |-- my-default
|       `-- nginx
|    `-- wwwroot
|
Application updates and deployment
Angular frontend application — update
The only update we have to make in our frontend app (that runs in the ‘front-nginx1’ container) is to define the part of the back-end API endpoints (in the ‘backend-api’ container), which we have set up as ‘blogapi’.
If you have already accessed the initial repo of the frontend Angular application, you can open the DataService (data.service.ts) and change the baseUrl:
from:
baseURL: string = ‘http://localhost:8080/blogapi/';
to:
baseURL: string = ‘/blogapi/’;
Thus, whenever a request concerns ‘blogapi’ it will actually be redirected to the http://net2-backend-api:8080/blogapi/ .
Angular frontend application — deployment
When you build the Angular application (e.g. via ng build command) the default output location of the compiled bundle is under the dist/<project-name>/browser subfolder of the root project folder. Then, the compiled bundle of the Angular Application should be deployed into the ../net2/frontend/nginx/wwwroot folder (in our case into the ~/DOCKER_SHARE1/net2/frontend/nginx/wwwroot folder).
If you wish, you can change the value of the ‘outputPath’ property and set it to ‘~/DOCKER_SHARE1/net2/frontend/nginx/wwwroot’ folder, so the output bundle will be directly deployed into our frontend shared folder.
Alternatively, you can automate the build and deploy process by using a bash shell script like the ‘build-and-deploy.sh’ provided below:
#!/bin/bash

ng build
rm -rf ~/DOCKER_SHARE1/net2/frontend/nginx/wwwroot/*
cp -a dist/ang18UseDynamicDataWithYourBlog2/browser/. ~/DOCKER_SHARE1/net2/frontend/nginx/wwwroot/
Using environment files with our Angular frontend application
As you have seen, we have directly updated the value of the ‘baseURL’ property (variable) inside the DataService class (data.service.ts). However, a better approach is to define it via a global variable.
In Angular, environment files are used to define global variables that differ between environments, such as development, testing, and production. These variables allow us to easily switch configurations, like `baseURL`, depending on the environment in which your application is running.
By default, Angular uses 2 (pre-default) environment files that can be put into the `src/environments/` directory: the `environment.ts` (for development and ng serve command) and the `environment.prod.ts` (for production and ng build command). This will allow us to define a global variable, e.g. ‘apiUrl’, and give it different values for development and production, like this:
   // environment.ts
   export const environment = {
     production: false,
     apiUrl: 'http://localhost:8080'
   };
// environment.prod.ts
export const environment = {
production: true,
apiUrl: 'http://localhost:8080/blogapi/'
};Note, that you can always add more than those 2 environment files (e.g. environment.development.ts , environment.testing.ts, etc.), but it is up to you and your specific needs.
Since for the build process the default environment file is the environment.ts file, in our case, we use the following 2 environment files:
// environment.ts (build default --> production)
export const environment = {
    production: true,
    // apiUrl: 'http://localhost:8080/blogapi/'
    apiUrl: '/blogapi/'
};
// environment.development.ts
export const environment = {
production: false,
// apiUrl: "/blogapi/"
apiUrl: 'http://localhost:8080/blogapi/'
};Then, we have to adapt the ‘baseURL’ property accordingly in the DataService class, i.e.:
baseURL: string = environment.apiUrl;Note that we have also to import the `environment` object:
import { environment } from ‘../environments/environment’;The real benefit of using environment files is that we can boost somehow the automation of the building process of our project. This means that we can configure environment-specific Builds.
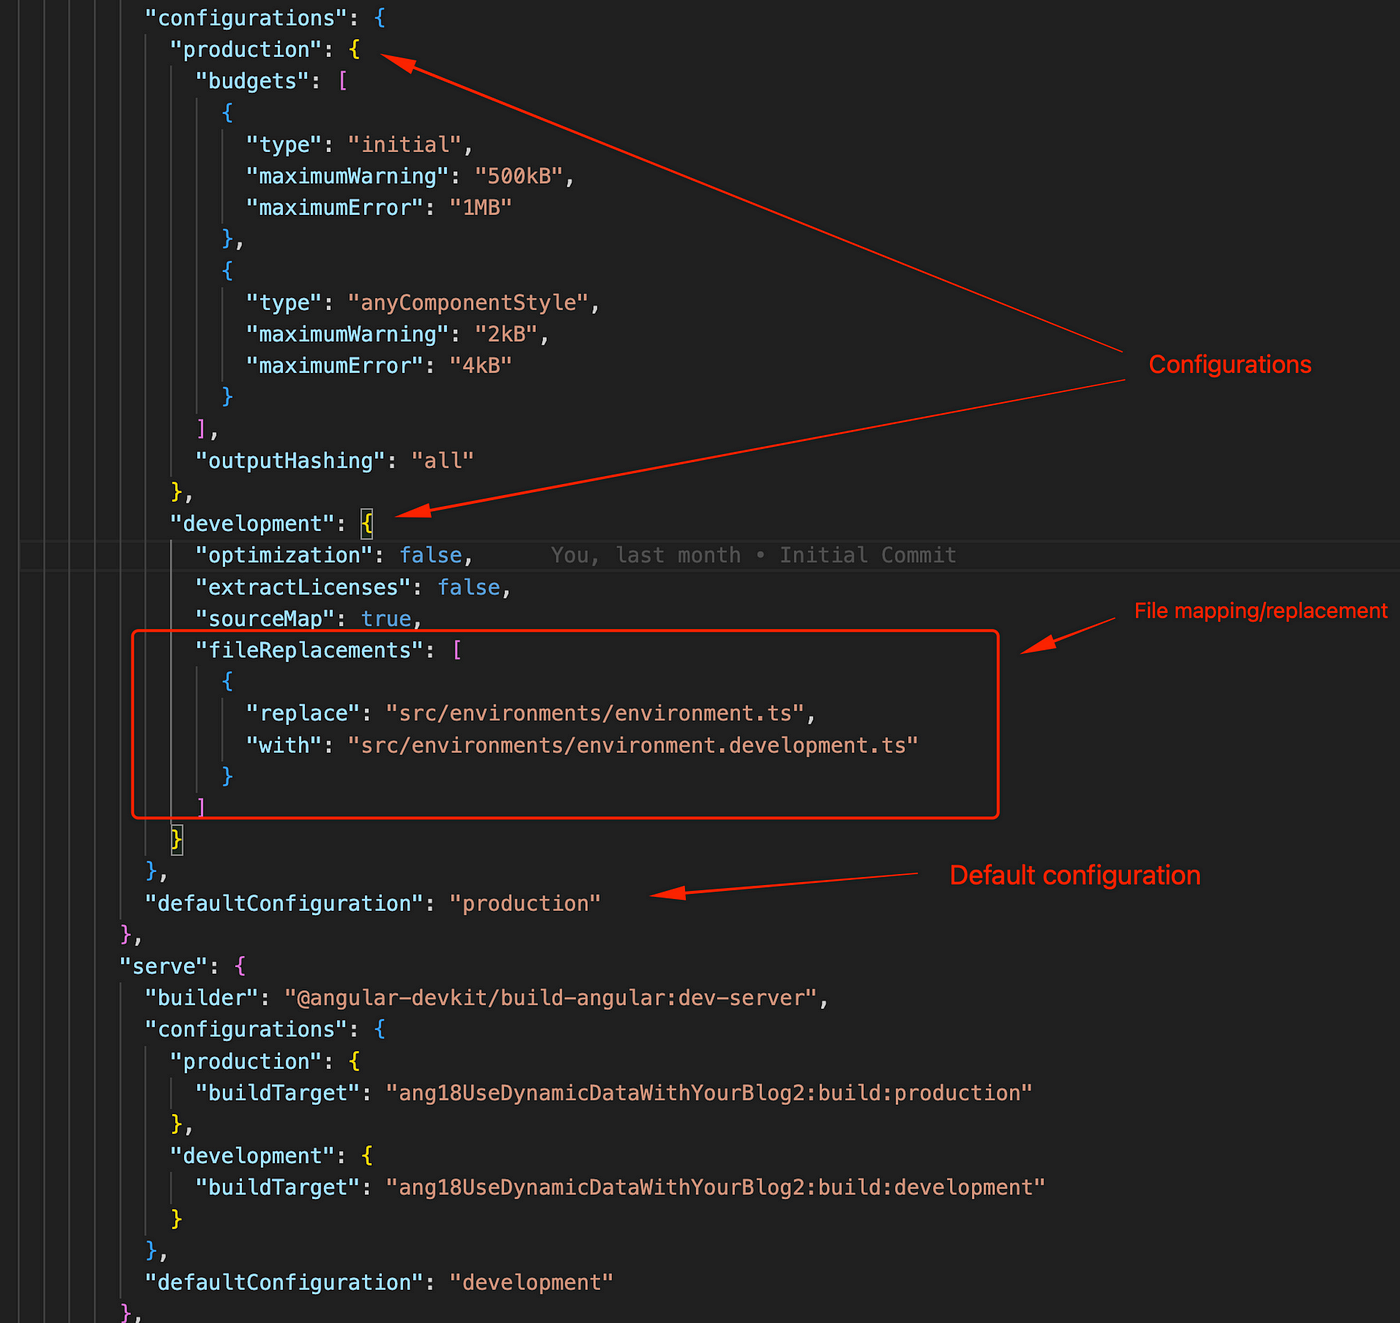
The `angular.json` file allows us to specify which environment file to use when building for a specific configuration. As you probably are aware, we can have multiple configurations defined in the ‘angular.json’ file. In the `fileReplacements` section, we can map the development file to the desired environment file. For the ‘build’ process the default configuration is the production configuration, and for the ‘serve’ process (where a default node server is running up) the default configuration is the development configuration. The following shows the mapping for the development section when we build our app (where the production configuration is the default):
You can configure more environments in the same way. For example, to add a testing environment:
   "configurations": {
     "testing": {
       "fileReplacements": [
         {
           "replace": "src/environments/environment.ts",
           "with": "src/environments/environment.testing.ts"
         }
       ]
     }
   }
Then, we can easily build or serve our app using different configurations. For instance:
ng build — configuration developmentor
ng serve — configuration testingetc.
A final note here, is that when we use the default environment.ts file (default for the build process) we can avoid specifying it with the ng build command (e.g.: see the bash script ‘build-and-deploy.sh’ above).
Java/Spring Boot backend application — update
(Recall that you can find the initial repo here). The main change we must make is to the pom.xml file, where we must remove the war packaging tags, since now we will use a .jar instead of a .war file. Moreover, for the same reason, the spring-boot-starter-tomcat dependency can be left out.
The next important change has to do with the hostname. We have already mentioned that we can use a container name as a hostname. So, the change we must make in our backend application is to update the database connection string inside the application.properties file.
from:
spring.datasource.url=jdbc:mariadb://localhost:3306/testblog2
to:
spring.datasource.url=jdbc:mariadb://net2-database-mariadb:3306/testblog2
where ‘net2-database-mariadb’ is our database container.
A final note about the backend application is the following: We don’t need anymore any Web Configuration for switching off the CORS protection since the backend and frontend apps do not run on the same host. So, we can ignore/remove the WebConfig.java class of the backend application.
Note, that you also will find the final backend repo at the end of the post.
Java/Spring Boot backend application — deployment
When you run maven to package your backend application the output folder of the .jar file (e.g. the blogbackdemo1–0.0.1-SNAPSHOT.jar file) is located under the target/ subfolder of the root project folder.
Note that you can skip the tests when you run Maven packaging, to avoid testing failures due to the unrecognized hostname, by using the -DskipTests flag, e.g:
mvn -DskipTests package -f <project-full-pathname>/pom.xmlThen, the backend executable package (the .jar file) should be deployed into the ../net2/backend/api folder (in our case into the ~/DOCKER_SHARE1/net2/backend/api folder).
You can also use a bash script to automate the build and deployment process like the one given below:
#!/bin/bash

mvn -DskipTests package -f <project-full-pathname>/blogbackdemo2/pom.xml"
cp target/blogbackdemo2*.jar ~/DOCKER_SHARE1/net2/backend/api/
In the above script, you should change the <project-full-pathname> accordingly. You can also update the mvn command using its full path name (if you haven’t installed it centrally, and/or it’s not in your PATH).
Starting up our stack
Finally, we are ready to start up our networked containers. For this, you can use the up command, to bring up the services with the shared volumes:
docker-compose upThen, you can access the full-stack application via your browser at http://localhost:8001.
BTW, it is good to know some other options we have, when we use the docker-compose command, so you can take a look at them, below:
up — The docker-compose up, starts, or restarts all the services (all containers) defined in a docker-compose.yml. In the default “attached” mode, you see all the logs from all the containers. In “detached” mode (-d), Compose exits after starting the containers, but the containers continue to run in the background.
build — The docker-compose build only builds the images, and does not start the containers
start -The docker-compose start command is useful only to restart containers that were previously created, but were stopped. It never creates new containers.
run — The docker-compose run command is for running “one-off” or “ad-hoc” tasks. It requires the service name you want to run and only starts containers for services that the running service depends on. Use run to run tests or perform an administrative task such as removing or adding data to a data volume container. The run command acts like docker run -in that it opens an interactive terminal to the container and returns an exit status matching the exit status of the process in the container.
If you use the Docker desktop app in your host you can run and stop all the containers in net2. E.g.: in a macOS Docker desktop:
👉Find here the final repo of the frontend Angular application project.
👉Find here the final repo of the backend Java/Spring Boot application project.
Conclusion
Containerizing a 3-tier full-stack application, using technologies like Angular, Spring Boot, and MariaDB, greatly enhances the scalability and maintainability of modern applications. By leveraging Docker Compose, we can automate and streamline the development and deployment process. This setup allows for seamless communication between the tiers while maintaining isolation, which is crucial for flexibility, testing, and performance. The ability to control different environments and manage services efficiently with tools like Supervisor ensures that the system remains robust and easy to maintain.
So, that’s it for now. I hope you found this post useful 👏 for you.
Stay tuned and keep coding!