Angular: The many faces of the Template Variable Syntax – a cheat sheet

231208
Intro
Angular uses special syntaxes that allow communication between the component code (Typescript class) and its HTML template.
This post is not an exhaustive reference for the subject; however, you might find it quite useful as a quick reference for various options Angular offers us when we work on templates of the components. It is actually, inspired by the official documentation. Furthermore, it is worth noticing that a 2-way binding syntax is also a subject in this post accompanied by the respective demo project in Stackblitz.
Interpolation

Perhaps, this is the first template syntax, one usually learns. Nothing special. Just include the property/variable in double-curly-braces {{ … }}. E.g.:
<p>{{title}}</p>
Template statement

We just enclose the method or property being used in the component inside double quotes “ . . . “. E.g.:
<button type="button" (click)="inceaseHeight()">Increase</button>
Binding syntax

Here we use the right brackets [ … ]. It is typically employed when we wish to update the state of a DOM element in the template to reflect a change in the value of a component property or variable. A DOM element’s state can be specified by a style, class, or attribute. We bind the property using the template statement to e.g.: an attribute of a DOM element that is related to the state of this element. The brackets, [], cause Angular to evaluate the statement on the right-hand side of the assignment as a dynamic expression.E.g.:
<!-- Bind button disabled state to `isUnchanged` property -->
<button type="button" [disabled]="isUnchanged">Save</button>
We can distinguish 2 main cases:
- Property binding for the status of DOM elements such as attributes, classes, and styles.
- Event binding for responses to events and/or user actions such as keystrokes, mouse movements, clicks, and touches.
Property Binding
Sets a property of a target DOM element. E.g.:
<img alt="item" [src]="itemImageUrl">
Note that a directive is considered a DOM element. Furthermore, we can use the property binding syntax to pass down a property value from a parent component to a child property decorated via the @Input decorator, as we will see a bit later on.
Attribute binding
The attribute binding syntax resembles property binding, but instead of an element property between brackets, you precede the name of the attribute with the prefix attr, followed by a dot. Then, you set the attribute value with an expression that resolves to a string.
<!-- create and set an aria attribute for assistive technology -->
<button type="button" [attr.aria-label]="actionName">{{actionName}} with Aria</button>
Class binding
A class can be applied or not. For a single class, we can similarly add the class prefix followed by a dot and then the name of the class. E.g.:
<button type="button" [class.my-red-button]="onWarning"> {{buttonText}} </button>
The onWarning property value should be either true or false.
When we have to apply multiple classes we can use the binding just with the class word, and as values we have the following choices:
- A string of the class names comma separated
- A string array tith the class names.
- An object with (key-value) properties, where keys should be class names and values true or false
e.g.:
Multi-class binding  [class]="classExpression"      string    "my-class-1 my-class-2 my-class-3"
Multi-class binding  [class]="classExpression"      Record<string, boolean | undefined | null> {foo: true, bar: false}
Multi-class binding  [class]="classExpression"      Array<string>       ['foo', 'bar']
Style binding
Similarly with class binding, we can have a single style or multiple classes to be applied.
<nav [style.background-color]="expression"></nav>
<nav [style.backgroundColor]="expression"></nav>
Event binding
It uses a similar syntax as we’ve seen before, in Property binding syntax but instead of brackets [] we use parentheses ( … ).
example 1:
<button (click)="onSave()">Save</button>
example 2:
<input (keydown.code.shiftleft.altleft.keyt)="onKeydown($event)" />
Moreover, apart from using a standard html element event, we can also use a predefined custom directive.
example 3:
<h4>myClick is an event on the custom ClickDirective:</h4>
<button type="button" (myClick)="clickMessage=$event" clickable>click with myClick</button>
{{clickMessage}}
Template variables
In order to define them, we have to prefix the variable name with the hash # symbol.
They are used to pass values from one part of a template into another part of the template e.g.: for getting the input from a user response. Template variables can be used within the component template, i.e.: template variables are scoped to the template that declares them. They can be applied to a DOM element, a directive/component, a TemplateRef in conjunction with the ng-template, and/or a web component.
. . .
<input #uname placeholder="User Name" />
. . .
<button type="button" (click)="displayUserName(uname.value)">Call</button>
. . .
As you can see we can use the uname template variable to pass its `value` to an event handler/function.
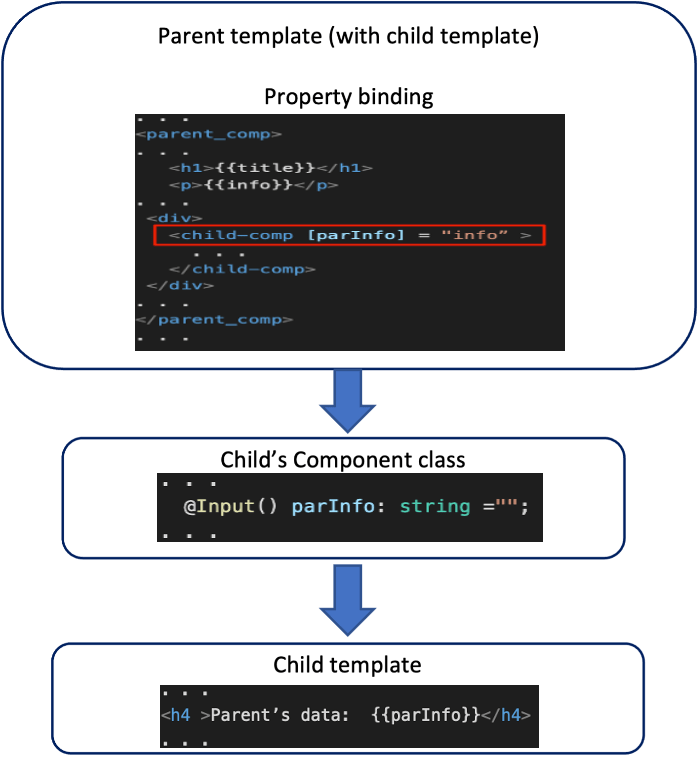
Using @Input to pass data from parent to child

The property binding syntax ( brackets []) is also used for passing component property values down to its child component. E.g.:
<app-child-item [childItem]=“parentItem”></app-child-item>
The following diagram shows the flow of the property value from the parent to the child component:

Note that to monitor any change of the property in the parent, we have to use Angular’s OnChanges lifecycle hook.
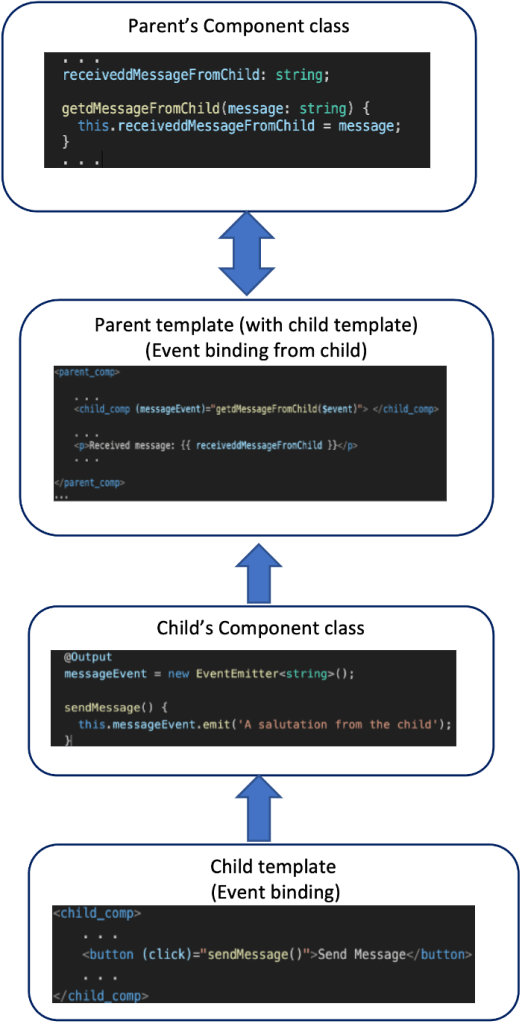
Using @Output to pass data from parent to child

The event binding syntax using parentheses (…) is also valid for passing a child component property value, up to its parent component (via @Output decrator emission).
<child-comp (messageEvent)="getMessageFromChild"></child-comp>
The following diagram shows the flow of the property value from the child to the parent component:

We have seen previously how we can pass data from parent to child component using the @Input decorator (in the child component code), and property binding in parent’s template (within the child’s opening tag/selector).
We have also seen how we can pass data from child to parent component using an emission of a child property value via the @Output decorator (in the child component code), and event binding in parent’s template (within the child’s opening tag/selector).
So, one can implement both of them using different properties for passing values from child to parent, and vice-versa. E.g.:
<parent-comp>
. . .
  <child-comp
  [item]="parentItem"
  (childItemChanged)="parentFunction($event)">
  </child-comp>
. . .
</parent-comp >
However, we can use just one property and achieve 2-way binding between them.
Two-way data binding

Angular’s two-way binding syntax is a combination of square brackets and parentheses, [( … )]. The [()] syntax combines the brackets of property binding, [], with the parentheses of event binding, (). Inside the parentheses, we have to use just 1 property, defined in the child component class. For this, in the child component, we have to use both of the decorators: @Input and @Output, but here we have to follow a simple rule.
Let’s say, if for the property ‘height’ we apply the @Input decorator to get its value from the parent, then we have to decorate with the @Output decorator the ‘heightChange’ property. This means, that we have to add the Change suffix to the property name we used with the @Input decorator.
e.g.:
<child-comp [(height)]="fontSizePx"></app-sizer>
For demo purposes, you can refer to the following example project. It shows how the 2-way binding works between a parent and a child component. The parent component passes down an initial value for defining the height of a div element in the child. The user can increase or decrease the div height by pressing the + or – buttons in the child. The change is reflected immediately in the child, as well as in the respective property value of the parent.
The child.component.ts:
The child.component.html
The parent.component.ts
The parent.component.html
Finally, you can find bellow the full running code of the demo 2-way binding project in Stackblitz:
https://stackblitz.com/edit/stackblitz-starters-eufyrg?file=src%2Fparent%2Fparent.component.html
or
https://stackblitz-starters-eufyrg.stackblitz.io
That’s it for now! I hope you enjoyed it!
Thanks for reading and stay tuned!
