
GitHub Copilot in VS Code with a different account

231130
Intro
GitHub Copilot significantly increases the productivity of developers. This is mostly because using GitHub Copilot can drastically cut off the time spent searching the web on sites like StackOverflow or other blogs, for a code solution. And this is where GitHub Copilot can really assist you in coding faster.

Nevertheless, this article isn’t aimed at providing instructions on utilizing GitHub Copilot. Instead, its focus lies in demonstrating the setup process within VS Code using the GitHub Copilot extension. But hold on! This is something quite straightforward. Isn’t it? Yes, it really is. (Furthermore, you can always read more at official docs, e.g.: here.)
Well, the main focus here, is on configuring VS Code to use just 1 Copilot account, simultaneously with any other additional GitHub account one might have.
The problem
According to official docs: “If you want to use GitHub Copilot, you either need a subscription for GitHub Copilot in your personal account, or you need to be assigned a seat by an organization with a subscription for GitHub Copilot Business.”. This practically, means that you have to have signed in VS Code with an account that is linked to a Copilot subscription (personal or assigned to you by a business/organization).
It is obvious, that the majority of developers using Git and GitHub had at least 1 GitHub account, even before Microsoft introduced Copilot. But if you already have your GitHub account, what if you decided to create another one linked to a paid Copilot subscription just to see if Copilot fits your needs, can you use it with your older repos?
When you use VS Code with Git and GitHub, it asks you to log in to your GitHub account by opening your Chrome browser at the GitHub Sign-In page, where you can provide your account credentials and authorize VS Code to use your account, for accessing it whenever you use it with your Git local repo (for pushing, pulling, etc.). This is a procedure that you probably followed just once and afterward everything works smoothly.
Now it’s time to use your new account linked to your paid Copilot subscription. So, let’s see how we can deal with this.
The solution
Sign Out and Sign In with a different account
Well, it is obvious that you have to change the account you already use with the new one linked to Copilot.
However, if you want to switch to a different GitHub user account in VS Code, you have first to Sign Out from the GitHub account, (if you have already Signed In). As we’ve said this can be done using the Chrome browser. Otherwise, even if you have Signed Out from it within VS Code, trying to Sign In again, VS Code automatically uses Chrome browser to see if you are already Signed In, and if so, it uses this Signed-In account again.
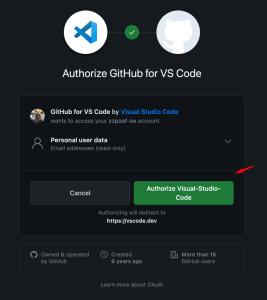
So, in case you are Signed Out, VS Code opens the Signed In form in GitHub using the Chrome browser, e.g.:
Then you can Sign In with a different account, and authorize GitHub to allow to VS Code to access your account.
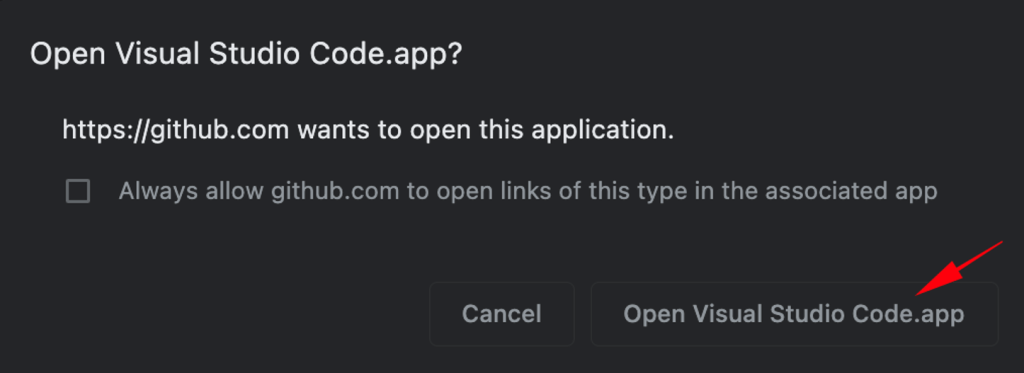
Finally, you have to click on the browser button “Open Visual Studio Code app” which brings you back to your VS Code window.

Now, in VS Code, you can see that your account is the new one:
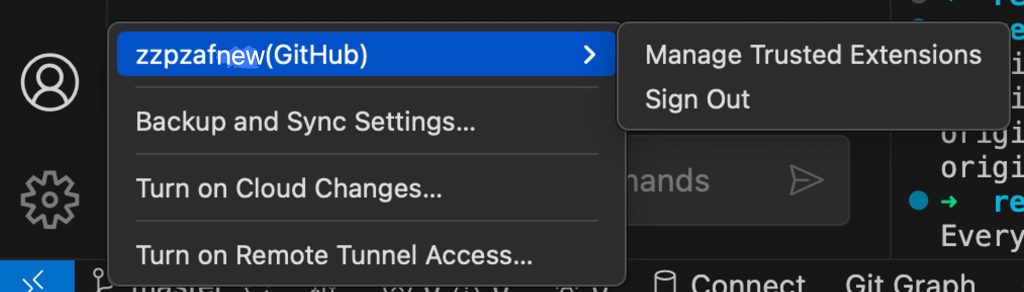
This is OK, however, you have no yet access to your previous remote GitHub repo. If you try to push something from your existing project to your remote repo (that you probably have previously defined) you will face an error access warning, and you push fails.
Change the settings in your local .git/config file and use a PAT
Of course, we are not Sign Out and Sign In again with the previous GitHub account credentials. Neither we are going to change Git global user settings.
The solution here is to use our previous account Personal Access Token (PAT). If you don’t have a PAT yet, you can to https://docs.github.com/en/authentication/keeping-your-account-and-data-secure/creating-a-personal-access-token for instructions on how to generate one.
Just a note here, for those who are going to create a new PAT: Pay attention to set up your PAT correctly with the minimum required scopes: ‘read:org’, ‘repo’, ‘workflow’, and probably: ‘gist’, ‘write:packages’, otherwise you will face a error like “error validating token: missing required scope ‘read:org’”.
Now you have created your PAT you can copy it and even store it in a text file, e.g. ‘myPAT1.txt’.
Next step is to use it to access directly your existing repo.
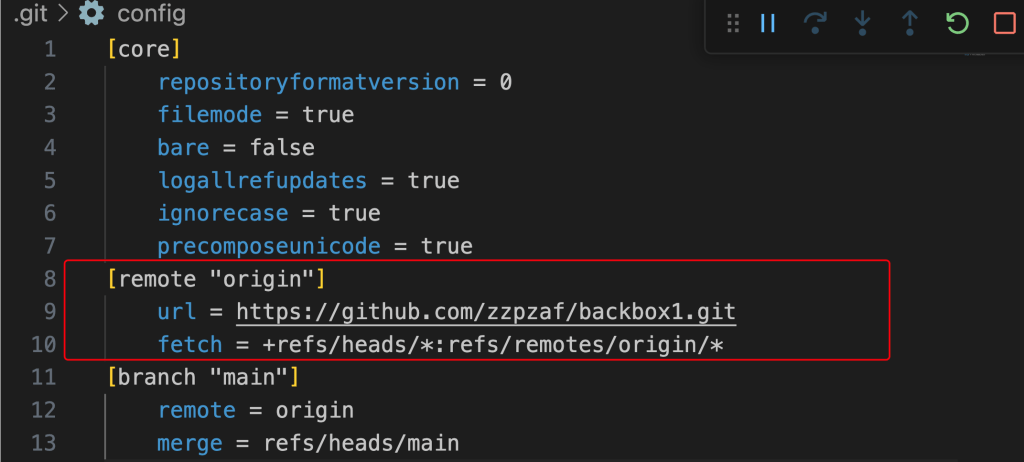
As you should be aware, whenever you initialize a new local Git repo, a file with the name ‘config’ is created inside the hidden .git subdirectory in your project root folder. This is where Git stores your local repository settings. And of course, this is also true for your existing remote repo (the one that is under your previous GitHub account, which is not linked to the Copilot). So if you have previously created a remote origin, you can use the ‘git remote -v’ command and check it, e.g.:
➜  backbox1_230729_COMMIT-4 step1 git:(main) ✗ git remote -v
origin	https://github.com/zzpzaf/backbox1.git (fetch)
origin	https://github.com/zzpzaf/backbox1.git (push)
➜  backbox1_230729_COMMIT-4 step1 git:(main) ✗
You can open your local .git/config file in VS Code and check that there are the respective entries for your remote origin, similar to:
The last step is to use your PAT as prefix to access the repo, like that:
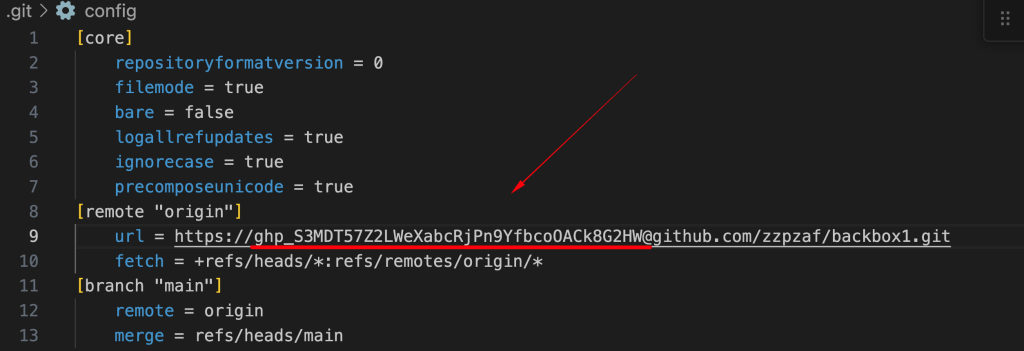
    url = https://<PAT>@github.com/zzpzaf/backbox1.git
    fetch = +refs/heads/*:refs/remotes/origin/*
Below is how it looks like using a (fake) PAT:
Then you can save it, and also, you can check this again using the git remote -v command:
➜  backbox1_230729_COMMIT-4 step1 git:(main) ✗ git remote -v
origin	https://ghp_S3MDT57Z2LWeXabcRjPn9YfbcoOACk8G2HW@github.com/zzpzaf/backbox1.git (fetch)
origin	https://ghp_S3MDT57Z2LWeXabcRjPn9YfbcoOACk8G2HW@github.com/zzpzaf/backbox1.git (push)
➜  backbox1_230729_COMMIT-4 step1 git:(main) ✗
So, that’s it! Now you can be Signed In with your Copilot account, enjoying all its AI assistance while you work on a project created with a different GitHub account (your older one). This procedure can be applicable also, to any other paid VS Code extension!!!
As a final note I’d like to warn you to be careful enough and don’t use it in a share computer!
That’s it for now! I hope you enjoyed it!
Thanks for reading and stay tuned!