
Angular: any component 👉⇢ dynamic component!

231107-25
Intro
A step-by-step approach on how you can implement Angular dynamic components.
What dynamic components are
Don’t get confused. Dynamic components are not exotic components. Dynamic components are any of our ordinary components when they are being used dynamically, i.e., when loaded at runtime. So, we can create and render a dynamic component on the fly. Generally, you can consider that any component can be, or become, a dynamic component when we load it at runtime.
Furthermore, a dynamic component can be any Angular ‘normal’ component, regardless if it is a standalone component (default from Angular 16 and afterward), or an ordinary ng-module-based component.
How to load a component dynamically
Usually, a dynamic component is loaded at runtime via using another ‘host’ (or ‘parent’, or ‘container’) component. A host component is where we dynamically create and use our dynamic component.
Also, we need to define an ‘entry point’ (also known as ‘anchor point’) in the template of the host component for rendering our dynamic component. This is because we are not going to use the dynamic component-defined selectors. However, the ‘entry point’ is where the dynamic component will be injected. The entry point actually forms the DOM node, where the dynamic component’s view will be attached.
Note also, that an entry point should be applied within the <ng-template> or the <ng-container> tags (the Angular built-in directives) in the template of the host component of our choice.
What we will do is to see how we can use any component as a dynamic component, by implementing real working code examples, and using all the related options Angular offers us.
A simple way to render a dynamic component directly in the template of the host component is by using the Angular ready-made NgComponentOutlet directive. However, a more advanced and widely-used option is to use the createComponent() function of the ViewContainerRef class, with a template variable, or a directive. This is where we will focus more in this post, after a short intro to the NgComponentOutlet directive.
As a final example we will see how we can make a candidate dynamic component almost entirely unknown for the host component, and how using a factory service can facilitate this.

Note that the full code repos are provided in each step of the implementation examples. So, let’s start.
Using the built-in NgComponentOutlet directive in the template of the host component.
This option allows us to place directly in a host’s template any component we wish to be rendered in a dynamic fashion. Let’s see a couple of simple examples.
Given that we’ve started a new Angular project, we would have the AppComponent in place by default so that it can be used as our host component. Thus, what we have to do is create a candidate component for our dynamic component. E.g.: the MyDynamic1Component. For demo purposes let’s change its default template a bit, to something like this:
<p>This is my-dynamic1 component rendered in ppComponent templte vi using the NgComponentOutlet!</p>
The next thing is to use our MyDynamic1Coponent to its host component -the AppComponent. First, we have to import our dynamic component to the AppComponent and create a property/field for it. The AppComponent should look like this:
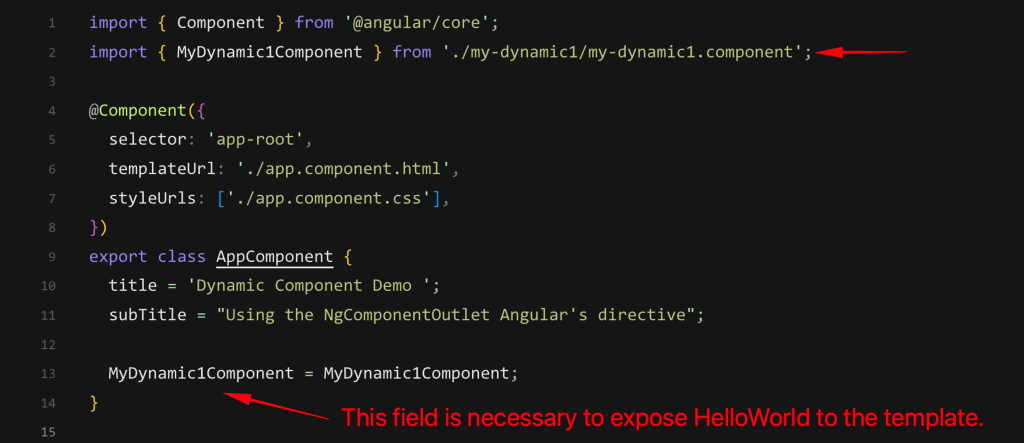
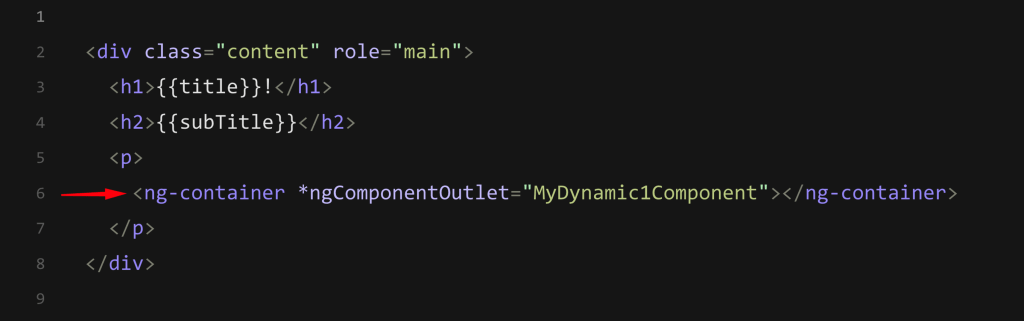
Finally, let’s place the NgComponentOutlet directive inside n <ng-container> opening tag (in the host AppComponent template), like this:
👉 Find the repo of the code (ngnomponentoutlet1) here.
So far so good. But we can make some improvements to the host’s (AppComponent) code that can allow us to be more flexible, e.g. to pass some data from the host to the dynamic component, to trigger when the dynamic component can be loaded. Let’s see quickly 2 simple examples of both of them.
Pass data from host component to the dynamic component.
Note that here we use input binding which works from Angular version 16.2 and afterward.
We can do that in a similar manner we pass data from a parent to a child component, i.e. via using the @Input decorator in the dynamic component which now plays the role of a child component.
However, the difference here, is that we can have an array of property-value pairs in the host component, so we can use the @Input decorator for each one of those properties. e.g. in the host component code .ts file:
. . .
dynInputs = { 'compLabel': 'my-dynamic1', 'hostCompName': this.compName  };
. . .
In host template .html file:
. . .
<ng-container *ngComponentOutlet="dyn2; inputs: dynInputs;"></ng-container>
. . .
in the dynamic (‘child’) component code .ts file:
. . .
  @Input() compLabel!: string;
  @Input() hostCompName!: string;
. . .
in the dynamic (‘child’) component .html file:
. . .
<p>This is {{compLabel}} component rendered in {{hostCompName}} template via using the NgComponentOutlet!</p>
. . .
👉 Find the repo of the code (ngnomponentoutlet2) here.
Trigger the loading of a dynamic component
A simple way to trigger the loading of our dynamic component is to use a button, that calls a function which in its turn changes a property value to true. Then we can use this property value with the *ngIf directive in the host template.
The host code .ts file:
The host template .html file:
👉 Find the repo of the code (ngnomponentoutlet3) here.
After having obtained some grasp of using the NgComponentOutlet directive, it’s time to proceed further, using the createComponent() function of the ViewContainerRef class with our Typescript code.
Using the createComponent() function of the ViewContainerRef class with a template variable or a directive
As we’ve said a more advanced option, is to use the createComponent() function of the ViewContainerRef class with a template variable or a directive. The advantage of both of these approaches is that we can do much more things playing with the Typescript code, than the error-prone template. This also offers us more flexibility and control over various conditions and aspects of using app-wide dynamic components.
Note that here, we will reference examples based on Angular version 13 and afterward (without using the deprecated ComponentFactoryResolver). In the 13th Angular release (13.2), the use of ComponentFactory and ComponentFactoryResolver have been deprecated (removed) and the Ivy rendering engine is solo responsible for instantiating a dynamic component.
Before proceeding to see how to use either a –template variable or a directive, it will be good to make some reference notes about some of the Angular built-in elements that we are going to use.
The @ViewChild decorator
The @ViewChild decorator is one of the most commonly used decorators, for accessing DOM elements via Angular DOM querying mechanism. It can be used as a property decorator for accessing:
- an html (a DOM) element as a part of a template view.
- a component -> Such component cam be a child or a dynamic component
- a directive
Thus, the @ViewChild decorator allows us to define and access component references, to elements that are contained inside component’s template. Many times, we say that using it, we inject template elements (via their template references) into component member variables via the @ViewChild decorator.
The basic syntax to ViewChild decorator is the following:
. . .
   @ViewChild([reference from template], {read: [reference type]});
. . .
Usually, we use the @ViewChild decorator with a template reference variable, i.e. a template variable starting with #, and which is nothing but a named reference to a DOM element within the template, e.g.:
. . .
   <div #someElement>
. . .
Then, in the component, we can access it like that:
. . .
  // Access DOM element using Angular @ViewChild
  @ViewChild("someElement") domReference;
. . .
We can use the @ViewChild to decorate any component class property, e.g. the viewRef private property below:
. . .
  @ViewChild('dynamic', { read: ViewContainerRef })
  private viewRef!: ViewContainerRef;
. . .
We actually inject the template reference variable ‘dynamic’ to the viewRef property, which allows us to manipulate it according to our specific goals (e.g.: to load a dynamic component in the ‘dynamic’ anchor-template reference (the entry-point in the template).
The ViewContainerRef
According to official documentation the ViewContainerRef class:
“Represents a container where one or more views can be attached to a component.
Description
It Can contain host views (created by instantiating a component with the createComponent() method), and embedded views (created by instantiating a TemplateRef with the createEmbeddedView() method).
A view container instance can contain other view containers, creating a view hierarchy.”
Container here, actually means, a view, such as a template or a DOM element.
Generally, a dynamic component is implanted into a specific place in the template using ViewContainerRef reference. Usually, it is used in conjunction with @ViewChild decorator, to obtain a specific template reference variable in the host/parent component template.
In order to add a dynamic component to the host template, we have to call the createComponent() method of ViewContainerRef. This method returns a reference to the loaded component. Then we can use that reference to interact with the component, e.g.: calling its methods, assigning values to or reading its properties, etc.
Furthermore, to destroy the created dynamic component view, we have to call its clear() method.
The ng-template
ng-template directive represents an Angular template. Recall that a template is nothing but a group of DOM elements that can be reused in views across the app. So, this tag will contain a group of DOM elements as part of the component template.
Angular integrates ng-template internally into numerous structural directives that we frequently utilize, such as ngIf, ngFor, and ngSwitch.
It should be noted that by utilizing a ng-template tag, all we are doing is declaring a template—we are not actually using it yet. In actuality, this means that ng-template is powerless on its own and neither renders nor accomplishes anything. To render something, rendering logic is required. So, the logic for rendering the content of a ng-template is to use the ngIf, ngFor, or ngSwitch directives. For instance:
According the official documentation:
A template variable can refer to the following:
- a DOM element within a template
- a directive or component
- a TemplateRef from an ng-template
- a web component
. . .
Angular assigns a template variable a value based on where you declare the variable:
- If you declare the variable on a component, the variable refers to the component instance.
- If you declare the variable on a standard HTML tag, the variable refers to the element.
- If you declare the variable on an <ng-template> element, the variable refers to a TemplateRef instance which represents the template.
The ng-container
The ng-container directive is not rendered in the DOM tree; rather, it denotes an element (similar to div) that is a logical construct used to combine other DOM elements. We don’t need to create a separate element (div, etc.) specifically for attaching a structural directive to a region of the page because it represents an element. For example:
Therefore, when we employ numerous structural directives and don’t have a parent wrapper element that works (like a div), ng-container is the best option. This parent wrapper element job can be fulfilled by the ng-container.
The difference
The difference compared to ng-template, lies in the fact that the ng-template requires a structural directive in order to render child elements, but the ng-container does not require one. Additionally, ng-template does not support multiple structural directives; nonetheless, ng-container appears to be a more advantageous solution in many situations as it may be used to wrap numerous items with various structural directives.
After the reference notes above, now is time for coding. First, we are going to use an example with a template variable, and then with a directive.
Using a host component with a template variable as an ‘entry point’
The dynamic component
A typical ‘dynamic’ component can be any component, and quite simple, as well. Actually, what our dynamic component does, is just to fetch a a free stock photo (a flower image) from the Pexel. Below, are the files of the code .ts, the template .html, and the style .css for our ‘my-dynamic’ component.
The code :
The template :
The style :
The host component
Again, a host component can be any component of our app. For simplicity, we can use just the AppComponent created by default when we create a new Angular project. Below is a very simple example (.ts, .html, and .css files):
The code :
We have already said that the general syntax of the @ViewChild is:
@ViewChild([reference from template], {read: [reference type]});
As you can see in our example above, here, we use just the VieWContainerRef reference type, which in our case, does nothing more than return a reference of the container view of our host component. This is doable because we simply use the template reference variable, which is within that view.
Note that usually, we use the appropriate reference type that fits a particular case. For instance, if we have a template reference variable for a simple native DOM element such as a span, div, etc, we can use the ElementRef type. If the variable reference concerns an embedded template element, we can use the TemplateRef.
Note also that, generally, there are 2 types of views that can be attached to a view container: Host Views which are linked to a Component, and Embedded Views which are linked to a template.
The template:
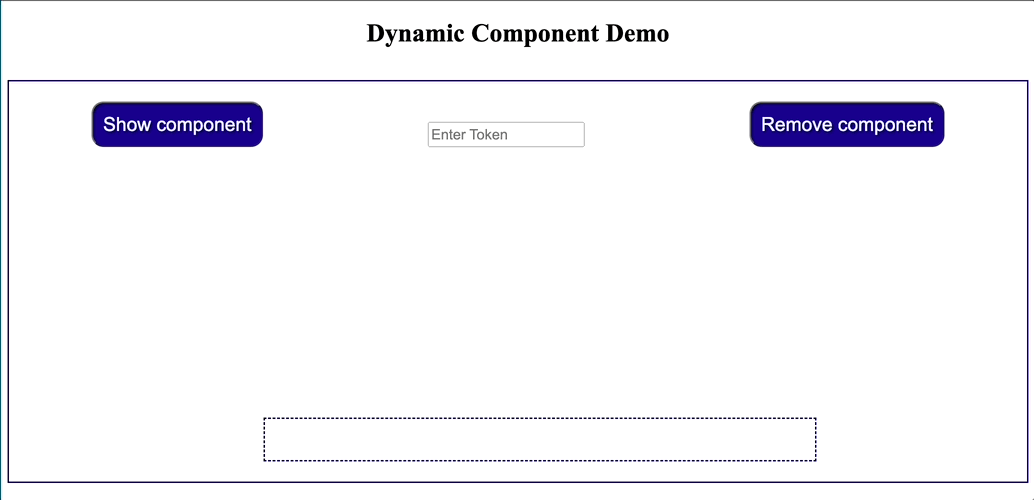
Note that we use 2 buttons. The 1st loads dynamically our component, and the 2nd removes/clears it, via the showDynamicComponent() and the removeDynamicComponent() functions respectively (in the code Typescript file).
As you can above, in the host (app.component) template, the <ng-template #dynamic></ng-template> is the container for our DynamicComponent. This is where Ωthe dynamic component will be displayed. This is also known as ‘anchor’ or ‘entry-point’.. We actually use the template variable: ‘#dynamic‘, which has been defined with the @ViewChilde decorator in the code file ‘@ViewChild('dynamic', { read: ViewContainerRef })‘.
The style:
Finally, this is how the output result looks like:
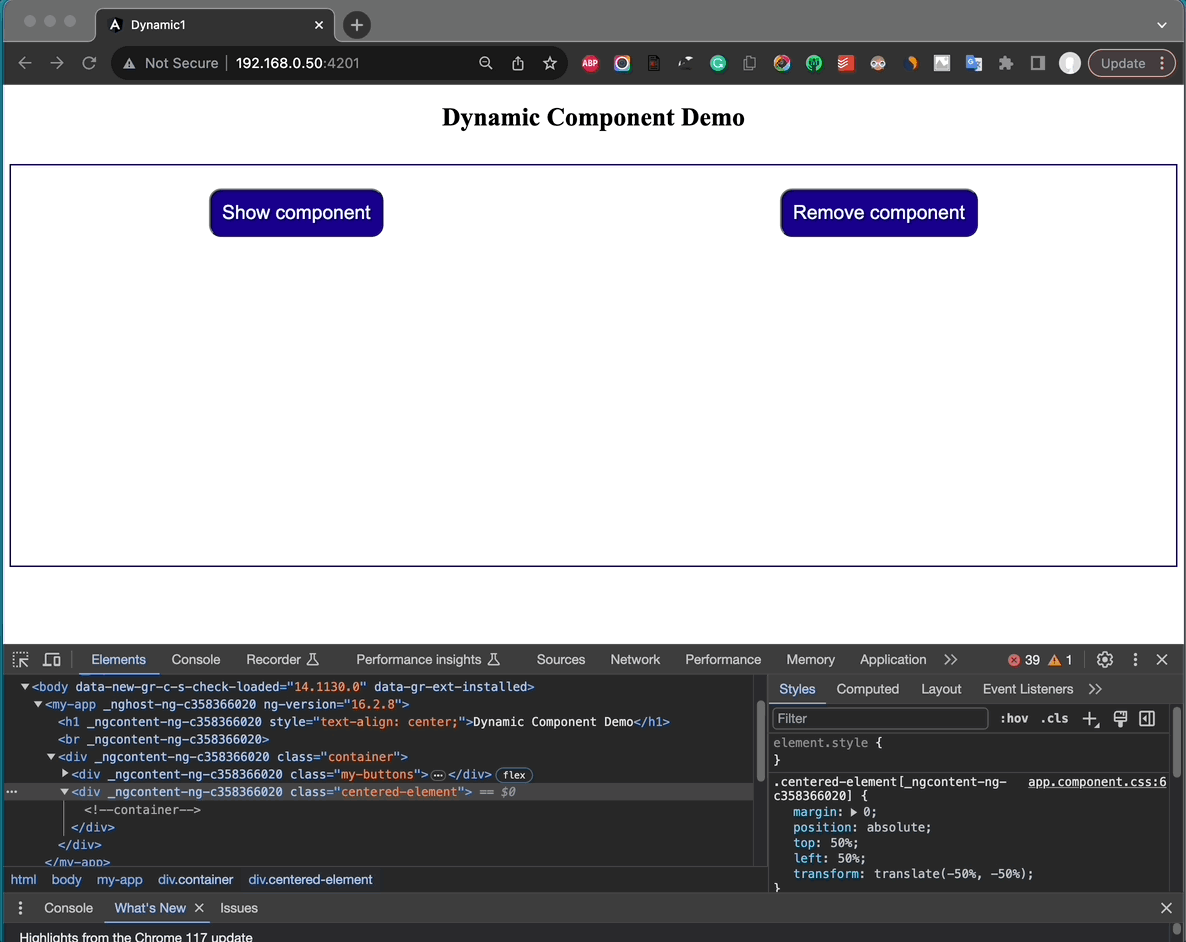
👉 You can find the so far code (1st commit of the demo repo) here.
Now let’s see how we van apply a directive instead.
Using a dedicated directive (a helper derective) as a ‘dynamic child loader’
In most of the cases using a dedicated helper directive as a ‘child loader’ for a dynamic component is the preferable choice. This is the preferable approach because using @ViewChild decorator, we can access template references only after the ngAfterViewInit lifecycle hook.
Such a ‘child’ or ‘helper’ directive is also known as a ‘host directive’. A ‘child-loader’ directive, will be responsible for loading components dynamically wherever required in the project. That means that we can apply the ‘child-loader’ directive in any other component in our app (When we apply the ‘child-loader’ directive in a component, this component plays the role of the host or parent component of the dynamic component which becomes a dynamic ‘child’ of its parent).
Note that, every directive can inject a reference to the ViewContainerRef into its component constructor. It is actually a reference to the view container of the directive’s host element (where the directive’s entry point is placed).
Below is our ‘AdDynDirective’ example helper directive:
And this is the updated code of the host (app.component):
Passing data to the dynamic component
Please note, that we also pass the subtitle value to the dynamic component by the line: this.componentRef.instance.subTitle = "My most-liked rose"; Inside our dynamic component, you will see that we will use the @Input decorator to capture it, like the way we do to get data in a child from its parent component.
The only change in host’s template is to use the directive selector in the place of the template variable::
Finally, using @Input is the only change in the dynamic component:
The result is pretty the same.
👉 You can find the updated code (2nd commit of the demo repo) here.
Next step is to see how we can pass data to host component using the known @Output decorator
Passing data from the dynamic component to the host.
We will use the @Output decorator the same way we do to pass data from a child component to a parent component. For demo purposes, we are going to inform the host component, i.e. the AppComponent, whenever the mouse is hovering over our dynamic component, i.e. the MyDynamicComponent, (over its flower image).
The MyDynamicComponent component.
The code:
The template:
The style:
The AppComponent component.
The code:
The template:
The style:
Take a look of the output result:
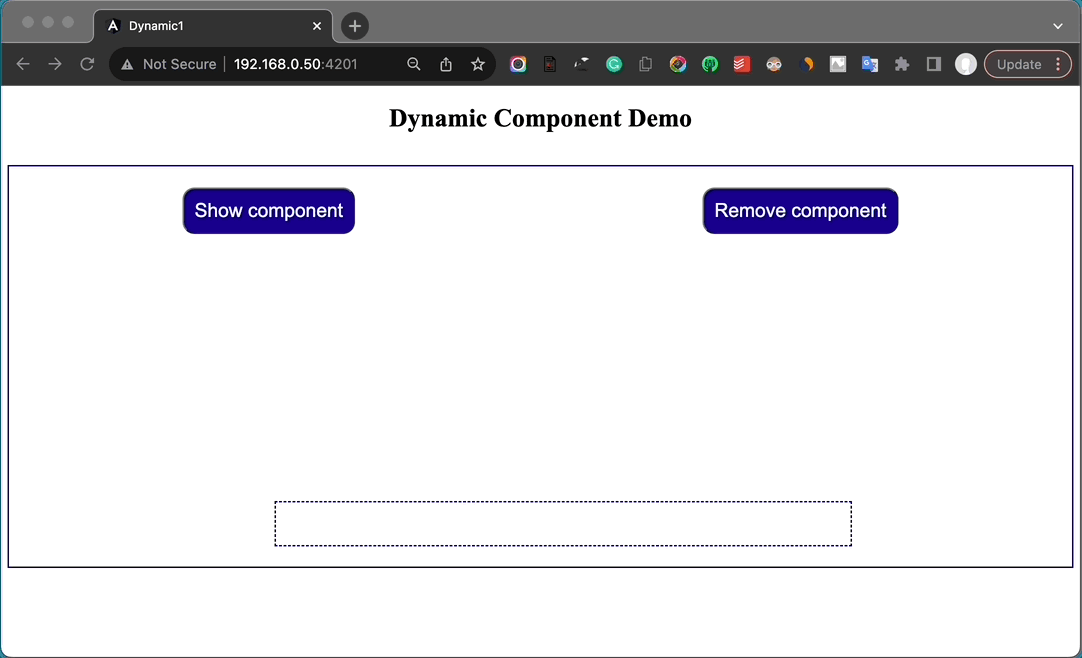
👉 You can find the updated code (3rd commit of the demo repo) here.
Next, we will see how we can improve a bit our code, trying to limit what our host component knows about our dynamic component.
Delegate dynamic component creation to the helper directive
So far, the only use of our helper directive is to be an anchor, e.g.: to mark the entry-point for our dynamic component. The real job is done by the host component (The AppComponent in our case).
However, we can change a bit this, and make our dynamic component (the MyDynamicComponent in our case) almost agnostic to our host component, by delegating its creation to the helper directive. For that purpose, we can create a specific method (the createMyDynamicComponent method) in our directive like that:
After that we can call it directly from the host component:
As you can see the dynamic component remains unknown to the host component. However, since we want to keep interacting with it, we still have to obtain its instance reference (componentRef), and of course, we should be aware about its properties (subtitle and dynEvent) in order to be able to use them inside the host component. In case we don’t use them, the dynamic component can be entirely unknown to the host component. The only link needed is the directive selector in the host template.
The output result is pretty similar to the previous one.
👉 You can find the updated code (3rd commit of the demo repo) here.
Our next example is about switching components. For this purpose, we need to create another ‘dynamic’ component. Then, we can adapt our code so we can fire the switching between components. As a final step, we are going to create a factory service for selecting and providing a dynamic component on the basis of a predefined string value (a token).
Switch between dynamic components
First we have to rename the so far our dynamic component from MyDynamicComponent to MyDynamic1Component (my-dynamic1) and then we can create a new component, the MyDynamic2Component (my-dynamic2).
The code of the 2nd dynamic component can be pretty similar to the 1st one:
However, the template of the 2nd component can offer some interaction with the user, e.g.:
And its style is quite simple:
So, now we have 2 candidate dynamic components: my-dynamic1 (MyDynamic1Component), and my-dynamic2 (MyDynamic2Component).
Of course we can use them directly in our host component, using the appropriate selection logic in it, however a better approach would be to separate the logic of selection of t …. . This can be done using a distinct factory service capable to offer the proper component.+++. So we can create a new factory service naming it ‘DyncompService‘:

Our goal is to call a ‘method-in-charge’ of this service, from our host component, and get the dynamic component we want. Actually, what we can do, is to create a method for instantiating the appropriate dynamic component on the basis of a token (token as string parameter).
Also, since we want to avoid using any other component, that are not in the ‘list’ of our candidate dynamic components, we can create, export and use a new Union (Type Guard) type (the custom ‘MyDyComp‘ type) for the ‘list’ of components we are going to use as dynamic. (Recall, that our ‘list’ consists of only the 2 components:MyDynamic1Component and MyDynamic2Component, but you can add any other component you wish). Note also that, an alternative approach is to use an interface that should be implemented by all candidate dynamic components, but here I prefer just to use the Union type. Creating and exporting our new Union type is pretty simple:
export type MyDyComp = Type<MyDynamic1Component> | Type<MyDynamic2Component>;
That said, below is the example code of our factory service:
As you can see above, the ‘method-in-charge’ is the ‘getDynamicComponent()’ that takes as parameter a string (a token) and returns the proper component.
Next we have to use this factory service. What we will do is to inject the factory service (DyncompService) into the helper directive (AdDynDirective). Our helper directive will use it for instantiating the appropriate dynamic component, and also will set the subtitle message. Thus, our helper directive can be updated like this:
As you can see, the directive expects to receive a string-token in order to instantiate the appropriate dynamic component, and this will be done by our host component (AppComponent). So, below is the updated code, template and style of our host component.
The code:
The template:
The style:
This how the output result looks like:
👉 You can find the updated code (5th commit) of the demo repo here.
Total independence!
So far we have communicated with the helper directive by importing it into our code (of the host component) and calling its function in charge of creating and getting the selected dynamic component. We also use code logic to get the token string input from the template and pass it to the directive. What we did was actually to re-create and re-instantiate the selected component in the host component. If you take a closer look at the AppComponent and AdDynDirective code, you probably will notice that we use overlapping code for creating and instantiating the selected dynamic component. And this is a bit odd. Isn’t it?
So, can we make our host component entirely independent from the instance of the dynamic component, as well as from the helper directive? The answer is Yes! and involves changes only in 3 files: the code in the AdDynDirective, and the code and the template file of the AppComponent. So, let’s see how we can do that.
To achieve our goal we will use the @Input @Output decorators within our helper directive. This will allow us to pass and get data to and from the host component. More precisely, this will be done only via the host template.
Note that if you want to get a grasp on how we can use the @Input, and @Output decorators with the respective property and binding syntax, (as well as other template syntaxes) you can take a look at the following post of mine:

The updated template file of the AppComponent.
As you can see the key change here concerns the syntax of applying the helper directive. We added the property binding for the token string, (actually, we used only the value of the template variable ‘#input’) and the event binding syntax for passing up to the host component the message from the component instantiated in the directive (We will see it a bit later on).
<ng-container adDynamic [inVal]="input.value" (inAreaMsg)="dynCompMsg($event)"></ng-container>
According to the above line of code, inside the helper directive, we have to use a property named ‘inVal’ with the @Input decorator, and a property named ‘inAreaMsg’ with the @Output directive. Let’s see it:
The updated code of the AdDynDirective:
The main change above is that we create -and instantiate- the selected component inside the directive’s ngOnChange() lifecycle hook method. And this is necessary, because, as you are probably aware, thengOnChange() is called before ngOnInit()when the component/directive has bound inputs and whenever one or more data-bound input properties change, which is exactly our case here: We want to change (switch) the dynamic component whenever the token string entered by the user (via the #input template variable), is changed.
The other important point concerns how we can inform the host component when the mouse hovers on the component or not, by passing up, actually by emitting, the respective emitted message from the selected component. In the previous version of the code, we were able to subscribe directly from the host component to the emitted message from the dynamic component, because, the host component was responsible for creating a new instance of the dynamic component. Now, since we use the host template only, the directive is solely responsible for this -the host component knows nothing about the directive logic and what is going on with the creation of a dynamic component. So, whenever the mouse hovers in and out of the selected component created, we have to emit the respective message to the host component via the event-bound property. Note that in the directive, we, subscribe to the event emitted from the dynamic component (its template precisely), and at the same time we emit the message to the host component:
this.componentRef.instance.dynEevent.subscribe((msg: string) => this.inAreaMsg.emit(msg));
The host component, in turn, handles the emitted message in the ‘dynCompMsg()’ method, as you can see below.
This is the updated code of the host (AppComponent):
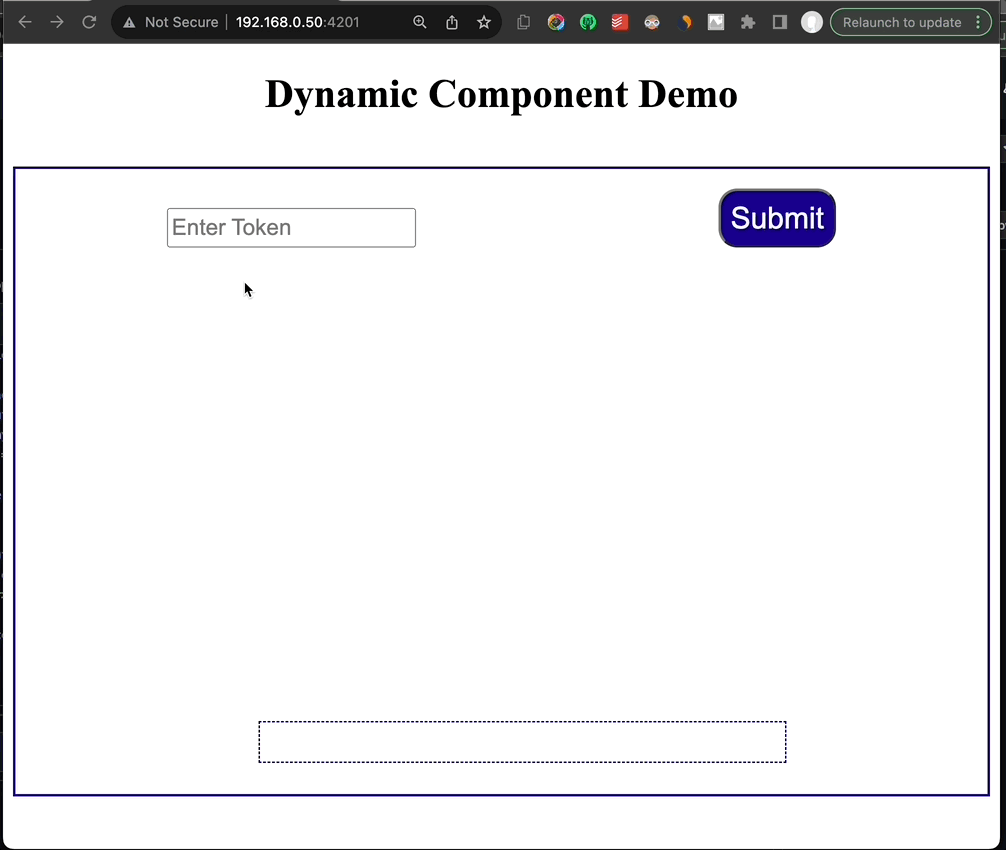
As you can see the code is the minimal possible one. It has nothing to do with creating or instantiating anything. We have also replaced the 2 buttons for showing and removing the dynamic button, with just one button firing a void the ‘showDynamicContent()’ method handler which plays the role of the submission of the string token value entered by the user. Everything is handled by the fully decoupled helper directive and the code behind it.
The final updated code of the host component template is given below:
This is how the final output result looks like:
Final notes
What we have seen in this post is how we can use any component as a dynamic component, by implementing real working code examples and using all the related options Angular offers us.
Especially, in the final demo app, the dynamic components (MyDynamic1Component and MyDynamic2Component) are instantiated from a factory service (DyncompService) and applied to the host component (AppComponent) via the helper directive (AdDynDirective), The selection of the dynamic component is based on a token (string value) provided by the user in the hosting component (AppComponent).
This results in the dynamic components being entirely independent and unknown to the host component. We don’t have made any direct reference (via import), neither to any specific dynamic component nor even the helper directive, apart from the fact that we only apply it -via its selector tag- in the host template.
This is a good example of how one can use any component as a dynamic component, by decoupling her/his code and making it modular and maintainable. That way you can use any number of candidate dynamic components, as well as adapt any host component to render one or more of the dynamic components, as a dynamic content view.
👉 Find the final repo here.
So, that’s it for now! I hope you enjoyed it!
Thanks for reading and stay tuned!
Instead of this:
this.componentRef.instance.subTitle = “My most-liked rose”;
We should use like this:
this.componentRef.setInput(“subTitle “,”My most-liked rose”);
in this case we don’t need to trigger change detection