
Notes on SSH, private-public keys, and the tools: OpenSSL and OpenBSD ssh-keygen

230322-0422
Intro
Here are some notes about the private and public keys, as well as the commonly used tools, OpenSSL and OpenBSD ssh-keygen.
SSH
According Wikipedia: “The Secure Shell Protocol (SSH) is a cryptographic network protocol for operating network services securely over an unsecured network. Its most notable applications are remote login and command-line execution”.
Mainly, the SSH protocol is used for client–server applications, by connecting an SSH client with an SSH server.
The most commonly implemented software stack is OpenSSH, released in 1999 as open-source software by the OpenBSD developers. Implementations are distributed for all types of operating systems in common use, including embedded systems.
OpenSSH
OpenSSH is the premier connectivity tool for remote login with the SSH protocol. It encrypts all traffic to eliminate eavesdropping, connection hijacking, and other attacks. In addition, OpenSSH provides a large suite of secure tunneling capabilities, several authentication methods, and sophisticated configuration options.
The OpenSSH suite consists of the following tools:
• Remote operations are done using ssh, scp, and sftp.
• Key management with ssh-add, ssh-keysign, ssh-keyscan, and ssh-keygen.
• The service side consists of sshd, sftp-server, and ssh-agent.
OpenSSH is developed by a few developers of the OpenBSD Project and made available under a BSD-style license, and It is incorporated into many commercial OS-es and other products.
ssh command-line tool
All the major LINUX distros and macOS versions, as well as the Windows, include the OpenSSH client and thus, one can just use the ssh command-line tool to connect to a SSH server. Note that the ssh command-line tool is considered as a replacement for rlogin, rsh and telnet to allow shell access to a remote machine.
See below, about installing and using the ssh-keygen tool.
SSH-server
An SSH server is a software program which uses the Secure Shell protocol to accept connections from remote computers (clients). Remote terminal connections via a ssh client, as well as SFTP/SCP file transfers, are the most known use cases for an SSH server.
For remote terminal connections, OpenSSH toolset provides the sshd command-line tool (daemon) that implements the server-side part of the SSH protocol.
The SSH communication session
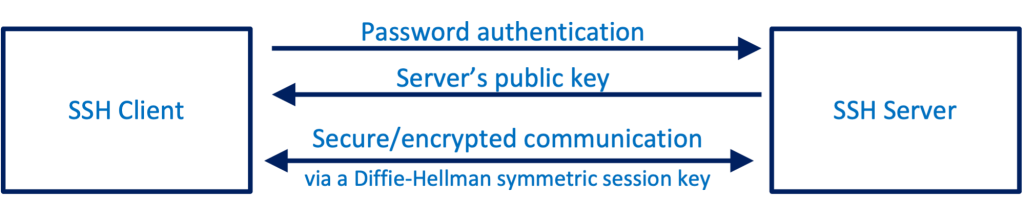
Note that, an SSH session is established in two steps.
- The first step consists of the initial “handshake” or the initial “negotiation”, and if the outcome is successful, to establish the encryption rules for the upcoming communication session.
- The second step is to authenticate the user and discover whether access to the server should be granted.
1st step – negotiation and establishment of secure/encrypted communication
Main points of this procedure, are:
Initially, the client attempts a TCP connection to the server
The server responds by providing the protocols and the versions it supports. The server also makes its own public key available to the client. If the client has already stored the server’s public key (e.g. in its ~/.ssh/known_hosts file) then the host is already known and the negotiation continues. In some cases, you might get a warning indicating that the “REMOTE HOST IDENTIFICATION HAS CHANGED”. You can read more about how you deal with that in one of my other posts here.
After that the client has to accept one of the protocol versions provided by the server.
Next, the negotiation continues for creating and using a commonly approved session key (a symmetric key). This process is based on the Diffie-Hellman algorithm. Shortly, in the Diffie–Hellman key exchange scheme, each party generates a public/private key pair and distributes the public key. After obtaining an authentic copy of each other’s public keys, client and server can compute a shared secret key. The shared secret key is the outcome of this process. And as we said, this is a secret symmetric key (one and the same key for encryption and decryption). The purpose of this is to wrap all further communication in an encrypted tunnel that cannot be deciphered by outsiders.
After the session encryption is established, the 2nd step for user authentication takes place.
2nd step – User authentication
Note that, the OpenSSH server can authenticate users using the standard methods supported by the SSH protocol: with a password; public-key authentication, using per-user keys; host-based authentication, which is a secure version of rlogin’s host trust relationships using public keys; keyboard-interactive, a generic challenge–response mechanism, which is often used for simple password authentication, but which can also make use of stronger authenticators such as tokens; and Kerberos/GSSAPI.
SSH key-pair authentication
However, the most common methods are password and SSH key-pairs authentication. SSH key-pairs authentication is a much more secure approach.
An SSH key-pair is nothing but a pair of a public and private keys, which are asymmetric/different keys. Each one of both of the 2 involved parties, the client and the server has its own key-pair.
Note that for enabling SSH key-pair authentication, the corresponding public key of the client should be installed/stored in the remote server. (e.g. under the user’s home directoryin the .ssh/authorized_keys file).
In short, the main points of this process include:
When the client attempts to connect to the remote server, it actually sends to the server a packet with the public key encrypted with the client’s corresponding private key. (The whole packet is encrypted with the symmetric session key we saw in the 1st step). This packet identifies absolutely the client user.
Then, the server can verify if the packet sent corresponds with one of the authorized (public) keys, and if the client\s private key is verified and matches an authorized public key, then the client is authenticated and a shell session is launched.
Password authentication
Secure keys authentication

Installing OpenSSH ssh-keygen tool
This is the fundamental OpenSSH tool for generating private/public key pairs. To generate an SSH key pair, you have to use this tool. This tool is part of the OpenSSH package/suite. The OpenSSH is part of major Linux distros. You can check that the tool has been already installed your system, using, eg.:
$ dpkg-query -l openssh*
or
$ dpkg --list | grep openssh*
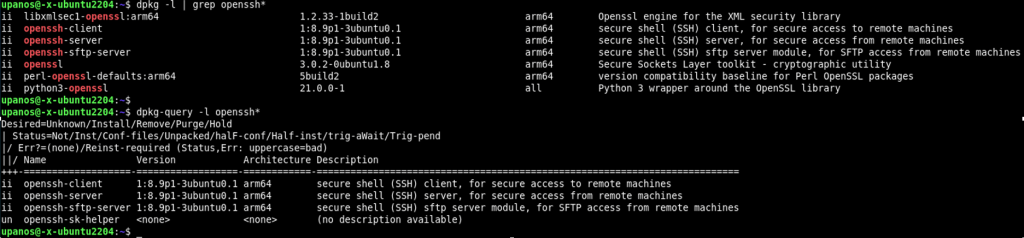
If not, you should install it (openssh-server and openssh-client), e.g:
$ sudo apt install openssh-server openssh-client
Using ssh-keygen
The first step in setting up SSH key authentication is to generate an SSH key pair on your local computer, the computer you will log in from.
Before to run it for key-pair generation, you can run it with the –help parameter to obtain a list of parameters syntaxes:
$ ssh-keygen --help
You can run it without any parameter. The tool works interactively asking for input of some data. In your local computer’s terminal, generate a key pair with this command: ssh-keygen.
$ ssh-keygen
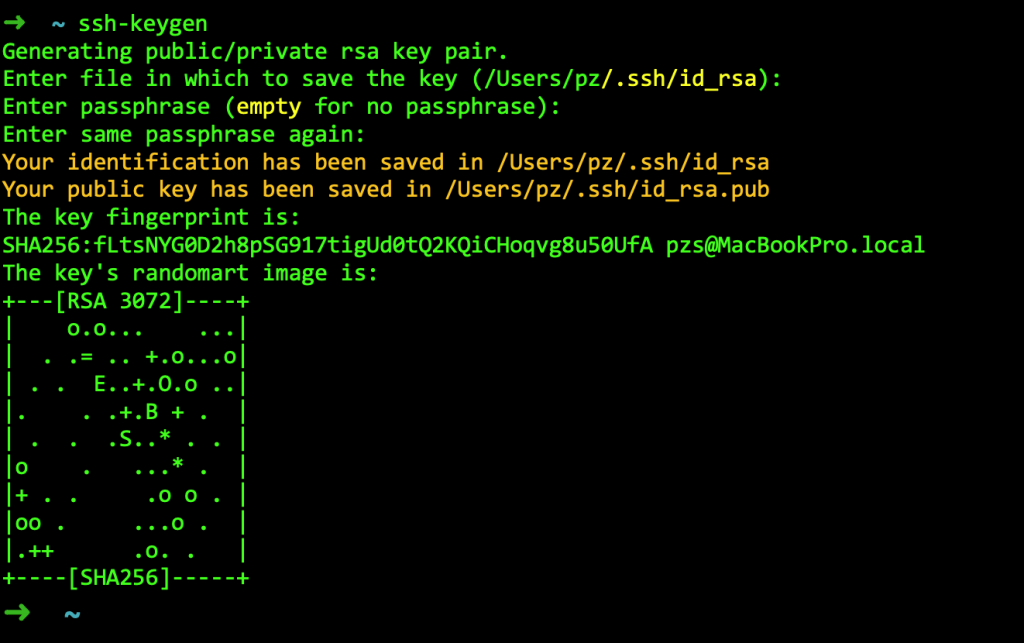
At the prompt, you may accept the default key location or enter a different path. If you accept the default, the keys will be stored in the .ssh directory, within your user’s home directory.
By default, it will create a 2048-bit RSA key pair, which is adequate for most cases.
Since we use the default algorithm is the RSA, the private key will be in a file called id_rsa. The public key will be also stored in a file with the same name but “.pub” appended, i.e.: the public key file will be called id_rsa.pub.
So, under the (hidden) /.ssh folder in your home directory you will find the 2 files: id_rsa and id_rsa.pub.
If you are just getting started with SSH keys, it is best to stick with the default location. Doing so will allow your SSH client to automatically find your SSH keys when attempting to authenticate. If you would like to choose a non-standard path, type that in now, otherwise, leave the prompt blank and press RETURN to accept the default.
If you previously generated an SSH key pair, you may see a prompt like this:
/home/username/.ssh/id_rsa already exists.
Overwrite (y/n)?
If you choose to overwrite the existing key, it will be deleted and you will no longer be able to use it to authenticate. That is, you should not overwrite it unless you are sure that you do not need it to authenticate to any of your servers.
This optional passphrase is used to encrypt the private key. If you set a passphrase here, it will be required whenever you use the private key for authentication—that is, authentication will require both the private key and its passphrase, which can provide additional security if the private key is somehow compromised. If you leave the passphrase blank, you will be able to use the private key to log into your servers without a password—that is, authentication will occur based on your private key alone, so be sure to keep your key secure.
Now that you have a public and private SSH key pair, you will want to install the public key on the servers that you want to use SSH key authentication to log in to.
Authenticate to your Server Using SSH Keys
After you have successfully installed your client user public key on the targeting server using one of the methods above, you should be able to log into the server using key authentication. That is, you will no longer need the remote user’s password to log in.
Attempt to log into the remote server using SSH:
ssh username@remote_host
If you did not create your SSH key pair with a passphrase, you will be logged in immediately. If you created your key pair with a passphrase, you will be prompted for it.
If you are logged into your server, that means that the SSH key was successfully installed.
Server-side prerequisites
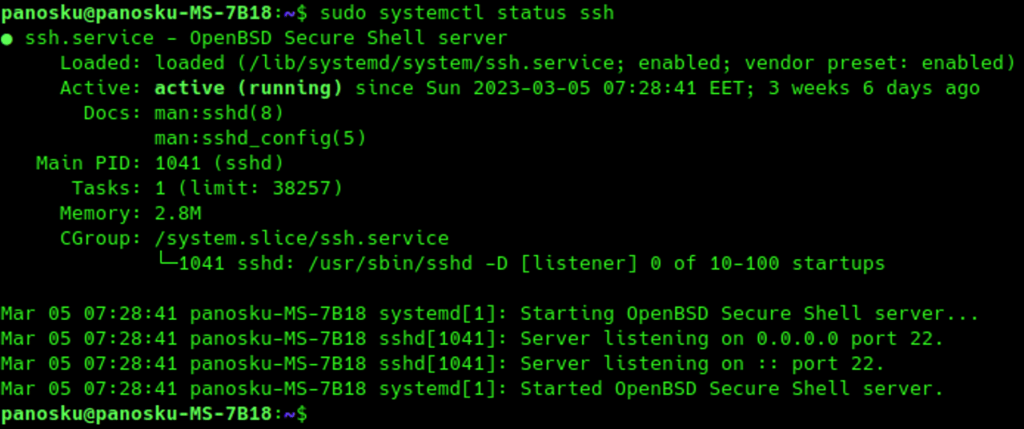
Either you should have access to the server as sudo user or ask the server administrator to provide you with the related information.
The ssh server daemon should be started.
Check if the ssh runs on the targeted server
$ sudo systemctl status ssh
Keys storage
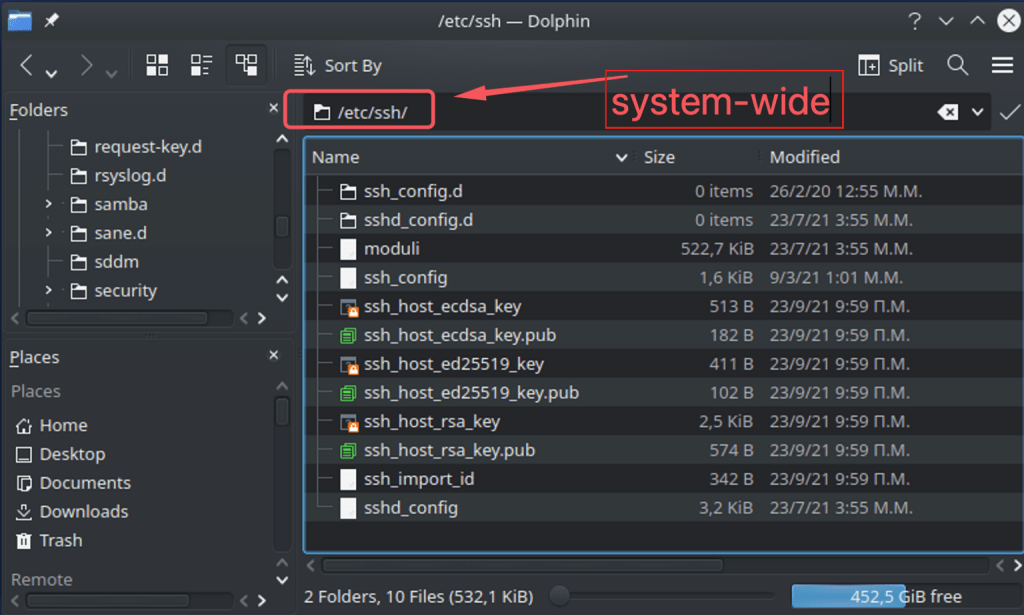
~/.ssh/known_hosts file
A host (e.g. a PC) when interacts with another host, can act as either a client or a server.
The ~/.ssh/known_hosts file concerns the client-side role. This file holds public keys of all known servers, that this client recognizes and/or has already connected to.

The server public key is stored in the very first time you attempt to connect to a server. This very first time the client is responsible to accept the public key presented by the server and check if this public key is really the public key of the server you wanted to connect to. If the client can obtain the public key of a server, then that key can be added to ~/.ssh/known_hosts file manually. After the public key has been stored in the ~/.ssh/known_hosts file. Then the client can connect to the server safely.
~/.ssh/authorized_keys file
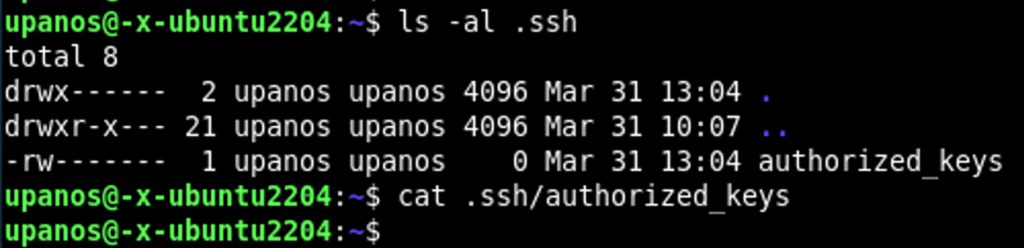
The ~/.ssh/authorized_keys file concerns the server-side role of a particular host (when it acts as a server). This file is the place where public keys of all known clients are stored. A public key of a client should be existed in that file and it is necessary for that client’s user authentication.
As we have previously said, using the ssh-keygen tool, we create a pair of files. One holds the private key of the client user and the other one the client user’s public key. (e.g.: id_rsa file holds the client user private key and the id_rsa.pub file holds her/his public key – Recall that by default both of those files are kept inside the client’s ~/.ssh folder).
Often the client user has to provide her/his public key to the server manually, (e.g. entering it by copy/paste in a form field interactively).
If the public key of a client user is existing in the ~/.ssh/authorized_keys file, then that user can connect to that server using the ssh key-pair authentication.
OpenBSD ssh-keygen vs OpenSSL
ssh-keygen by default generates keys in an OpenSSH-specific format. The OpenSSH-specific format uses the XDR-like SSH wire format, encoded in base64. The exception is for SSHA-1 based ‘rsa1’ keys, however SHA-1 is considered insecure and you shouldn’t use it.
This format is considered offering better key protection, and also allows storage of key comments within the private key file itself. The key comment may be useful to help identify the key. The comment is initialized to “user@host” when the key is created, but can be changed using the -c option.
OpenSSL uses X.509 SubjectPublicKeyInfo in ASN.1, usually in PKCS#1 wrapped in PEM format. The PEM format is based on an ASN.1 DER serialized structure encoded in Base64. This also contains the RSA parameters (n, e, d, p, q, etc).
PKCS#1, PKCS#8 and PKCS#12 (Public-Key Cryptography Standard) are standards that govern the use of particular cryptographic primitives, padding, etc. All define file formats that are used to store keys, certificates, and other relevant information.
PEM is basically a base64 encoded DER (binary) file, with a header, and optionally with some meta-data. Specifically, the PEM format assembles some data, such as (but not limited to a PKCS1 or PKCS8 key or a certificate, CSR, etc):
- a line consisting of 5 hyphens, the word BEGIN, one or a few (space-separated) words defining the type of data, and 5 hyphens
- an optional (and rare) rfc822-style header, terminated by an empty line
- base64 of the binary (the actual) data, broken into lines of 64 characters (except the last); some programs instead use the (slightly newer) MIME limit of 76 characters
- an ending line – like the BEGIN line but with END instead.
Some readers check/enforce the line length and END line and some don’t, so if you get those wrong you may create files that sometimes work and sometimes don’t, which is annoying to debug.
Note that the PEM format is considered a bit old (OpenSSH 6.5 introduced this feature years ago on 2014-01-30).
ssh-keygen can also generate/write to a PEM format private keys using the -m flag (e.g.: ssh-keygen -m PEM).
After that, I close the notes about SSH/SSL and the related tools (for now :-).
That’s it! I hope you enjoyed it!
Thanks for reading and stay tuned!