
Spring Boot Security Configuration, practically explained – Part6: A deep intro to filter/token-based security

230131
Preamble
I’ve not found so far, a post explaining clearly and deeper what is behind the scenes of the Spring authentication/authorization process, integrating also concepts like filters, tokens, customizations for an Authentication Manager or an Authentication Provider, and so on. So, I decided to make this one on my own. The result seems good enough, and personally, I like it ? LoL. I also hope the same you will. Enjoy it!
Intro
It is presumed that you already have some experience with Spring Boot REST API development. This means that you are familiar enough with some key subjects related to developing a simple REST API such as CRUD operations, DTO, JSON, authentication and authorization, JWT tokens. etc. Thus, don’t expect to find every related subject, to be covered in this post. However, I tried to include all the necessary links referencing the official documentation.
Besides, there are hundreds of dozens of Spring/Spring Boot REST API security implementation examples that anyone can find in articles and posts via searching on Medium and other dev sites on the web. You can also find the rest of the series of posts of mine in Medium that can also help you to get yourself familiar with the related subjects.
Note: This post and all the code included concern Spring Boot 3 and Spring Security 6, and are based on SecurityFilterChain bean custom configuration.
What we are going to work with
- Intro to token-based authentication process
- Filters and the Security Filter Chain
- The Basic Authentication and the BasicCustomFilter
- Bean-based security customization with SecurityFilterChain
- Custom Authentication Manager
- Custom Authentication Provider
- Custom User Details Service
- Custom Filter for basic authentication
- Custom Filter dealing with both Base64 and JWT tokens for authentication and authorization
Step-by-step code examples are included. You can also find a fully-working example repo at the end of this post.
So, let’s start.
The very basic authentication and authorization endpoints and user roles (authorities)
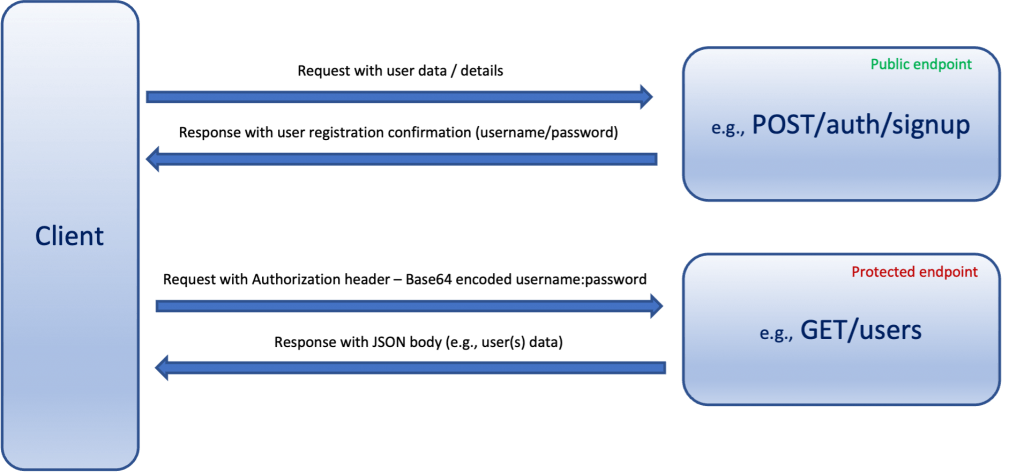
In short, a REST API application can use one endpoint (e.g. /signup, /register, etc) that can be accessed without any authentication or authorization by the users who want to register. The app also uses another endpoint (e.g. /signin, /login, /authenticate, etc.). This endpoint is where the user has to provide her/his credentials which actually is the pair of username and password.
Other endpoints can be protected. Access to the protected endpoints is only allowed to the authenticated users who also have specific authorizations e.g. specific authorities or roles.
For instance. The endpoint /items can be accessed only by users carrying any of the roles USER_ROLE or ADMIN_ROLE and the endpoint /users can be only accessed by users having the ROLE_ADMIN.

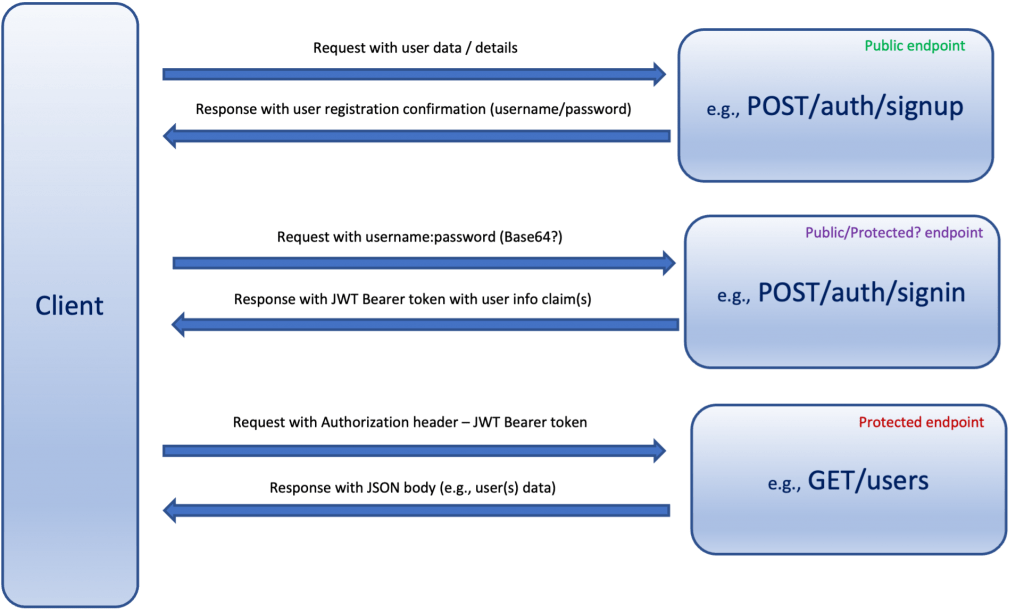
The process with tokens (JWT tokens) in short
If the user is successfully authenticated the app returns a JWT token based on the details of the authenticated user. In most cases, the username is considered enough to participate in the payload of the generated JWT token.
A valid JWT token should be returned to the authenticated user with the response. The JWT token can be either returned as an Authorization header having as value the generated JWT token with the prefix “Bearer “, or it can also be returned as an entity (JSON serialized) in the response body.
Next, when the user wants to access a protected endpoint, she/he has to provide the JWT token obtained previously. Generally, the user has to provide a valid (e.g. not expired) JWT token.
Then, the app extracts the user details (e.g. the username) from the JWT token provided, and searches (via a service, a database, etc.) for that specific username. If the user is found, then her/his authorizations (authorities/roles) are also fetched. If she/he has the appropriate authorizations, then she/he can proceed to the resources of the endpoint requested.
Authentication, based on username and password – Basic Authentication
Spring framework Authentication offers us a number of various mechanisms that can be used to authenticate a user.
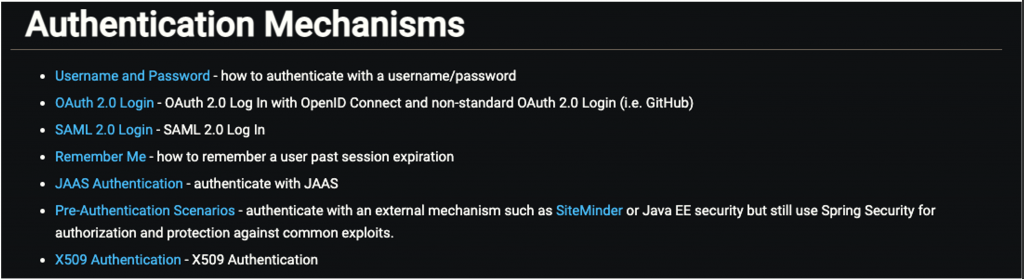
As the documentation states “One of the most common ways to authenticate a user is by validating a username and password.” and this is true for thousands of REST API applications.
Since in this post, we are dealing with REST API implementation, we are going to focus on Basic Authentication. The Spring Basic Authentication follows the Basic HTTP Authentication standard and it is also known as “Basic Auth”, “http basic auth”, etc. In short, when we want to send an http request, we must provide an Authorization Header with a value of a Base64-encoded username:password token prefixed by the word indicating the scheme that should be used, which in the Basic Authentication is the word “Basic ” (A space should separate the Basic word and the Base64-encoded token). The example below is taken from the official documentation: for a user with username “Aladdin” and password “open sesame” the following header would be presented:
Authorization: Basic QWxhZGRpbjpvcGVuIHNlc2FtZQ==
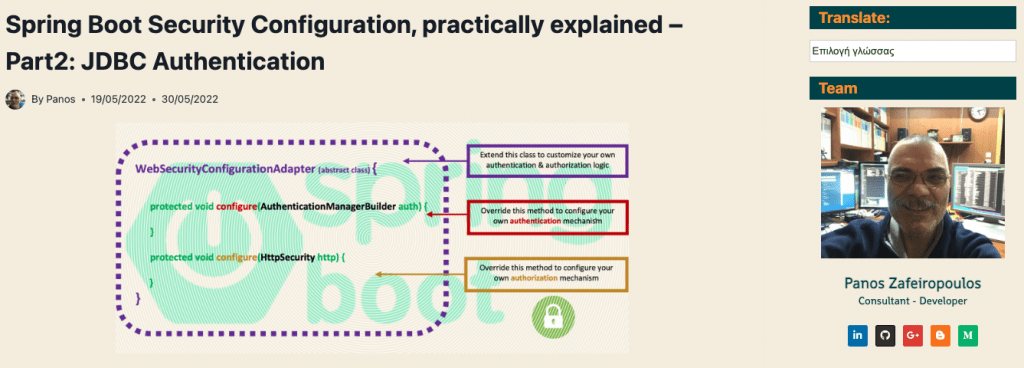
Note if you want asap to start working and implementing Spring Security Basic Authentication, you might find useful the following 2 posts of mine:
The Username / Password Basic Authentication mechanism in Spring
The following paragraphs give you a quite deep dive into the internal Spring mechanism, via filters.
Filters intro
Take a look at the example below (taken from the official documentation) on how we can implement Spring security authentication using the SecurityFilterChain (the “new way” bean-based, without extending the deprecated WebSecurityConfigurerAdapter).
@Configuration
public class SecurityConfiguration {

    @Bean
    public SecurityFilterChain filterChain(HttpSecurity http) throws Exception {
        http
            .authorizeHttpRequests((authz) -> authz
                .anyRequest().authenticated()
            )
            .httpBasic(withDefaults());
        return http.build();
    }

}
The important thing you have to take into account is the fact that the above configuration concerns the SecurityFilterChain. Actually, all the functionality of the Spring Security Architecture is based on a filter chain. Any HTTP request to a Spring Boot REST API application is first passed through(intercepted) by a number of filters, and the term is used for such a number of filters a request passed through forms a FilterChain.

Without any kind of customization, a Default Filter Chain is made up of built-in Spring Filters. There is also a default order in which Spring arranges the filters in a chain. (you can find it here).
So, when it comes to security authentication and authorization this is actually implemented by Security Filters (the SecurityFilterChain is being formed by those filters). Of course, as you can suspect, we can always add one or more custom filters of ours to the Security filter chain.
Generally, a Spring filter is a component (an instantiated class) that it gets called when HTTP Request arrives at the application server. A filter can be used to manipulate by any manner the incoming request, e.g.: It can be used totally change request parameters. When a filter finishes the processing, it can do one of two things: it can either pass the (probably modified) http request to the next filter, or it can stop further processing and just answer the request by sending back an HTTP Response. A filter can even suspend and disallow any further processing of an HTTP Request. A filter that allows a request to be processed will also process HTTP Response that was generated by other components. So, a filter can also modify the returning response as well.
Since the filters can be chained (in a filter chain), each filter allows the request to be processed by the next filter. Finally, a request ends up in Spring DispatcherServlet and reaches the app’s Controller methods that are in charge to handle the appropriate endpoint and http method (POST, GET, etc.).
A first example of customization of the SecurityFilterChain Bean
According to what we have said, below, you can see a minimum configuration of a SecurityFilterChain Bean (inside a Security configuration class) using the Basic Authentication:
When we want to apply the Basic Authentication to protect our endpoints applying the httBasic() configurer/customizer, the built-in BasicAuthenticationFilter has automatically been added to the SecurityFilterChain, amongst other Spring default filters. You can easily check it by looking carefully at the output logs during your application startup:
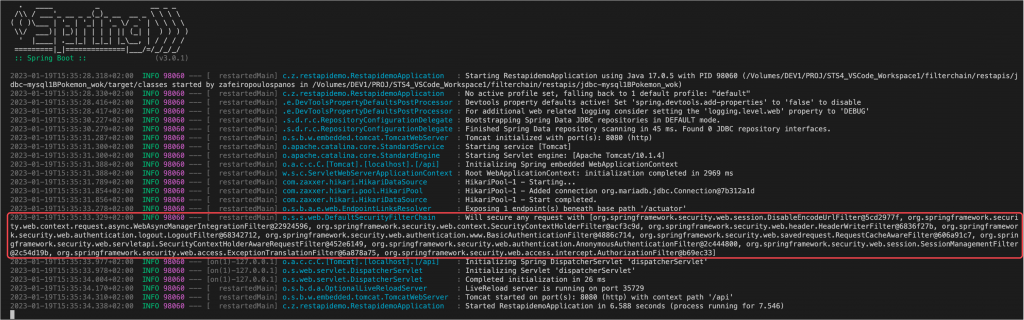
This is the list of the filters of our app, ordered automatically:
org.springframework.security.web.session.DisableEncodeUrlFilter@5cd2977f,
org.springframework.security.web.context.request.async.WebAsyncManagerIntegrationFilter@22924596,
org.springframework.security.web.context.SecurityContextHolderFilter@acf3c9d,
org.springframework.security.web.header.HeaderWriterFilter@6836f27b,
org.springframework.security.web.authentication.logout.LogoutFilter@68342712,
org.springframework.security.web.authentication.www.BasicAuthenticationFilter@4886c714,
org.springframework.security.web.savedrequest.RequestCacheAwareFilter@606a91c7,
org.springframework.security.web.servletapi.SecurityContextHolderAwareRequestFilter@452e6149,
org.springframework.security.web.authentication.AnonymousAuthenticationFilter@2c444800,
org.springframework.security.web.session.SessionManagementFilter@2c54d19b,
org.springframework.security.web.access.ExceptionTranslationFilter@6a878a75,
org.springframework.security.web.access.intercept.AuthorizationFilter@b69ec33
You can check on your own, that by removing the .httpBasic() configurer, the BasicAuthenticationFilter disappears from the above list. So, you can easily understand that the configuration of a SecurityFilterChain bean, actually means adding (or removing) one or more filters from the chain.
Spring Security, provides us with a number of “ready-made” filters that are much more than what you see above. All of them, are actually various implementation classes based on the
Filter interface. This means that whenever we want to create our custom we must write the filter logic in the doFilter() interface contract method in our implementation class.
Using a custom filter helps us to perform some specific to servlets tasks, such as:
- Filters that perform some request processing before the request reaches the controller.
- Filters for processing a response before it reaches back to the client.
- Authentication and Authorization filters that help deal with security e.g. verifying provided authentication tokens
- Filters for header(s) customization(s)
- Logging Filters that provide tracing information for loggers.
- Filters that deal with request validation.
- Localization – Targeting the request and response to a particular locale.
The Basic Authentication steps
BasicAuthenticationFilter instantiation
When a user submits her/his username and password, the BasicAuthenticationFilter processes the HTTP servlet request’s BASIC authorization header. This request header is the Authorization header and its value is a Base64-encoded username/password token.
e.g.: recall the one we have seen before:
Authorization: Basic QWxhZGRpbjpvcGVuIHNlc2FtZQ==”
Then, the BasicAuthenticationFilter, decodes/extracts the username and password and uses them to create an Authentication object (also known as an authentication token). In this case this object is usually an instance of the UsernamePasswordAuthenticationToken class.
AuthenticationManager, PrividerManager, and AuthenticationProviders
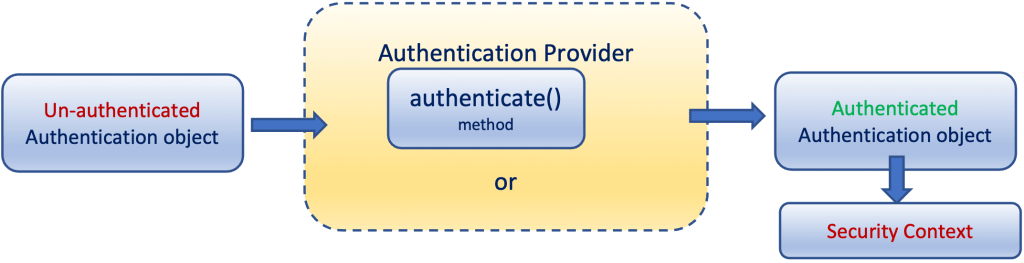
After that, the Authentication object is passed to a class that implements the AuthenticationManager interface. An AuthenticationManager implementation should override the contract authenticate() method to authenticate the Authentication object (the user credentials).
Note that an AuthenticatuionManager instantiation automatically takes place by the Spring Security mechanism, even without any configuration. This is because as we have said, a number of filters and a security filter chain is automatically formed during the application start.
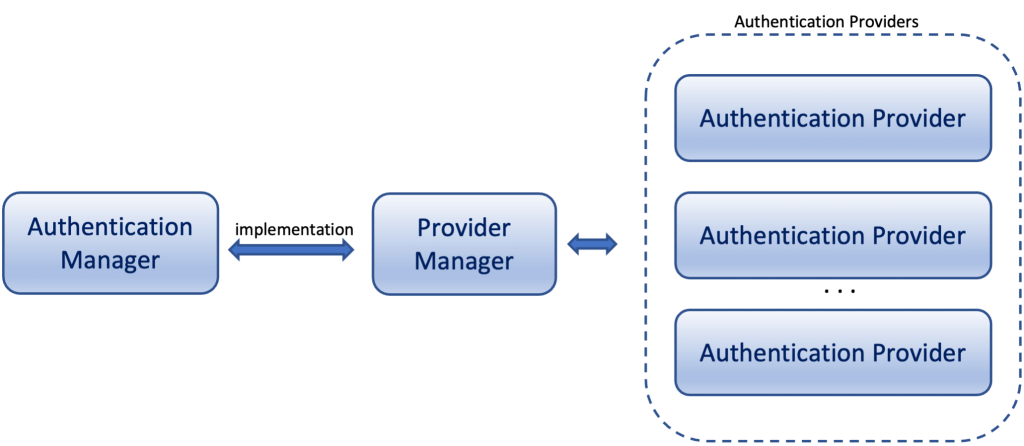
As we said, the Authentication Manager is just an interface. Spring framework by default uses the “ready-made” implementation class: the ProviderManager. However, the ProviderManager, instead to deal with the authentication request on its own, delegates this task to an AuthenticationProvider. It actually can use a list of configured AuthenticationProviders, and then one of them should be the right one that does the authentication.
So, the built-in ProviderManager class is automatically instantiated and searches for any available AuthenticationProvider. After that, it Iterates an Authentication request through a list of AuthenticationProviders. So, actually, the AuthenticationManager acts as a registrar-coordinator where you can register multiple providers. And based on the request type, it will forward an authentication request to the correct provider.
This means that the ProviderManager calls the corresponding authenticate() method of the appropriate AuthenticateProvider. As a response, it gets the Principal Authentication Object -if the authentication is successful. A Principal object can be used to represent any user entity, such as an individual, a corporation, and a login id. Most often, we use it to get the logged-in user username.
AuthenticationProviders are usually tried in order until one provides a non-null response. A non-null response indicates the provider had the authority to decide on the authentication request and no further providers are tried. If a subsequent provider successfully authenticates the request, the earlier authentication exception is disregarded and the successful authentication will be used. If no subsequent provider provides a non-null response or a new AuthenticationException, the last AuthenticationException received will be used. If no provider returns a non-null response or indicates it can even process an Authentication, the ProviderManager will throw a ProviderNotFoundException.
Custom AuthenticationManager
Apart from the automated mechanism of the instantiation of the ProviderManager, we can also implement and use our very own custom AuthenticationManager (by implementing the AuthenticationManager interface). In such a case, we can also put or authentication logic inside it, by overriding its contract method authenticate(). Inside this method, we can access the Authentication object (that has been put in the SecurityContext (via the SecurityContextHolder) by a filter, e.g. the BasicAuthenticationFilter), and extract its details (e.g. username). Then using our logic, we can attempt to authenticate the user, and if the authentication is successful, we must return a fully populated Authentication object (including granted authorities). That way there is no need to use any AuthenticationProvider. The job is directly done in the custom AuthenticationManager.
Below, in the Practical examples section, you can find an example of implementing and using a custom AuthenticationManager.
Custom AuthenticationProvider
Creating and using a custom AuthenticationProvider is another option that we can use. What we have to do is to implement a class and override the 2 contract methods (one more than the AuthenticationManager) that are exposed by the AuthenticationProvider interface:
- authenticate() performs authentication with the request (similar to the AthenticationManager authenticate() method.
- supports() checks if this provider supports the indicated authentication type
Note that when the Spring traces a @Component annotated class that implements the AuthenticationProvider interface, then it automatically instantiates the default AuthenticationManager that uses this custom AuthenticationManager.
We will also see below, an example of an implementation of a custom AuthenticationProvider.
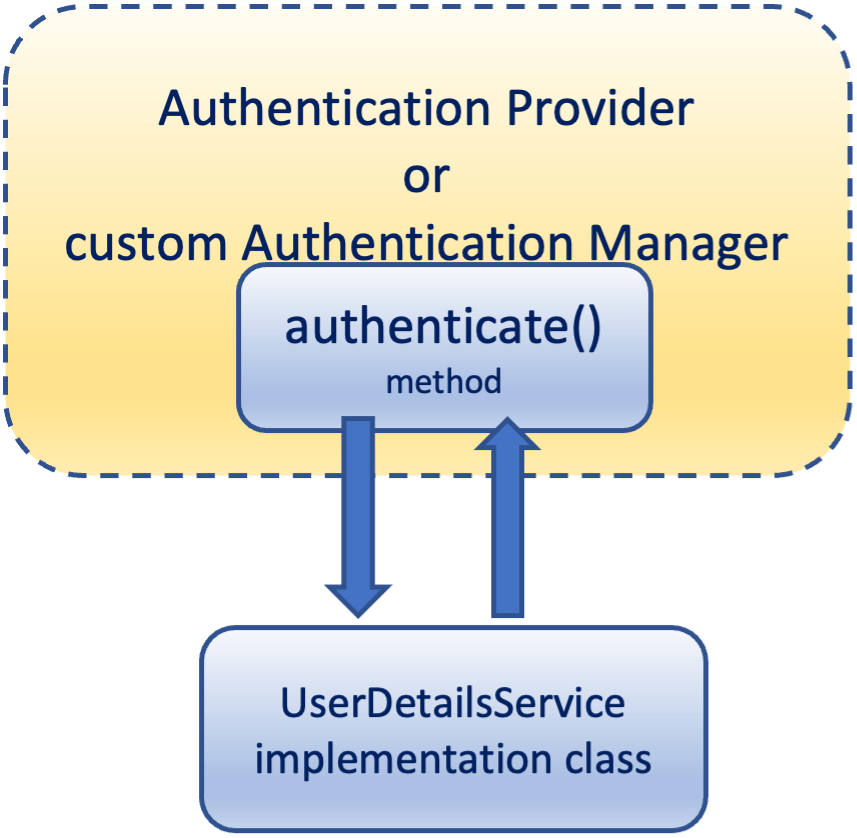
A custom AuthenticationManager or a custom AuthenticationProvider can call an appropriate service to check the existence of the username or better to check if the username-password pair is a valid one. If the user exists and the password is valid then the Authentication object is authenticated.
Usually, (but not always and not necessarily), a custom AuthenticationManager or AuthenticationProvider uses a specific service. Many times, this service can be a custom implementation of the UserDetailsService interface and can deal with any type of data source (e.g.: in-memory, database, LDAP, etc).
The Authentication object
Probably you have understood, that real authentication happens when an Authentication object has been authenticated. So, let’s stay a bit more on the subject.
The Authentication object (the authentication token) actually, can be either un-authenticated or authenticated.
When the BasicAuthenticationFilter processes and extracts the username and password -as we said- it creates an instance of the UsernamePasswordAuthenticationToken class which actually is un-authenticated and puts it in the SecurityContext (using the SecurityContextHolder).
UsernamePasswordAuthenticationToken authenticationToken = new UsernamePasswordAuthenticationToken(username, password);
SecurityContextHolder.getContext().setAuthentication(authenticationToken);
As you probably have understood, the UsernamePasswordAuthenticationToken class, (which implements the Authentication interface), is a well-known and widely used class. The important thing here is the fact that this class offers us 2 constructor options:

1st option
UsernamePasswordAuthenticationToken(Object principal, Object credentials)
This constructor (without the authorities collection) can be safely used by any code that wishes to create a UsernamePasswordAuthenticationToken. Its method .isAuthenticated() (inherited by its parent AbstractAuthenticationToken class) returns false.
For instance, it can be used by any filter in the filter chain and can put an un-authenticated authentication object (albeit it carries user credentials) in the SecurityContext object via the SecurityContextHolder.
2nd option
UsernamePasswordAuthenticationToken(Object principal, Object credentials, Collection<? extends GrantedAuthority> authorities)
This constructor includes the authorities collection and should only be used by an AuthenticationManager or an AuthenticationProvider implementation when they are satisfied with user credentials and produce a trusted authentication. This means that this constructor in an authentication manager or authentication provider automatically sets the authenticated field to true (and thus, the .isAuthenticated() will return true.).
If the Authentication object (the username/password credentials in the UsernamePasswordAuthenticationToken) is successfully authenticated, then, the BasicAuthenticationFilter puts the Authentication object with the Principal inside the SecurityContextHolder. Thus, the SecurityContextHolder is where Spring Security also stores the details of who is authenticated and her/his authorizations (authorities/roles).

Authentication can also take place inside a filter, e.g. a custom filter. Note that after the BasicAuthenticationFilter puts an authenticated instance of the UsernamePasswordAuthenticationToken in the SecurityContextHolder, its mission stops and it can invoke the FilterChain.doFilter(request, response) to allow the rest of our application logic to continue normally.
This makes clear that Spring Security does not “care” how the Authenticated object has been authenticated, e.g. if it has been done by a custom authentication manager, an authentication provider with or without a UserDetailsService, etc. Thus, if the Authentication object contains the user authorities/roles and its .isAuthenticated() method returns true, the user has been successfully authenticated.
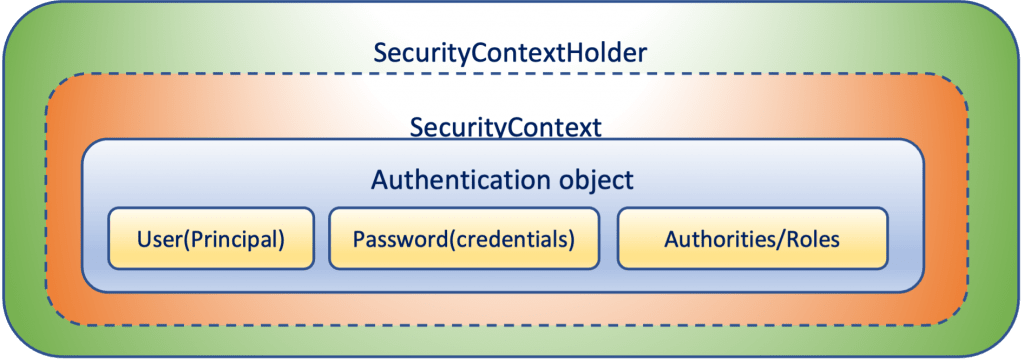
The SecurityContext and the SecurityContextHolder
The SecurityContext is the instantiated object of the SecurityContext interface, and it contains an Authentication object. The SecurityContext is wrapped by the SecurityContextHolder class, the “heart” of Spring Security’s authentication model. Via the SecurityContextHolder, the Authentication object can be set or picked up by an authentication manager (or authentication provider) and processed by an AuthenticationProvider via the ProviderManager or by a custom AuthenticationManager.
Practical examples
The basics
As we have said, the BasicAuthenticationFilter is automatically being used from Spring, whenever we use the .httpBasic() configurer. But this is not the only possibility we have. We can add “manually” a BasicAuthenticationFilter. The code snippet below extracted from a Security configuration class, shows an example of doing so:
Note that, any instantiation of the BasicAuthenticationFilter requires an instance of an AuthenticationManager to be injected (to be passed in its constructor). Also note, that the same is true for many other inbuilt filter classes.
So, we need an AuthenticationManager.
When we used to use the (deprecated now) WebSecurityConfigurerAdapter we could just override the authenticationManagerBean() method, by doing something like that:
@Bean
@Override
public AuthenticationManager authenticationManagerBean() throws Exception {
	return super.authenticationManagerBean();
}
But now, since we don’t use it, we cannot do that.
However, now, we can create an AuthenticationManager bean by getting an instance of the AuthenticationManagerBuilder from the context as a shared object. An example of how we can create a bean that returns an instance of an AuthenticationManager is given below:
The example above concerns a AuthenticationManager which can be used globally (because it is @Bean annotated). Without any security configuration (when just the security dependency is on the classpath), Spring Boot provides a default global AuthenticationManager, with only one default user (with username “user” and a randomly generated password which you can get from application logs).
However, here we can add an in-memory user just for our demo purposes. For that, we can use the AuthenticationManagerBuilder with the simplest authentication possible, which is based on the inMemoryAuthentication(). This adds in-memory authentication to the AuthenticationManagerBuilder using the InMemoryUserDetailsManagerConfigurer to allow customization of the in-memory authentication. We use it just to add a user with username “Aladdin”, password “open sesame” and roles “ADMIN” and “USER”. As you can understand this actually represents the Authentication object e.g., an instance of the UsernamePasswordAuthenticationToken which is being used by the AuthenticationManager.
Finally, we can use the above-defined AuthenticationManager to authenticate an incoming request via the BasicAuthenticationFilter.
Implementation of a custom Authentication Manager
Of course, instead of using a bean of a custom AuthenticationManager, we can create our very own @Component annotated class and implement our custom global AuthenticationManager. The below snippet can be used as a starting template:
A fully working, yet quite simple example of the above implementation is also given below:
As you can see, what it does, is authenticate the user passed in from the BasicAuthenticationFilter as an Authentication object. If the username and password match the existing ones, then it returns a full Authentication object by instantiating a UsernamePasswordAuthenticationToken. “Full” here means that the returned Authentication object also holds the authorities/roles of the existing user.
Then, in our Security configuration class, we can inject our custom-made global AuthenticationManager and use it in our FilterSecurityChain like that:
Note that, as we’ve underlined, the example above, uses a custom global AuthenticationManager. So, if we want to use it as local, (just for the BasicAuthenticationFilter, inside our SecurityFlterChain), we have first to remove the @Component annotation from the implementation class (the “MyAuthenticationManager” in our case), to prevent it to be populated as a bean in the application context:

and then we have also to remove the @Autowired annotation and instantiate the class on our own.

The rest of the code remains intact.
Using a custom Authentication Provider
Until now, we have used an Authentication Manager and its own authenticate() method to authenticate a user. However, using a custom Authentication Provider is not far away from what we’ve seen so far.
Any implementation of a custom Authentication Provider (based on the AuthenticationProvider interface) should use and override 2 contract methods. The 1st one is the authenticate() method and it can be considered identical to the one we’ve seen previously in the custom Authentication Manager. The 2nd one is the supports() method This 2nd method returns true or false. It should return true if this AuthenticationProvider supports the indicated Authentication object (e.g. if the Authentication object supports an instance of the UsernamePasswordAuthenticationToken class).
The fully working example of our first custom AuthenticationProvider is given below:
Next, we have to use it in the app’s custom Security class with the FilterChainBean. Again, we can choose to instantiate the global or a local AuthenticationManager (which we have to use for “feeding” the BasicAuthenticationFilter). Below we use a local AuthenticationManager version by constructing a new ProviderManager and passing to its constructor our custom AuthenticationProvider (the autowired instance of the “MyFirstCustomAuthenticationProvider” in this case):
But how we can use the default global AuthenticationManager? Previously we have said that a @Component annotated class, that implements the AuthenticationProvider interface, results in the instantiation of a global default AuthenticationManager. So how we can use this global AuthenticationManager instance (bean) inside our security configuration class and use it with the BasicAuthenticationFilter?
The AuthenticationConfiguration bean class
Recall, that at the beginning of the examples, when we first added the BasicAuthenticationFilter we used a bean of an AuthenticationManager with a very simple InMemoryUserDetailsManagerConfigurer using a shared object. This was the AuthenticationManagerBuilder instance. But where it comes from?
It actually comes from the security configuration objects that Spring automatically builds for us. And one of the most important and early instantiated objects is the AuthenticationConfiguration class. This is actually a @Configuration annotated class that Spring uses to automatically instantiate a number of helpers (builders and configurers), and amongst them the AuthenticationManagerBuilder bean, that we can use in our custom security configuration class.
Note, that previously, we used the AuthenticationManagerBuilder to build a very simple “custom” AuthenticationManager, and then we made it global (we annotated with @Bean).
Of course, we could also use the default (the one with username “user” and the random password) but we added just 1 in-memory user, for our demo purposes.
However, in our case, a custom AuthenticationManager is already in place, because Spring did so for us, after it found our @Component custom AuthenticationProvider.
So, one option we have is to autowire the AuthenticationManagerBuilder bean and use it, not to build a new AuthenticationManager like before, but just to obtain the existing one this time. Here is what our custom security configuration class looks like:
One more thing that can be added here, is the fact that instead of the AuthenticationManagerBuilder, we can also autowire the AuthenticationConfiguration bean itself. This is because the class has a very specific method, the getAuthenticationManager(), that could be a bit clearer for obtaining the AuthenticationManager. So, using this option we can modify slightly our custom security configuration class like that:
Using a custom UserDetailsService with our custom AuthenticationProvider
There are several examples out there, even in the official documentation (that show how simple is to customize a UserDetailsService. Spring indeed provides us with a number of implementation classes and configurers that cover the most common cases e.g. (InMemoryUserDetailsManager, JdbcDaoImpl, JdbcUserDetailsManager, LdapUserDetailsManager, LdapUserDetailsService).
In most cases, using a customized UserDetailsService fits well when we directly use it in our custom security configuration, with an AuthenticationManager. Particularly, the “ready-made” class of DaoAuthenticationProvider also has a method that can be used to pass in a custom UserDetailsService. If you wish to get a good grasp of using it with real MariaDB database data, you can read the following post of mine, where you can also find the full code in the repo provided at the end of the above post.
Here, we use a simple custom AuthenticationProvider, so, especially here, there is no that big need to delegate the task of getting an authenticated User object, to a custom UserDetailsService. However, since using a custom UserDetailsService class gives a better level of “separation of concerns”, let’s go for an example using a very simple custom implementation of UserDetailsService together with our “MyFirstCustomAuthenticationProvider”.
A simple approach for using separate classes includes:
- a user entity object,
- a repository that can deal with real data and
- a service (the custom UserDetailsService) that does the job and returns the UserDetails (the User).
So, let’s see the code blocks.
This is a user entity name “User”
This is an in-memory “repository” named “UsersRepo”
And this is a simple example of a custom UserDetailsService implementation – named: “Custom UserDetailsService”.
Finally, below is the updated version of our custom AuthenticationProvider – now renamed to “CustomAuthenticationProvider”
Our custom security configuration class remains intact.
That’s it. So far so good.
Replacing the BasicAuthenticationFilter with a custom one for handling the Basic Authentication
So far, we have seen in detail the Basic Authentication process and how we can customize it further. The BasicAuthenticationFilter is considered as the front-end guard that extracts the username and password from the HTTP Base64 token of the Authorization header and puts the un-authenticated Authentication object into the SecurityContext, where it can be authenticated via an AuthenticationManager, an AuthenticationProvider, or a UserDetailsService.
However, we can also implement our custom filter that can replace the BasicAuthenticationFilter.
Our example is a simple yet fully functional approach, which -like the BasicAuthenticationFilter- extends the OncePerRequestFilter, and also requires an instance of an AuthenticationManager to perform the authentication. However, note that our implementation example does not actually guarantee a single execution per request dispatch. (If you wish to challenge yourself and learn more take a look at the original source code of the BasicAuthenticationFilter).
The example code of our first custom filter (named “CustomRequestHeaderTokenFilter”) for handling the Basic Authentication is given below:
Basically, its main functionalities are:
- It extracts “manually” the Base64 user credentials (username and password) from an Authorization header having a value of a Basic token. For credentials extraction, it uses the embedded support of Base64 encoding/decoding offered by Java 8 and afterward. (Note, you can also use the “ready-made” class BasicAuthenticationConverter as the BasicAuthenticationFilter does).
- Creates an un-authenticated Authentication object
- Delegates the authentication to the authenticate() method of the AuthenticationManager passed in.
- Puts the Authentication object returned to the SecurityContext
After that, we have just to replace the BasicAuthenticationFilter with our CustomRequestHeaderTokenFilter in our custom security configuration class (no other changes):
Modifying our CustomRequestHeaderTokenFilter to support JWT Bearer token-based Authorization
Most of the posts out there used to use 2 custom filters: 1 for authentication and 1 for authorization. Many custom authentication filter implementations are based on the “ready-made” UsernamePasswordAuthenticationFilter, class. which by default, tries to authenticate a pair of values passed as request parameters “username” and “password”, of a request made at the “/login” endpoint (URL). On the other hand, authorization filters are usually custom classes that extend either the BasicAuthentication or OncePerRequestFilter class (which we have seen). On the other hand
When we successfully authenticate a user, we have to put an authenticated Authentication object into the SecurityContext. An authenticated Authentication object (e.g. UserNameAuthenticationToken) practically means that it has to be fully populated, i.e. it has to include the authorities/roles of the user (e.g. via a UserDetailsService).
When we authorize (an authenticated) user, this practically means that we have also to gain the authorities/roles of the user and populate a fully authenticated Authentication object into the SecurityContext.
As you can understand, in both of the cases, we need to populate a fully authenticated Authentication object into the SecurityContext. So, taking all the above into account, we can combine both functionalities, in just 1 custom filter. Actually, we can do that by modifying our CustomRequestHeaderTokenFilter to also support JWT Bearer token-based authorizations.
When the user wants to log in (sign-in) she/he has to provide an Authorization header with a Basic token (Base64 encoded username:password). Then, if the authentication succeeds, a Bearer JWT token has to be returned back via the response sent back to the user from the /signin endpoint holding a Bearer token WWW-Authenticate header. Then, if the user wants to access other protected endpoints, (protected via roles/authorities), she/he has to provide just the valid Bearer JWT token like the one previously obtained. After that, we can fetch that particular user’s roles/authorities e.g. from the UserDetailsService. If the fetched roles/authorities correspond to the ones required from the requestMatchers of that endpoint, then, the user can proceed and access the related resources.
One more thing that should be concerned is the fact that one can also use the Basic Authentication to access role-based endpoints. Since the Basic Authentication should only be required/applied for the /signin endpoint, we can also add this functionality to our customizations. This means that even a valid pair of username and password provided in any endpoint other than the /signin will be treated as forbidden. Similarly, if a valid Bearer token is provided to the signin, it will also be rejected.
What we need
Dependency(-ies)
We need a good library for doing the job with JWT tokens e.g.: encoding, generating, extracting, validating, and so on. There is a quite long list of such libraries and you can take a look at the Maven repository here on your own. A good choice for me is the jjwt-api. Below are the dependencies you should add to the app’s pom.xml:
A token utilities class
A token-utilities class that will provide us with the necessary (static) methods to work with tokens. Apart from the methods for working with JWT tokens (based on the jjwt-api library), methods for working with Base64 encoding/decoding can also be added (From version 8 and afterward, Java provides embedded Base64 support). Below is a simple example of such a class named “TokenUtils”:
A constants’ class
We can always define the constants we need externally, e.g. in application.properties file, and to get them as environment variables. However, here we use just public static final constants in a helper class named “SecurityConstants”:
The updated version of our CustomRequestHeaderTokenFilter
As you can see the code is quite simple, yet it deals with both: Basic Authentication and JWT Bearer token Authorization. For the authentication, it needs an AuthenticationManager bean as in the previous example. The Basic Authentication is required only for the /singin endpoint. When a Bearer token is sent, then it validates the token, extracts the username from the JWT claim(s), and fetches the user roles/authorities via a UserDetailsService bean (no authentication for the JWT bearer token).
When a user has been authenticated, the /auth/signin endpoint handler in the RestController extracts the username from the SecurityContext, generates a JWT token passing the username as a claim, and returns that token as a Bearer token value of an Authorization header with the response. Here is the code example:
Finally, we have to make some modifications to our custom security class. Because we have “autowired” the UserDetailsService in our CustomRequestHeaderTokenFilter we had to annotate it as a @Component (as a bean). This was necessary for Spring IoC mechanism that manages all beans. So, since the CustomRequestHeaderTokenFilter bean, requires an AuthenticationManager (actually the default ProviderManager that has been automatically created after the Spring traced the bean of our CustomAuthenticationProvider), we have to make it also as a bean. As usual, we can get it out from the AuthenticationConfiguration instance. After that, we can pass it in a function that instantiates and returns an instance of our CustomRequestHeaderTokenFilteras a bean again. Then, when we register our filter, we can actually register just the bean instance returned by this function.
A final modification is to adjust slightly the in-line ExceptionHandlingConfigurer. So far, we have used it for returning just a WWW-Authenticate header, however we can add a couple of lines for providing some more information back to an unauthenticated user. (Note that you always can add your own custom AuthenticationEntryPoint implementation class)
Below, is how the modified code of our custom security class finally becomes:
That’s it! No any changes to CustomAuthenticationProvider, CustomUserDetailsService, etc.
Conclusion
Not much to say. This was a bit long journey for a post, but I’d decided to make it a one-stop shop for anyone who wants to dig a bit deeper on some of the Spring Security fundamental subjects like FilterChain, Authentication and Authorization, Basic Authentication, Tokens (JWT) and customizations of AuthenticationManager(s), AuthenticationProvider(s) and custom filters.
So, if you had the courage and patience to go through it, the full repo here is for you!
Note: Below, you can find my next post. It presents a very detailed custom implementation of the more powerful and more elegant, (but a bit “weird”) ‘UsernamePasswordAuthenticationFilter, used again for both: Basic Authentication and JWT Bearer Authorization. You will also like the sophisticated error handling for authentication and authorization Errors.
Moreover, if you enjoyed it, I would appreciate any feedback from you. Thanks for reading and stay tuned!
Nice writing Panos, gives the in-depth understanding of the basic spring security background process. Is it possible to have two total different security implementation in single application, like JBDC Auth and OAuth?
Thank you, Ramanujam.
Of course, it is possible to configure the Spring security, in a way to deal with different authentication schemas. Spring and Spring Boot are quite powerful providing different options one can follow to do so (e.g. different SecurityFilterChain beans, different inner classes, custom implementation filters, etc.) I haven’t yet published a specific article about such a case, and maybe I’ll do that in the future. A possible relevance can be found in another post of mine here or here which can be used, to deal with both LDAP and JDBC authentication.
Thank you again.
Panos
Great article!learned a lot! Thank you so much!