Spring Boot Security Configuration, practically explained – Part1: Starting with Spring Boot Security and Basic HTTP Authentication

220426 – 220510 – 221210
Intro
This is the 1st in a series of posts about the Spring Security customization based on the implementation of a custom class extending the WebSecurityConfigurerAdapter abstract class.
The legacy Spring Boot Security Configuration, extending the WebSecurityConfigurerAdapter abstract class, is considered deprecated and is being replaced by a component-based security configuration. However, since the existing coding base is huge, here, we will stick to customization of the WebSecurityConfigurerAdapter, and we will try to provide a better understanding, using practical examples.
Note, that if you don’t wish to continue seeing the warning curly yellow lines in your IDE when you use the latest versions of Spring Boot, you should use (switch to) an earlier version of Spring Security (spring.security dependency. Here is how you can do that.
Prerequisites
Since we are going to focus on the subject, it is supposed that you have started having some familiarity with Spring Boot development, REST APIs, Maven dependency management and POM files, JSON, and other related subjects (Spring annotations, eg. @Beans, authentication, authorization, Spring validation, exception handling, DTOs, application properties, connecting to a database using JDBC, etc.). If you haven’t, then now is a good chance to start digging deeper in Spring / Spring Boot, far the best Java development framework.
Starting with Spring Boot Security and Basic HTTP Authentication
Starting with Spring Boot Security
Adding security to your SPRING Boot applications is pretty simple. All you need to do is to add a dependency to your Maven POM.
The added dependency spring-boot-starter-security takes care of all of the dependencies related to spring security. Actually, those dependencies are:
- spring-security-core: Implements the core features of Spring Security
- spring-security-config: Provides the Spring Security namespace
- spring-security-web: Provides filters and other features needed to secure web applications
When the security dependency is on the classpath, the Spring provides some auto-configuration defaults, including the security of all endpoints, as well as setting content-negotiation strategy to ‘httpBasic’ – Basic Authentication.
Moreover, without doing any further configuration, a default username (= ‘user’) and a randomly generated password are added. Those credentials can be used to log in to the application. So, after we ran the application, we can notice that there are some new entries in the output Log console:
Note: What actually is shown above, is a number of ordered security filters, automatically generated/imposed by Spring Framework. And one of them in the above, ordered filter chain is the BasicAuthenticationFilter. Later on, we will see a bit more Security Filters and the Security Filter Chain, and how we can customize them.
Even, if we try to access our app/endpoint via a browser, we are automatically redirected to a login page!!! – a login screen:

In Spring, with default enabled security (as so far), a login Entry point is automatically used to redirect the non-authenticated request. The redirection is on a default login page. However, in a REST Service, displaying a login page doesn’t make any sense, as Rest Services most of the time, will be called by some custom-made client apps rather than browser requests.
So, for solo REST services (no Web apps) it is better to send the 401 Unauthorized response when the request comes without the authentication, rather than redirecting to the default generated login page to get the authentication. Be aware that in such a case the 401 Unauthorized, actually means Un-Authenticated!
Starting customising Spring Security – using a Custom security configuration class
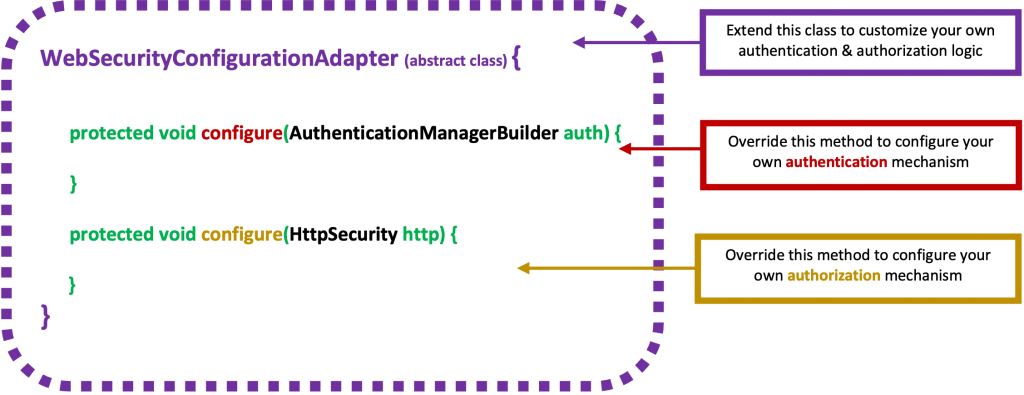
So far, we haven’t written either one line of code!!! However, if we want to proceed to set our custom security settings, we have to create a main security configuration class. We can give any name to such a class (below we use the name ‘SecurityConfig’), but this class has to extend the basic Spring class which is the ‘WebSecurityConfigurerAdapter’.
The WebSecurityConfigurerAdapter class is an abstract class that implements the WebSecurityConfigurer interface, and its custom implementation, allows us to define the security configuration needed for our app. Finally, we also have to annotate this our security configuration class with @Configuration and @EnableWebSecurity.
In order to customize our security configuration, basically, we have to deal with 2 things: We have to provide an authentication mechanism and protect (or better authorize) the HTTP paths/endpoints we wish for our app.

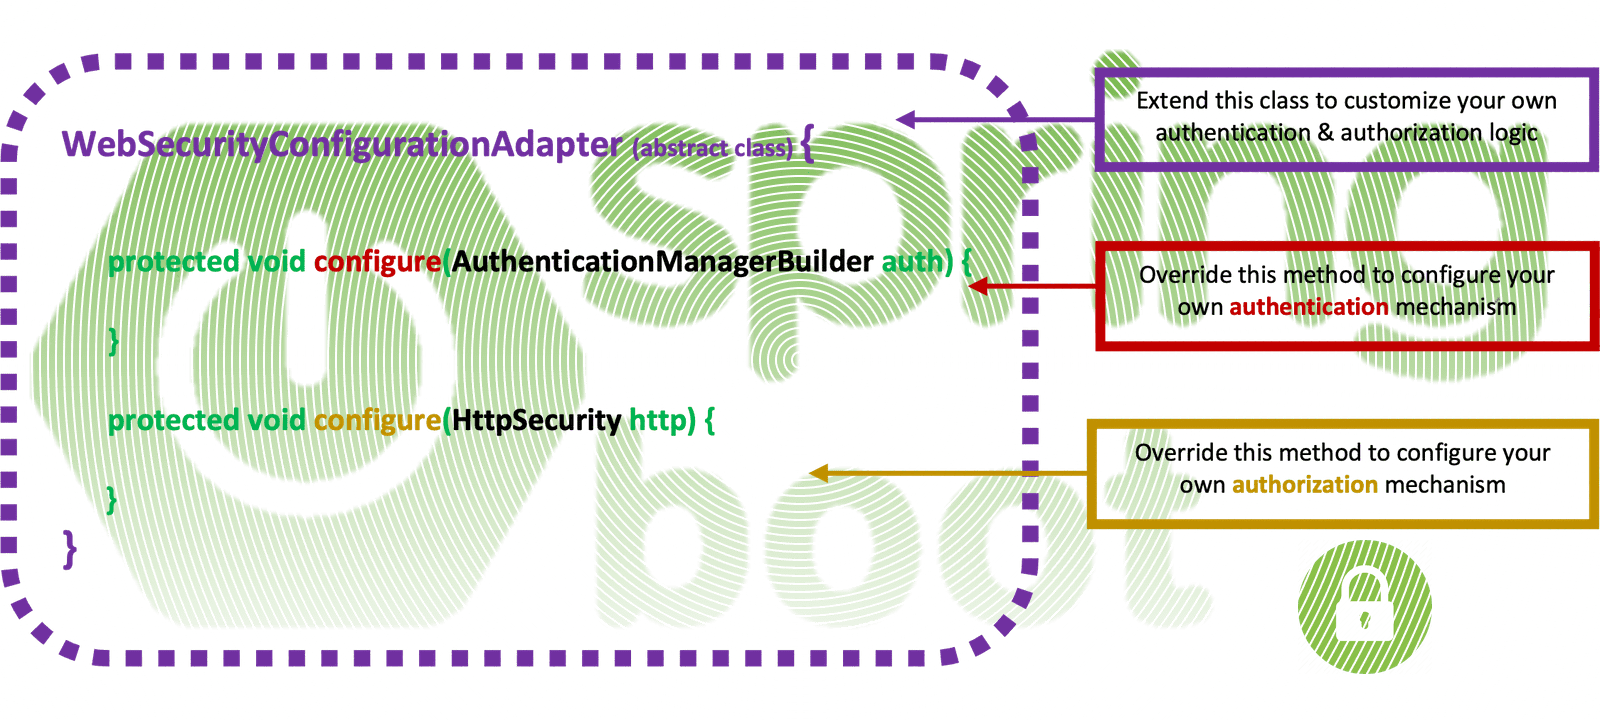
Hopefully, the Spring WebSecurityConfigurerAdapter class provides us with the 2 protected methods, that allow us to deal with both: to build (or define) our Authentication mechanism (using an AuthenticationManagerBuilder) and to configure the HttpSecurity, for authorization of authenticated user(s).

Below is maybe the most basic and trivial custom Security Configuration class that you can implement.
The above implementation is actually a form-based configuration suitable for other web MVC applications. However, we can configure it for a form-less REST API app, removing the .and.formlogin(), and adding the httBasic() configuration:
The above configuration requires that any URL requesting access should be authenticated with a basic authentication providing a username “user’ and password “mypassword”.
The 1st configure() method is responsible for configuring restrictions for accessing application resources (URL paths and endpoints). Restrictions are configured with a number of filters. For example, using antMatchers with endpoints (url patterns) and authorizations (roles or authorities of a user) we can restrict the access of an authenticated user to our app resources.
Find the final code in the repo here.
The 2nd configure() method is responsible for configuring an authentication mechanism. Here, the authentication mechanism uses the trivial in-memory authentication scheme provided by Spring Security. If the authentication is satisfied (user name and password are matched), then it assigns the role “ROLE_USER” to that user(principal). This granted role is necessary to authorize that specific user(principal) for accessing or not, paths and endpoints configured via antMatchers in the previous 1st configure() method.
? Note that, instead of overriding the 2nd configure() to make (to build) an AuthenticationManager, we can make a @Bean annotated method that uses and configures an AuthenticationManagerBuilder to build and return an AuthenticationManager as a bean. So, the above example can be re-written like that:
Moreover, we have to notice that the 2nd configure() method uses the Spring Security class: AuthenticationManagerBuilder. This class uses a number of methods-configurers (one of which is the inMemoryAuthentication() we’ve used in the above example) that allow us to configure in more detail our authentication.
Some other commonly used methods providing Authentication Providers configuration (via AuthenticationManagerBuilder) are:
– authenticationProvider()
Adds authentication based upon the custom AuthenticationProvider that is passed in.
– jdbcAuthentication()
Adds JDBC authentication to the AuthenticationManagerBuilder and returns a JdbcUserDetailsManagerConfigurer to allow customization of the JDBC authentication.
– ldapAuthentication()
Adds LDAP authentication to the AuthenticationManagerBuilder and returns a LdapAuthenticationProviderConfigurer to allow customization of the LDAP authentication.
Note that, each authentication provider can cooperate with a UserDetailsService in order to retrieve and authenticate user details. We can also configure a ‘UserDetailsService’ configuring the userDetailsService() via the AuthenticationManagerBuilder. We can do that by passing it a custom UserDetailsService.
All of them allow us to customize the authentication mechanism to fit our needs. However, we will see them later on. So, before proceeding further, it’s worth taking a look at very fundamental info about the Basic HTTP Authentication and how it works in Spring. Then, step-by-step we will be familiarized and we will add more customizations to our Security configuration.
Basic HTTP Authentication Intro
One of the most common ways to authenticate a user is by validating a username and password. As such, Spring Security provides comprehensive support for authenticating with a username and password. As it has been mentioned before, this is the default Spring Security authentication scheme.
The Basic HTTP Authentication is a quite common practice in RESTfull applications. The Basic HTTP Authentication implements a simple challenge and response mechanism, with which a server can request authentication information (a user ID i.e a username and password) from a client. The client passes the authentication information to the server in an Authorization header. The authentication information is in base-64 encoding.
If a client makes a request for which the server expects authentication information, the server sends an HTTP response with a 401 status code, a reason phrase indicating an authentication error, and a WWW-Authenticate header.
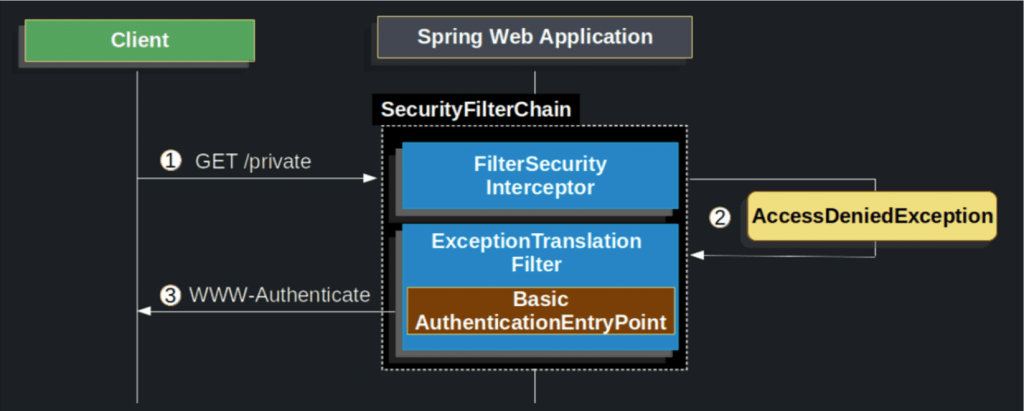
The following image, taken from the official Spring documentation here, depicts nicely how the challenge process takes place by the Spring Security.

- First, a user makes an unauthenticated request to the resource end path “/private” for which it is not authorized.
- Spring Security’s FilterSecurityInterceptor indicates that the unauthenticated request is Denied by throwing an AccessDeniedException.
- Since the user is not authenticated, ExceptionTranslationFilter initiates Start Authentication. The configured AuthenticationEntryPoint is an instance
BasicAuthenticationEntryPointthat sends a WWW-Authenticate header. TheRequestCacheis typically aNullRequestCachethat does not save the request since the client is capable of replaying the requests it originally requested.
The format of a WWW-Authenticate header for HTTP basic authentication is:
WWW-Authenticate: Basic realm="My Site"
Then the client resends the original request with an Authorization header. Alternatively, the client can send the Authorization header when it makes its original request, and this header might be accepted by the server, avoiding the challenge and response process.
The format of the Authorization header is:
Authorization: Basic username:password
The Browser sends the username and password using the above header. username and password are joined together with a colon in between and then encoded using base-64 encoding method. So if the username is “panos” and the password is “password1” than a string “panos:password1” is generated and then encoded using base-64 encoding. that in our case results: “cGFub3M6cGFzc3dvcmQx”.
Be careful, the Base64 is just an encoding mechanism, not an encryption mechanism. That means that a MITM (man-in-the-middle) attack, can easily decode the encoded string. (Try yourself with any of the free available online tools, e.g. at https://passwords-generator.org/base64-decode. So, this is completely insecure, and thus we have always have to use only a secure connection (HTTPS/TLS). Moreover, there are also some other issues with Basic HTTP Authentication, like:
- The password is sent repeatedly, for each request. (Larger attack window)
- The password is cached by the webbrowser, at a minimum for the length of the window / process. (Can be silently reused by any other request to the server, e.g. CSRF).
- The password may be stored permanently in the browser, if the user requests. (Same as previous point, in addition might be stolen by another user on a shared machine).
A better solution is to use the Basic HTTP Authentication (just once) in conjunction with Bearer Tokens e.g. encrypted JWT, but this might be a subject for another post.
Spring Security with Basic Authentication
When a client receives the WWW-Authenticate header it knows it should retry with a username and password. Below is the flow for the username and password being processed.
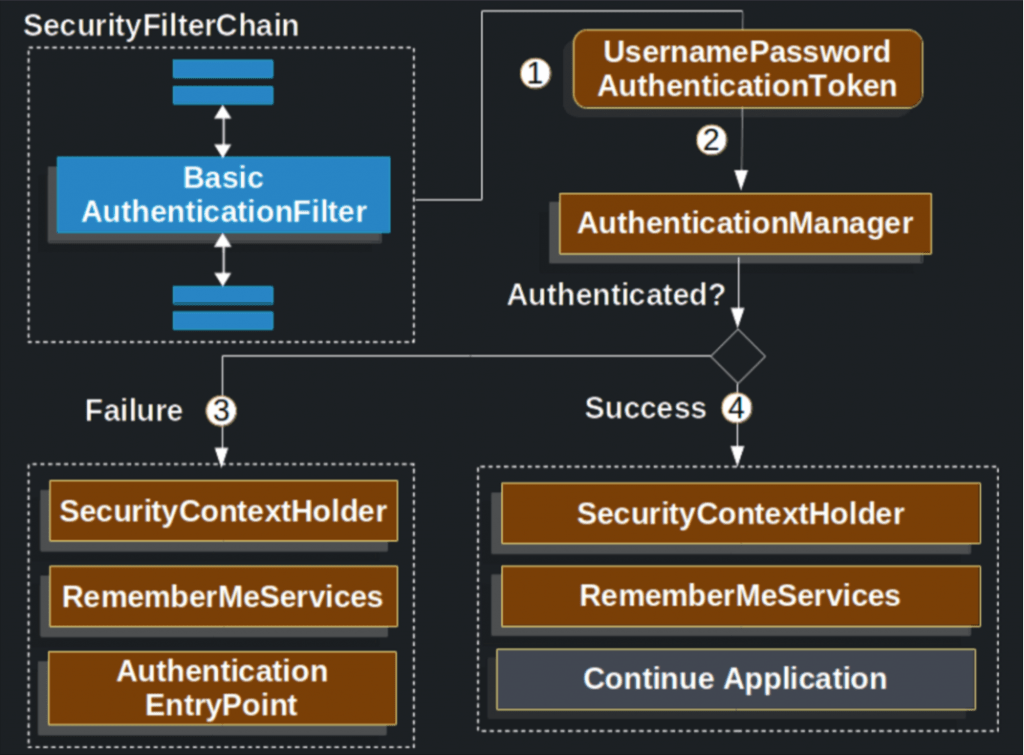
The official documentation of Spring, is always our supporting assistant. So the following image (you can access here) explains ver well the mechanism behind Spring Boot Basic Authentication:

- When the user submits his/her username and password, the BasicAuthenticationFilter creates a UsernamePasswordAuthenticationToken which is a type of Authentication by extracting the username and password from the HttpServletRequest (e.g. from the request header).
- Next, the UsernamePasswordAuthenticationToken is passed into an AuthenticationManager to be authenticated. The details of what AuthenticationManager looks like depend on how/where the user information is stored.
- If authentication fails, then Failure
- The SecurityContextHolder is cleared out.
- RememberMeServices.loginFail is invoked. If remember me is not configured, this is a no-op.
- AuthenticationEntryPoint is invoked to trigger the WWW-Authenticate to be sent again.
- If authentication is successful, then Success.
- The Authentication is set on the SecurityContextHolder.
- RememberMeServices.loginSuccess is invoked. If remember me is not configured, this is a no-op.
- The BasicAuthenticationFilter invokes FilterChain.doFilter(request,response) to continue with the rest of the application logic.
Notice, that the AuthentcationManager is a Spring Security interface, and can be implemented by the Spring Security ProviderManager class. The job of the ProviderManager is to iterate an Authentication request (Basic HTTP Authentication) through a list of AuthenticationProviders, which are classes that implement the AuthenticationProvider interface.
Spring offers us a plethora of AuthenticationProviders that can be used for user authentication, and usually, we use just one of them. Below, there is a list of some of the commonly used AuthenticationProviders.
- LdapAuthenticationProvider
- ActiveDirectoryLdapAuthenticationProvider
- DaoAuthenticationProvider
- JwtAuthenticationProvider
- OAuth2LoginAuthenticationProvider
We can also use any AuthenticationProvider and pass it as parameter in the AuthenticationManagerBuilder of the 2nd configure() method of our custom Security Configuration class as we have mentioned before. In order to do this, we can define a bean (e.g. a method using @Bean annotation inside our custom Security Configuration class that will be manage by Spring), that returns the AuthenticationProvider we defined. (We will see such an example later on).
Here, it’s worth mentioning that the purpose of an AuthenticationProvider is to authenticate a user via its authenticate method, AND provide a “fully authenticated object including credentials”- a ‘principal’ token, which is an (analogous to the selected AuthenticationProvider) implementation of the Authentication Spring Security interface. So, an AuthenticationProvider, after a successful authentication, results a set (an object) of user (principal) details, including the collection of any authorities/roles he/she has been granted. As the official documentation states: “Many of the authentication providers will create a UserDetails object as the principal”.
Actually, the user details object (the Authentication object) of an authenticated user (the principal) are quite important for the Spring Security configuration, and they are being used to control the access to the app resources. Hopefully, Spring Security offers us may options to get user details for an authenticated user, either after user authentication or during the process of user authentication.
That’s it!
Enjoy, and thank you for reading!
