
Salts and UUIDs for your PostgreSQL database

221102
Into
This post presents practical implementation steps for UUIDs and Password Salted Hashes when working with PostgreSQL Database.
The topics that will be discussed are:
- Working with the database, creating a new user and creating the demousers table
- PostgreSQL UUIDs – Using the uuid() function
- 2 approaches for Hashing and salting – Using Trigger(s)
- 2 versions of verification stored functions
Prerequisites
It is supposed that you understand the basic database concepts, UUIDs, and password salting and hashing. The previous post of mine gives some grasp on those subjects.
Moreover, in order to follow the examples of this post, you must have access to a running MariaDB instance and the psql CLI tool. [Here you can find how you can install it in your system as a stand-alone tool]. If you wish you can take a look at my post below on how to create and start using a PostgreSQL container.
Start working with the PostgreSQL database and create a new user and the demousers table
Connect via psql CLI at your running PosgreSQL instance, using your preferable credentials (username and password). Below is an example to connect to a remote instance:
~ psql -h 192.168.0.17 -p 5462 -U postgres -W
Then create a new database named “ticket-management”
postgres=# create database "ticket-management";
postgres=# \c ticket-management;
After that, create a new user “user1” with password “upassw1” and then assign him all privileges of the ticket-management database.
CREATE USER user1 WITH PASSWORD 'upassw1';
GRANT CONNECT ON DATABASE "ticket-management" TO user1;
GRANT ALL ON DATABASE "ticket-management" TO user1;
After that, logout and re-login, as user1:
~ psql -h 192.168.0.17 -p 5462 -U user1 -W ticket-management
That’s it. Now it’s time to see how we can use UUIDs in the PostgreSQL.
PostgreSQL UUIDs
Create and use the uuid_ossp extension
Postgres uses extensions. Extensions can be installed in each specific database using the general command:
CREATE EXTENSION IF NOT EXISTS "<extension-name>";
So, in order to use an autogenerated uuid value as a default value for our id -primary key column, we have first to install the uuid-ossp extension:
CREATE EXTENSION IF NOT EXISTS "uuid-ossp";
Note that you can always use the psql \df command to list all available functions. Below, you can see the functions provided by the installed uuid extension:
Create a new table – the demousers table
PostgreSQL is quite powerful and provides a specific column type, the uuid type, which is the appropriate type for using it as the type of the id column. Moreover, we will use the uuid_generate_v4() function, provided by the uuid extension previously installed, as the default value of the id column.
Alternatively, you can use a bit more specific type like varchar and char, instead of the general text type, for the username and password fields:
After the table creation, you can check if it does exist by using the \dt psql commad:
Now, it’s time to test if the uuid works OK by adding a new user
BEGIN;
INSERT INTO demousers (username, password) VALUES ('panos', 'panospassw1');
COMMIT;
That’s it! As you can see, the auto-created “cb5e9022-f45b-45ea-b9c6-952428cc45e8” UUID has been correctly inserted as the value in id field!
Note: As you probably have understood, PostgreSQL offers us a ‘turn-key’ solution for UUIDs: the uuid data-type, as well as the ability to use a function as a default value for a field (the uuid_generate_v4() for the id field), so there is no need to implement a trigger.
However, we will need one for hashing/salting needs.
PostgreSQL Hashing and Salting
Add and use pgcrypto Extension
Again, here before proceeding, we will need to install another postgres extension, the pgcrypto extension. This is necessary, since the pgcrypto package provides all the ‘standard’ functionality for selecting and using hash algorithms, random generated values, salting, etc.
Moreover, the pgcrypto extension, also provides some quite specific capabilities especially dedicate for password hashing and salting.
So, here we will see how to implement 2 triggers and their trigger functions, using both: the ‘standard’ way, similar to the approach we followed with MariaDB, and the PostgreSQL pgcrypto package via the crypt() function. However, first we have to create/install the pgcrypto extension:
CREATE EXTENSION IF NOT EXISTS "pgcrypto";
After we have the pgcrypto extension in place. we can proceed with creating a trigger and use the necessary pgcrypto functions. Actually we will see 2 approaches:
1st approach using the ‘standard’ way.
We will use the following functions:
- The pgcrypto gen_random_bytes() function to generate a random number of 8 bytes
- The encode() function for converting a byte number into hex string
- The concat() finction is used to concatenate 2 or more strings
- The pgcrypto digest() function that creates a hash value for the algorithm passed as argument. In our case her, we use the SHA256 algorithm.
You can read more for pgcrypto module and its functions, at the official documentation, here.
Now, we can proceed to create a trigger to support the auto-generation and auto-insertion of a salted hash value in the password column, instead of the password plain text, every time a new row is inserted. In PostgreSQL, a trigger creation presumes the execution of a trigger function. This means that we have to create both, the trigger itself and a trigger function, that will be fired (executed) by the trigger’s body. A trigger function can be easily recognised because it should return a trigger.
So, below, you can find the example code for creating such a trigger function, as well as the trigger itself.
The trigger function:
After the function creation you can check it has been created by using the \df psql command :
Now, we can create the trigger itself:
After the trigger creation you can check if it has been created by using the sql command :
SELECT * FROM pg_trigger;
Now, we are ready to test the trigger “Hash_Password_insert_1” we’ve just created, by inserting a new user:
BEGIN;
INSERT INTO demousers (username, password) VALUES ('panos2', 'panospassw2');
COMMIT;
Then, let’s see the table rows:
So far, so good. Time for the verification function.
1st case of password verification
Use the following code to create a stored function that can verifies if a password corresponds to a stored hash value:
If you wish you can use again the \df command to ensure that the ‘isuserpasswordvalid_1’ has been created.
As you can see above, the function accepts 2 text parameters for username and password. First, it obtains the existing user password using the username provided. Then, extracts the salt, which is actually the string of the first 16 characters of the store hashed password. Next, re-calculates a new hash value using the same algorithm. And finally compares the newly calculated hash value with the existing hash value which is the last part of the existing password string (from 17th character till the end). It returns TRUE (t) if there is a match, otherwise it returns FALSE (f).
Let’s check it:
SELECT IsUserPasswordValid('panos2', 'panospassw2');
That’s it. It works OK.
2nd approach using the pgcrypt crypt() function
The reason I’ve decided to include an alternative of the trigger function using the crypt() and gen_salt() functions of the pgcrypt extension, is because the official documentation states that: “The functions crypt() and gen_salt() are specifically designed for hashing passwords. crypt() does the hashing and gen_salt() prepares algorithm parameters for it.” Moreover, the actual implementation is just 1 line code. The same is also true for the verification function. Let’s see how it can be implemented.
So, below is how we can use them in our trigger function. Actually, the code creates a second version of the previous trigger function, this time with the name ‘trigger_function_password_hash_2’:
The trigger itself remains with the same name, but now it calls/executes the 2nd version of the trigger function:
Again, lets insert one more user to check how the salted hashed password looks like:
BEGIN;
INSERT INTO demousers (username, password) VALUES ('panos3', 'panospassw3');
COMMIT;
Pay attention that the output string of the stored hashed password, now, has a length of 60 non-hex characters. This is why the crypt() function is actually a bcrypt implementation. You can also check it on yourself, by using the on-line bcrypt verifier:
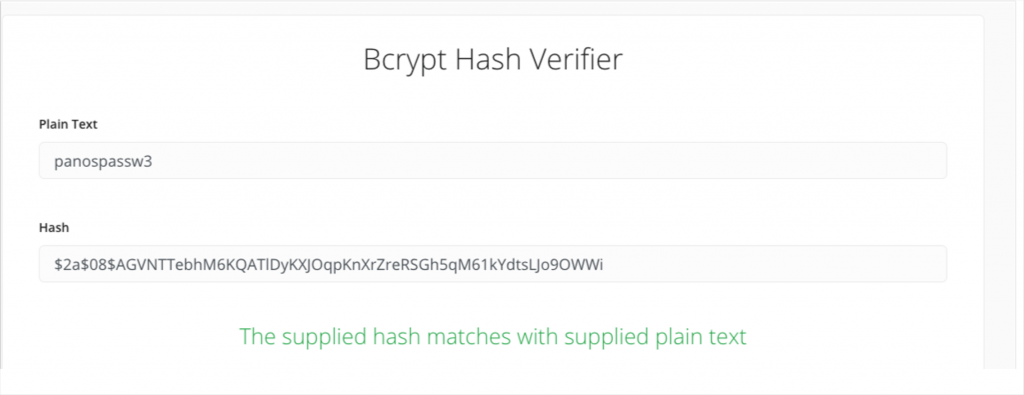
Moreover, this is also the reason that the crypt() accepts passwords of up to 72-characters long, as the official documentation states, which is also valid for the bcrypt. Thus, the output is a $2a$- null-terminated, UTF-8 encoded hash string, 60 characters long.
So far, so good! Let’s now create our own verification function.
2nd case of password verification using pgcrypt crypt() function
Use the following code to create a stored function that can verify if a password corresponds to a stored hash value created using the pgcrypt crypt() function:
The above
2nd version also accepts the same 2 parameters for username and password, and generally works very similarly with the previous verification function. However, here we use again the crypt() function, but this time we use the obtained stored hashed password, like a salt! Then, we test whether the result (the ‘newHash’) matches the stored hashed value.
Let’s check it:
select isuserpasswordvalid_2('panos3', 'panospassw3');
As you can see it returns TRUE (t), so the provided password matches with the store hashed vale.
That’s it all demonstrating how you can start dealing with UUID and salts and hashes in PostgreSQL
Keep reading other posts of mine for implementation examples of other databases.
That’s it… for now! I hope you enjoyed it!
Thanks for reading ? and stay tuned!
Very in-depth post, thank you so much for sharing!
One question I was left with was: What about when a user needs to reset their password? What updates are required to support handling the creation and insertion of a new hash for that user’s row? I went with the first suggested implementation, if that matters.
Thank you, Aaron!
Password reset actually means password change, or better: password UPDATE. However, the post examples use only INSERT triggers. You can update the trigger, on your own, to handle both: INSERT and UPDATE, (no matter of the trigger function implementation 1st or 2nd).
e.g.:
CREATE OR REPLACE TRIGGER “Hash_Password_insert-update_1”
BEFORE INSERT OR UPDATE ON demousers
FOR EACH ROW
EXECUTE FUNCTION trigger_function_password_hash_1();
Then, you can use an update SQL statement to change/reset the password of a user.
Panos