
Synology NAS Server: Looking around and “playing” with Terminal/SSH – Use SynoCommunity package source

201412
Enabling SSH terminal access in a Synology NAS server
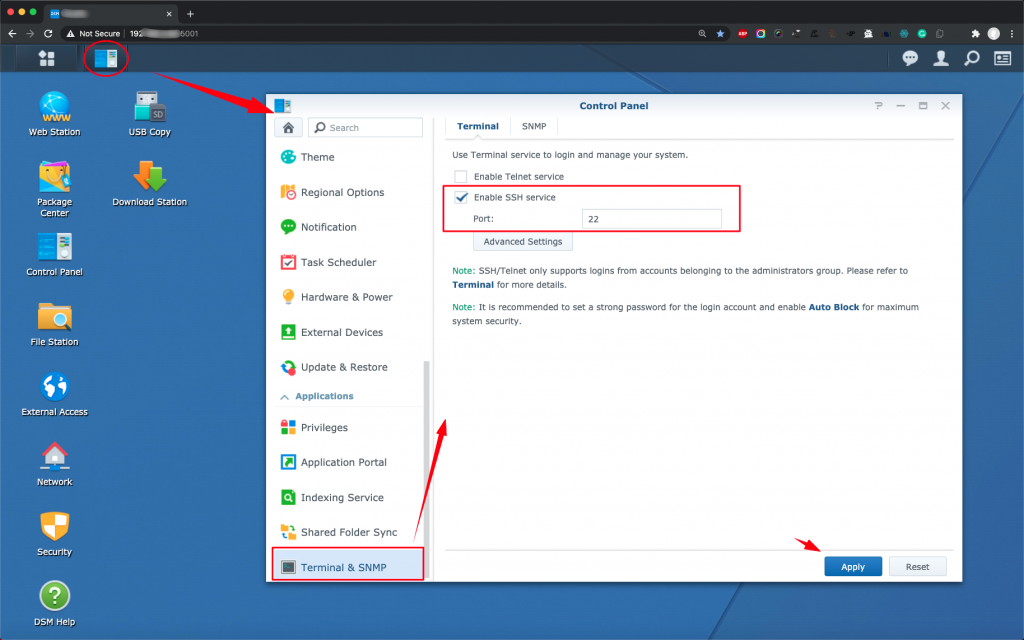
Open the web interface of your NAS server, using your browser. Then open the ‘Control Panel‘, go down to the left pane and choose the ‘Terminal & SNMP‘ tab. Then tick/click on ‘Enable SSH service‘. You can leave the default value 22 as Port, however, it is recommended to change it later, for security reasons. Finally, click the Apply button at the bottom.
Now, you are ready to access your Synology NAS server using a Terminal window from another host machine, eg. from your MAC in your local network.
Connecting to your NAS server via an SSH terminal on your MAC
Goto to your MAC, open a Terminal window, and use:
$ ssh user01@192.xxx.xxx.xxx
where ‘192.xxx.xxx.xxx’ is the local IP (IP4) address of your NAS server, e.g. 192.168.1.32, and ‘user01’ is a valid user name defined in your Synology NAS server.
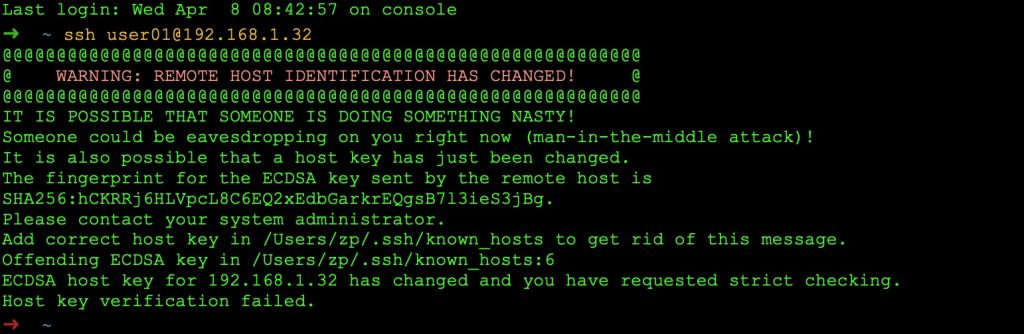
The very first time you will try to connect you might be warned:
The authenticity of host '192.168.1.32 (192.168.1.32)' can't be established.
RSA key fingerprint is SHA256:g1+pI+0ZqF0SD9AN4H8ONQcVXKK8MU/GPV/WroYAySQ.
Are you sure you want to continue connecting (yes/no)?
You can type ‘yes’, and then press ENTER to continue:
The authenticity of host '192.168.1.32 (192.168.1.32)' can't be established.
RSA key fingerprint is SHA256:g1+pI+0ZqF0SD9AN4H8ONQcVXKK8MU/GPV/WroYAySQ.
Are you sure you want to continue connecting (yes/no)? yes
Warning: Permanently added '192.168.1.32' (RSA) to the list of known hosts.
user01@192.168.1.32's password:
user01@nas01:~$
What actually has been done is that: a new entry has been added to your MAC’s ~/.ssh/known_hosts file, in /Users/<username>/.ssh folder:
192.168.1.32 ssh-rsa AAAAB3NzaC1yc2EAAAADAQABAAABAQCe2PBBtm0GzJMyXTssrzGU21p9IUbU0QOCWbMCGoEUbP2Qu0HWvmj2IOxrpcNdGaMVRlbQhtr/K5ReiqxSavDAHuNQehg8Nf6QGnPHLlk9J9JRO80C4g6q50WaJUtCSPhPOzvZLpH9k4Fgy7ogOITcEqu2gy+Zncd+sFahKnEff9dQ4J1aQj/ogA+ZY4X+fmg8aIjVC+7RAdeCFvIJ03iSM4JTGrjl9IClWfZS359gd146BW3GF4XeVZ2Tf2AhHgPXBwE7uMIXBwVs5NcYoX9AR8vzOxfV5btK9iSKqnCNQp13F82nsP6rwvsLQJ06/RWVF1KaVo/DDRKwqOFTqKqd

NB: Later in the future trying to connect again, you might get challenged with a warning message like:
In that case, you can get some guidelines to deal with it here.
So, I suppose that everything is done, and you can connect to your NAS server:
$ ssh user01@192.168.1.32
user01@nas01:/$ pwd
/
user01@nas01:/$ whoami
synpzaf
user01@nas01:/$
user01@nas01:/$ ls -al
total 64
drwxr-xr-x  24 root root  4096 Apr 11 19:42 .
drwxr-xr-x  24 root root  4096 Apr 11 19:42 ..
lrwxrwxrwx   1 root root     7 Nov 26 17:43 bin -> usr/bin
drwxr-xr-x   8 root root     0 Apr 11 16:45 config
drwxr-xr-x  10 root root 18940 Apr 11 16:45 dev
drwxr-xr-x  45 root root  4096 Apr 11 19:42 etc
drwxr-xr-x  42 root root  4096 Nov 26 17:43 etc.defaults
drwxr-xr-x   2 root root  4096 May 19  2018 initrd
lrwxrwxrwx   1 root root     7 Nov 26 17:43 lib -> usr/lib
lrwxrwxrwx   1 root root     9 Nov 26 17:43 lib32 -> usr/lib32
lrwxrwxrwx   1 root root     7 Nov 26 17:43 lib64 -> usr/lib
drwx------   2 root root  4096 May 19  2018 lost+found
drwxr-xr-x   2 root root  4096 May 19  2018 mnt
drwxr-xr-x   2 root root  4096 Nov 26 17:43 .old_patch_info
dr-xr-xr-x 372 root root     0 Apr 11 16:44 proc
-rw-------   1 root root  1024 Nov 26 17:44 .rnd
drwx------   2 root root  4096 Apr 11 17:48 root
drwxr-xr-x  28 root root  1400 Apr 12 14:01 run
lrwxrwxrwx   1 root root     8 Nov 26 17:43 sbin -> usr/sbin
drwxrwxrwx   4 root root  4096 Nov 26 17:43 .syno
dr-xr-xr-x  12 root root     0 Apr 11 16:45 sys
drwxr-xr-x   2 root root  4096 Nov 26 17:44 .system_info
drwxrwxrwt  10 root root  1520 Apr 12 14:18 tmp
drwxr-xr-x  11 root root  4096 May 19  2018 usr
drwxr-xr-x  15 root root  4096 Apr 11 16:45 var
drwxr-xr-x  14 root root  4096 Nov 26 17:43 var.defaults
drwxr-xr-x   1 root root   138 Apr 11 19:42 volume1
drwxr-xr-x   1 root root    84 Apr 11 16:45 volume2
drwxr-xr-x   1 root root    44 Apr 11 16:45 volume3
drwxr-xr-x   5 root root  4096 Apr 11 16:45 volumeUSB1
user01@nas01:/$
Initial Linux commands on your NAS server
Use the following Linux command to obtain initial information about Nas server’s Linux distro:
- uname -a
- cat /proc/version
- cat etc/hostname
- cat etc/VERSION
user01@nas01:/$
user01@nas01:/$ uname -a
Linux Nas01 4.4.59+ #25426 SMP PREEMPT Wed Jul 8 03:21:29 CST 2020 x86_64 GNU/Linux synology_apollolake_418play
user01@nas01:/$
user01@nas01:/$
user01@nas01:/$ cat /proc/version
Linux version 4.4.59+ (root@build3) (gcc version 4.9.3 20150311 (prerelease) (crosstool-NG 1.20.0) ) #25426 SMP PREEMPT Wed Jul 8 03:21:29 CST 2020
user01@nas01:/$
user01@nas01:/$
user01@nas01:/$ pwd
/
user01@nas01:/$ cat etc/hostname
Nas01
user01@nas01:/$
user01@nas01:/$
user01@nas01:/$ cat etc/VERSION
majorversion="6"
minorversion="2"
productversion="6.2.3"
buildphase="GM"
buildnumber="25426"
smallfixnumber="2"
builddate="2020/07/08"
buildtime="06:14:27"
user01@nas01:/$
List Environment variables
- printenv
user01@NAS01:/$ printenv
TERM=xterm-256color
SHELL=/bin/sh
SSH_CLIENT=192.168.1.61 51492 22
OLDPWD=/var/services/homes/user01
SSH_TTY=/dev/pts/20
LC_ALL=en_US.utf8
USER=user01
PAGER=more
MAIL=/var/mail/user01
PATH=/sbin:/bin:/usr/sbin:/usr/bin:/usr/syno/sbin:/usr/syno/bin:/usr/local/sbin:/usr/local/bin:/var/packages/Java8/target/j2sdk-image/bin:/var/packages/Java8/target/j2sdk-image/jre/bin
PWD=/
JAVA_HOME=/var/packages/Java8/target/j2sdk-image/jre
LANG=en_US.utf8
SHLVL=1
HOME=/var/services/homes/user01
TERMINFO=/usr/share/terminfo
LOGNAME=user01
CLASSPATH=.:/var/packages/Java8/target/j2sdk-image/jre/lib
SSH_CONNECTION=192.168.1.50 51492 192.168.1.64 22
PGDATA=/var/services/pgsql
_=/bin/printenv
user01@NAS01:/$
Check users defined
- cut -d: -f1 /etc/passwd
user01@nas01: $ cut -d: -f1 /etc/passwd
admin
anonymous
avahi
bind
daemon
dbus
dovecot
DownloadStation
FileStation
ftp
guest
http
ldap
lp
mysql
nobody
ntp
PDFViewer
postfix
postgres
root
rpc
SynoFinder
user01
system
user01@nas01: $
Check network configuration
- ifconfig
user01@nas01:~$
user01@nas01:~$ ifconfig
eth0      Link encap:Ethernet  HWaddr 00:11:32:2C:A6:03
          inet addr:192.168.1.32  Bcast:192.168.1.255  Mask:255.255.255.0
          inet6 addr: 2a02:587:ee19:7900:211:32ff:fe2c:a603/64 Scope:Global
          inet6 addr: fe80::211:32ff:fe2c:a603/64 Scope:Link
          UP BROADCAST RUNNING MULTICAST  MTU:1500  Metric:1
          RX packets:262108 errors:0 dropped:0 overruns:0 frame:0
          TX packets:114540 errors:0 dropped:0 overruns:0 carrier:0
          collisions:0 txqueuelen:1000
          RX bytes:193231035 (184.2 MiB)  TX bytes:40937068 (39.0 MiB)
          Interrupt:17

eth1      Link encap:Ethernet  HWaddr 00:1D:60:47:C6:5D
          inet addr:192.168.1.75  Bcast:192.168.1.255  Mask:255.255.255.0
          inet6 addr: 2a02:587:ee19:7900:21d:60ff:fe47:c65d/64 Scope:Global
          inet6 addr: fe80::21d:60ff:fe47:c65d/64 Scope:Link
          UP BROADCAST RUNNING MULTICAST  MTU:1500  Metric:1
          RX packets:111573 errors:0 dropped:0 overruns:0 frame:0
          TX packets:2772 errors:0 dropped:0 overruns:0 carrier:0
          collisions:0 txqueuelen:1000
          RX bytes:48877937 (46.6 MiB)  TX bytes:336567 (328.6 KiB)

lo        Link encap:Local Loopback
          inet addr:127.0.0.1  Mask:255.0.0.0
          inet6 addr: ::1/128 Scope:Host
          UP LOOPBACK RUNNING  MTU:65536  Metric:1
          RX packets:86158 errors:0 dropped:0 overruns:0 frame:0
          TX packets:86158 errors:0 dropped:0 overruns:0 carrier:0
          collisions:0 txqueuelen:0
          RX bytes:12064119 (11.5 MiB)  TX bytes:12064119 (11.5 MiB)

user01@nas01:~$
List running Processes
- ps -aux | less
- top
- htop
- . . .
You can continue playing around, using almost all known Linux shell commands. Below, you can see also, some Synology specific information and shell commands.
Check installed packages
In a Synology NAS server you can see installed packages under the folder /var/packages:
user01@nas01:/var/packages$
user01@nas01:/var/packages$ pwd
/var/packages
user01@nas01:/var/packages$ ls -al
total 52
drwxr-xr-x 13 root root 4096 Apr 11 18:00 .
drwxr-xr-x 15 root root 4096 Apr 11 16:45 ..
drwxr-xr-x  4 root root 4096 Apr 11 18:00 Apache2.4
drwxr-xr-x  5 root root 4096 Nov 27 11:58 DownloadStation
drwxr-xr-x  4 root root 4096 Nov 26 18:24 FileStation
drwxr-xr-x  5 root root 4096 Apr 11 17:48 MariaDB10
drwxr-xr-x  4 root root 4096 Nov 27 12:04 PDFViewer
drwxr-xr-x  4 root root 4096 Apr 11 17:41 PHP5.6
drwxr-xr-x  4 root root 4096 Apr 11 17:38 PHP7.3
drwxr-xr-x  4 root root 4096 Apr 11 17:43 phpMyAdmin
drwxr-xr-x  4 root root 4096 Nov 26 18:24 SynoFinder
drwxr-xr-x  4 root root 4096 Nov 27 12:04 TextEditor
drwxr-xr-x  4 root root 4096 Apr 11 13:41 WebStation
user01@nas01:/var/packages$
Check Synology NAS services
$ synoservicecfg –list
or use
$ cat /etc/synoinfo.conf
root@NAS01:/# synoservicecfg --list
DSM
apparmor
atalk
avahi
bluetoothd
bonjour
btacd
crond
cups-lpd
cupsd
dbus
dc-output
ddns
findhost
ftpd
ftpd-ssl
gcpd
heartbeat
hotplugd
iscsitrg
ldap-server
manutild
miniupnpd-handler
natpmpd
nfsd
nginx
.
.
.
ssh-shell
sssd
support-remote-access
synoagentregisterd
synobackupd
synocacheclient
synocachepinfiletool
synocgid
synoconfd
synocontentextractd
synocrond
synogpoclient
synoindexd
synologanalyzer
synologrotate
synomkflvd
synomkthumbd
synomount
synonetd
synoovs-db
synoovs-vswitch
synoperfeventd
synopyntlmd
synorelayd
synosnmpcd
synostoraged
synotifyd
synotunnel
synovpnclient
synowifid
synowstransfer
syslog-acc
syslog-ng
syslog-notify
system
telnetd
tftp
upnpd
ups-net
ups-usb
usbipd
winbindd
root@NAS01:/#
Use synoservice command
synocervice is a command specific for Linux implementations running on Synology NAS Servers, and it can be considered similar to service command known to other linux distros (e.g. Ubuntu). Via synoservice command you can check the status of a specific service, run and stop it, etc. Let’s check running services:
- synoservice –list
root@NAS01:/# synoservice --list
DSM
apparmor
atalk
avahi
bluetoothd
bonjour
btacd
crond
cups-lpd
cupsd
dbus
dc-output
ddns
findhost
ftpd
ftpd-ssl
.
.
.
sftp
snmp
ssdp
ssh-shell
sssd
support-remote-access
synoagentregisterd
synobackupd
synocacheclient
synocachepinfiletool
synocgid
synoconfd
synocontentextractd
synocrond
synogpoclient
synoindexd
synologanalyzer
synologrotate
synomkflvd
synomkthumbd
synomount
synonetd
synoovs-db
synoovs-vswitch
synoperfeventd
synopyntlmd
synorelayd
synosnmpcd
synostoraged
synotifyd
synotunnel
synovpnclient
synowifid
synowstransfer
syslog-acc
syslog-ng
syslog-notify
system
telnetd
tftp
upnpd
ups-net
ups-usb
usbipd
winbindd
root@NAS01:/#
You can use –help parameter to obtain a list of usages:
root@NAS01:/# synoservice --help
Copyright (c) 2003-2018 Synology Inc. All rights reserved.

SynoService Tool Help (Version 15284)
Usage: synoservice
	--help							Show this help
	--help-dev						More specialty functions for deveplopment
	--is-enabled		[ServiceName]			Check if the service is enabled
	--status		[ServiceName]			Get the status of specified services
	--enable		[ServiceName]			Set runkey to yes and start the service (alias to --start)
	--disable		[ServiceName]			Set runkey to no and stop the service (alias to --stop)
	--hard-enable		[ServiceName]			Set runkey to yes and start the service and its dependency (alias to --hard-start)
	--hard-disable		[ServiceName]			Set runkey to no and stop the service and its dependency (alias to --hard-stop)
	--restart		[ServiceName]			Restart the given service
	--reload		[ServiceName]			Reload the given service
	--pause			[ServiceName]			Pause the given service
	--resume		[ServiceName]			Resume the given service
	--pause-by-reason	[ServiceName]	[Reason]	Pause the service by given reason
	--resume-by-reason	[ServiceName]	[Reason]	Resume the service by given reason
	--pause-all		(-p)	[Reason]	(Event)	Pause all service by given reason with optional event(use -p to include packages)
	--pause-all-no-action	(-p)	[Reason]	(Event)	Set all service runkey to no but leave the current service status(use -p to include packages)
	--resume-all		(-p)	[Reason]		Resume all service by given reason(use -p to include packages)
	--reload-by-type	[type]		(buffer)	Reload services with specified type
	--restart-by-type	[type]		(buffer)	Restart services with specified type
								Type may be {file_protocol|application}
								Sleep $buffer seconds before exec the command (default is 0)
root@NAS01:/#
[t b u–t b c]
example of the ‘synoinfo.conf’ from giraffe nginx, apache, php, phpmyadmin
Be a root (su) user
- sudo su
user01@nas01:~$ sudo su
ash-4.3#
ash-4.3#
ash-4.3# whoami
root
ash-4.3#
Obtaining more tools – SynoCommunity
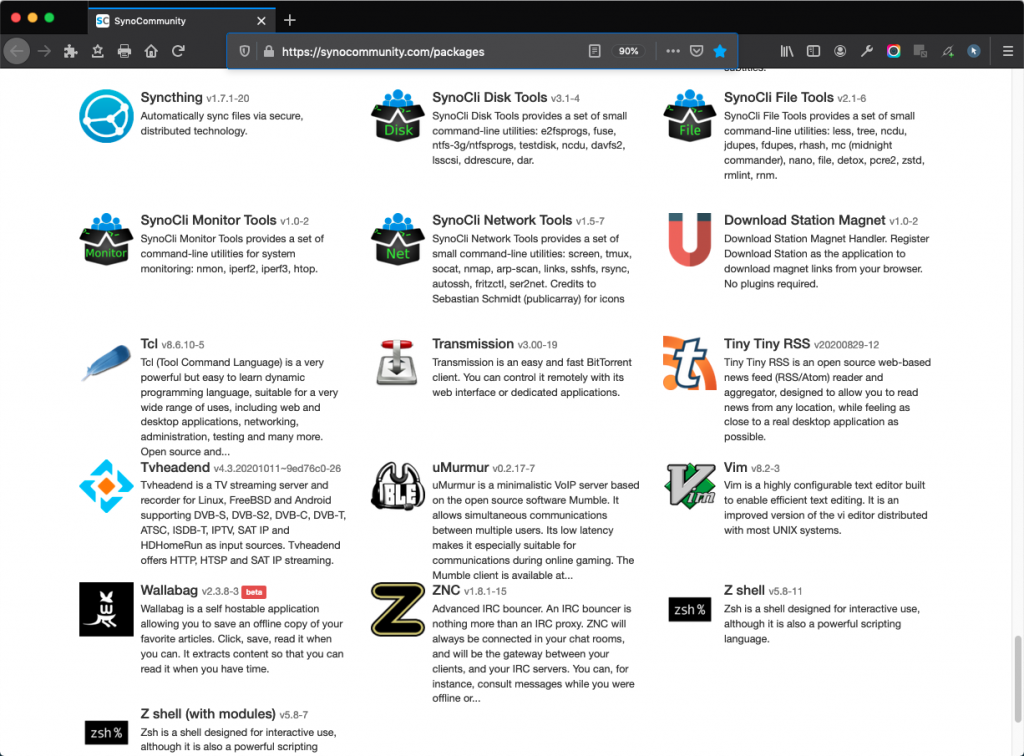
Probably, sooner or later you will be in a situation where you will start searching for some well known and quite useful commands which are available in other Linux distros (e.g. Ubuntu), but they are missed from your NAS server e.g. tree, rsync, tmux and other commands, nano editor, midnight commander, ntfs-3g, etc.
Fortunately, you can obtain all of them (and much more of course) at the SynoCommunity site.
You can even install them using your Synology NAS Package Center. Open the web interface of your NAS server, using your browser. Then open the ‘Package Center‘, go on the right top corner and click on Settings. Then choose the Package Sources tab. There, click on the Add tab, type SynoCommunity as Name, and http://packages.synocommunity.com/ as Location. Finally, click the OK button at the bottom.
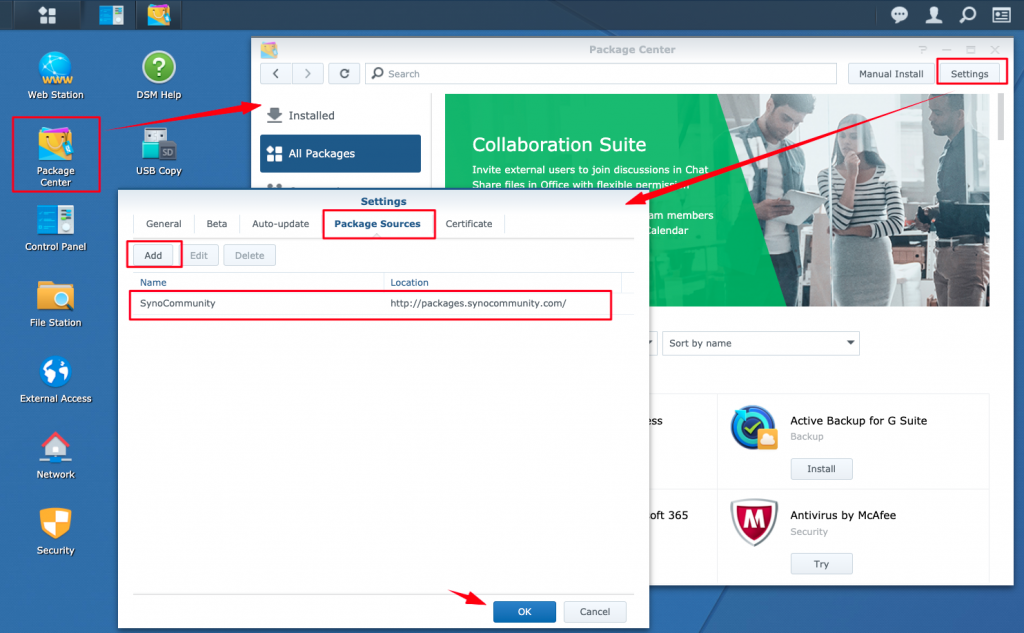
Then you will be able to use all the packages and tools offered by the SynoCommunity, via NAS Package Center.
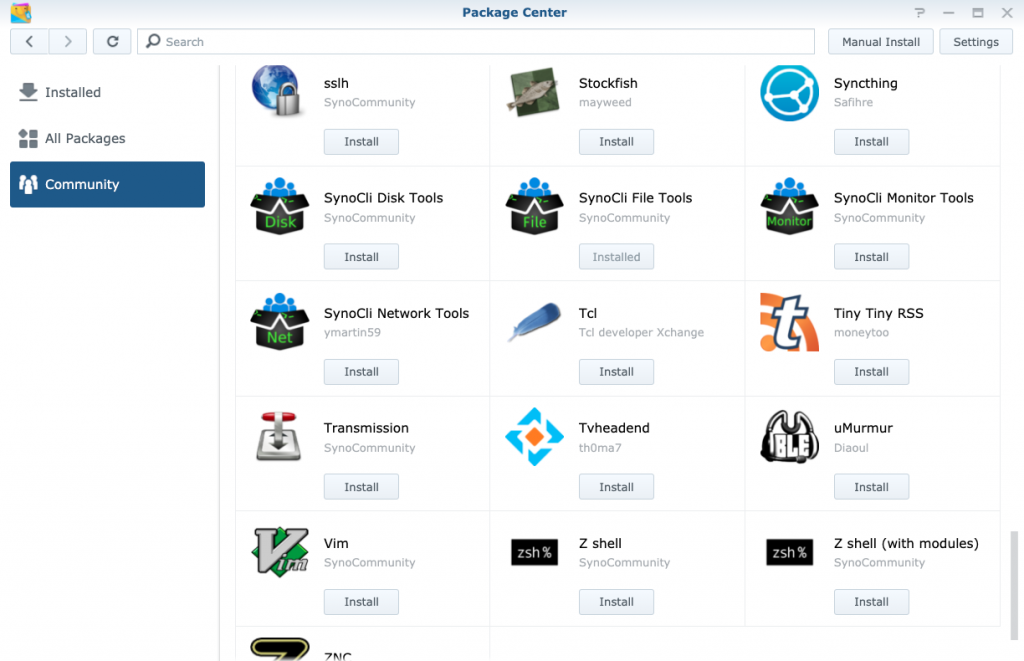
For, instance, you can install the SynoCli File Tools:

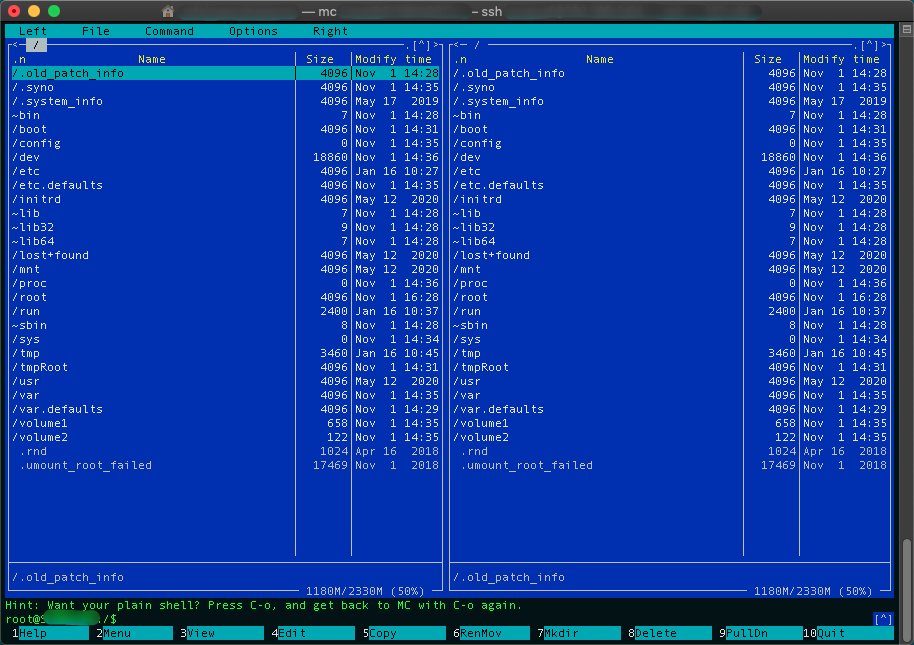
Then you can use all the tools included in that package. e.g the mc – midnight commander, which you can run and use from your terminal:
That’s it!
Thank you for reading!