
Spring Boot: just 4 beans for implementing a default JDBC Authentication with SecurityFilterChain-based Configuration

240117
Intro
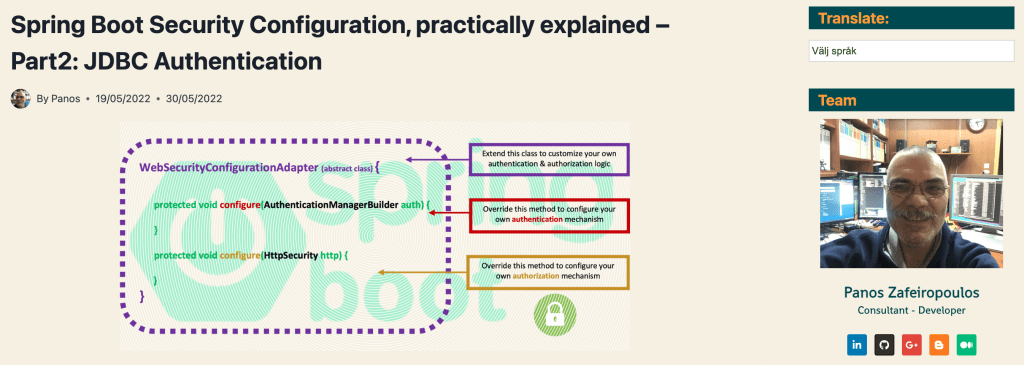
You probably know, that the WebSecurityConfigurerAdapter has been deprecated since Spring Security 5.7.0-M2. Now, if someone wants to start with a custom Security configuration in Spring Boot, it is strongly recommended to do it via a SecurityFilterChain bean. Since I’ve seen a lot of newcomer fellows striving even with very simple implementations using the ‘defaults’ offered by JDBC / Dao authentication, I decided to post here the very fundamental points on this subject. Let me say that this post is actually a SecurityFilterChain-based update to my previous post, where one can get familiarity with the basic concepts needed::
This post is also project-based and you can access the repo of the project at the end of this post. The main prerequisite of the project here is running a MariaDB instance. If you haven’t access to such a Database, here are 2 posts of mine that can help you with that:
– Installing and Using MariaDB via Docker
– Install MariaDB (10.5.8.-GA) via Homebrew on macOS
Furthermore, whenever you want to get a bit deeper into concepts like JDBC Authentication and its defaults, Basic Authentication, UserDetailsService, BCrypt and Password Authentication, DataSource, jdbcTemplate, DaoAuthentication, etc, I strongly encourage you to dive into my previous post mentioned above.
Project description
Project dependencies – the pom.xml file
This project is a pure REST API demo, exposing just a couple of protected endpoints. It is based on Java version 17, and the latest releases of Spring Boot 3.2.1 (announced on DECEMBER 19, 2023) and Spring Security 6.2.1 (announced on DECEMBER 21, 2023). The pom.xml file is given below, where you can see the project dependencies.
The database schema and the data
I use a database schema named “items1” with just 3 tables: “users”, “authorities” and “items”. Tables “users” and “authorities” comply with the standard columns required by the JDBC Authentication Default schema.
The Users table Columns
- username
- password
- enabled
The Authorities Table Columns
- username
- authority
However, I have also added some more fields. The schema and the data SQL scripts are given below, and they are also located in the resources folder of the project.
The schema.sql
The data.sql
I use the following setting in the application.properties file, so they are (re)created each time you start the project:
spring.sql.init.mode=always
spring.sql.init.continue-on-error=false
spring.sql.init.separator=@
Note that all the passwords are hashed (“encrypted”) via the BCrypt hashing function. For easy memorization, as password for each user, I use the username prefixed with “pw”, e.g.: for user “admin”, the password is “pwadmin”.
The “items” table is just for demo purposes feeding one of the exposed endpoints of the project.
The endpoints
I expose just 2 endpoints: “/users” and the “/items”. They respond only to GET requests. I prefix all exposed endpoints by using the env variable “server.servlet.context-path=/api” set in the application.properties file. So, whenever you wish you can test them by using the URL “http://localhost:8080/api/users” and “http://localhost:8080/api/items” respectively.
The controllers, the repos and the data objects
I use the 2 controllers: “UsersController” and the “ItemsController” with the respective method handlers for GET requests. They are supported by the respective repos “UsersRepo” and “ItemsRepo”, and the data (dto) classes: “UserDTO” and “ItemDTO”. Worth mentioning here, that we use the JdbcTemplate which is a central class in the JDBC core package. Using just it, we define and execute our own raw SQL queries, without any additional ORM, e.g. JPA/Hibernate). Otherwise, all the java classes are trivial enough, so there is no need for more time here (you can look at them in the repo provided at the end).
And now, the interesting part 😃.
The Custom Spring Security Configuration class
What we need is just 4 Beans!
- a SecurityFilterChain bean
- a userDetailsService bean
- a password encoder bean, and
- an authentication provider bean
Below you can find what is the purpose of each one of the beans, together with a short explanation, to get a grasp of the authentication-authorization process in Spring Boot.
The SecurityFilterChain bean is where we configure the settings for protecting our endpoints. For our demo-only purposes, I have disabled the CSRF and CORS checks. Also, since our project is a REST API app, I don’t care about any stateful capabilities, and thus I use a stateless approach for session management. I use dedicated entries for “/users” and “/items” for each request type (GET, POST, PUT, DELETE) and thus one can change them according to her/his specific case. Here I only allow users with the “ADMIN” role to access the “/users” endpoint, which is also true for PUT and DELETE requests for the “items” endpoint. Users with either the “ADMIN” or the “USER” role can access with GET and POST requests the “/items” endpoint. For testing purposes, I also added the “free” endpoint “/freeitems” (via the respective handler method in the ItemsController), so anyone can access it. All the requests should pass the Basic Authentication. Finally, I use a custom realm that is returned -as the value of the WWW-Authenticate header- back to the user whenever the authentication (e.g. wrong credentials) fails. The value of the realm is a string defined in the application.properties file: “app.realm=PZDemoRestAPI_REALM”
The userDetailsService bean implements the default JdbcDaoImpl class, which recognizes the provided schema and reads the default users and authorities tables, automatically. For this purpose, we use the datasource, which is also automatically created in the app context, by the database settings in the application.properties file.
The password encoder bean is necessary for checking the password provided by the user. The user provides her/his credentials (username and plain-text password encoded in a base-64 token string) via the Basic Authentication mechanism. The encoder encodes the plain-text password and provides it to an authentication manager that calls the user-details service and checks if it matches the one already stored in the database.
Finally, the authentication provider bean instantiates a DaoAuthenticationProvider and passes it to the user details service, as well as, the password encoder. The authentication provider does the real authentication job. If the user credentials provided are wrong, it returns a 401-Authorization error (which actually, is an authentication error, together with the site realm in a WWW-Authentication header). If the credentials are correct the user is authenticated and she/he can proceed to access the requested endpoint, according to her/his roles. If the user has a role that matches the one assigned to the endpoint and the type of the request (GET, POST, PUT, DELETE), then the respective controller takes the responsibility to answer that request.
Please find below the CustomSecurityConfiguration class:
Conclusion
As you can understand the example provided here, shows the 4 very basic beans required for the default JDBC-based Authentication for implementing a fundamental custom security configuration class based on the SecurityFilterChain. I hope that now you are ready to continue the adventurous journey for successful implementations of Spring Boot security configurations.
Find the project repo here.
As a final note, if you wish to go through more thorough explanations, you can also benefit from reading the following post of mine:

So, for now, that’s it!
Thank you for reading!