Move your Oracle Docker container with all its data

221112
Avoid some of the common pitfalls such as forgotten or locked passwords, being connected to an idle instance, etc..
Intro
One of the cool features Docker has is that you can persist the container data you wish, by using the volume mounting capabilities. This actually allows you to share data between the container and the host through volume (folder) mapping.
In one of my previous posts, I showed how you can build an image and run your own Oracle database container.

On that post, I used the -v (the –volume optional) parameter in the following docker run command to run/create a new container:
docker run --name oracle19c -p 1621:1521 -p 5500:5500 -e ORACLE_SID=dockor19c -e ORACLE_PDB=dockor19cPDB -v $HOME/DOCKER/dockerOracleDB/datafiles19c:/opt/oracle/oradata oracle19.3.0:or19c
As you can see in the above command, we’ve mounted the container’s internal folder ‘/opt/oracle/oradata’ to its host’s folder ‘$HOME/DOCKER/dockerOracleDB/datafiles19c’. Oracle uses the ‘/opt/oracle/oradata’ container folder, as the default folder for the database configuration datafiles. So, mounting it to a host’s folder allows us to preserve those configuration files and data files, even in the case where the container crashes or it has been deleted, removed, or moved to another host.
That said, our goal in this post is to take the steps on how one can transfer an updated image with the latest container status, as well as all the persisted data to another location, in another host.
Last but not least, we will discuss a couple of the possible issues that you might face with the new, re-created Oracle docker into the target host, such as forgotten or locked passwords, being connected to an idle instance, etc.
The steps
The steps we will get are:
- Commit all changes of the source container
- Create a backup image (a .tar) archive file with the container’s last stage.
- Transfer (move or copy) the created .tar file to a location into the target host
- Load the image from the .tar file to the target host docker repository
- Transfer / copy the persisted data to the target host preferred location
- Create a new container on the basis of the loaded image and the transferred data
Note that in this post we use an Oracle container, but the steps we take here are applicable to any other container, especially a database container.
Ready? Let’s start.

Step 1 – Commit all changes of the source container
Sometimes you perhaps have had to perform some updates in your container, for example, you have added or changed environment variables, updated or installed a file editor such as nano, vim, etc. Those changes are getting lost whenever you run again the ‘docker run …’ command. Of course, this is not valid if you just use the docker stop and docker start commands. However, in any case, the best approach before you transfer your container is to commit all changes in a new, updated image. This also allows you to keep intact the original image you have used to initially create it.
The docker offers us the docker commit command that does the job. The command actually, commits all the changes you made after container creation (even the internal shell history) and puts everything in a new updated image. It also allows us to provide options about the author, changes, a message, etc. Here we will keep it simple.
Let’s say the running container name you are interested in is ‘pzoracle122a’.and it its container id is ‘32f7e6928c0d’. Now, on the host where the Oracle container is existing (the source host) you can run this command like that:
docker commit -p 32f7e6928c0d oracle12.2.0.1-ee:dumbo2
The command pauses the container and creates a new image. Here we use the image name ‘oracle12.2.0.1-ee’ tagged with the tag ’dumbo2’.
When the command finishes you inform you by providing the sha256 of the new image created, e.g.
$ docker commit -p 32f7e2869c0d oracle12.2.0.1-ee:dumbo2
sha256:56764f41ad1f2cc58f3853e07d07112f24204a3f41a2b563c1562b53571203de
$
After that you can check your images:
$ docker images
REPOSITORY          TAG           IMAGE ID       CREATED          SIZE
oracle12.2.0.1-ee   dumbo2        56764f41ad1f   17 minutes ago   9.1GB.    <-------
oracle/database     12.2.0.1-ee   0de151257bd3   4 years ago      5.97GB
$
Step 2 – Create a backup image, i.e. a .tar archive file with the container’s last stage.
We are going to use the docker save command. So, on the source host run the following command:
docker save -o /volume6/docker/images/docker_dumbo2_or122.tar oracle12.2.0.1-ee:dumbo2
The command creates (outputs) the ‘docker_dumbo2_or122.tar’ file in the ‘/volume3/docker/images’ folder on the source host, using the ‘oracle/database:12.2.0.1-ee’ docker image.
Step 3 – Transfer (move or copy) the created .tar file to a location into the target host
We will use the secure copy scp command. We will do that from within the target host’s (with IP:192.168.0.17) destination folder. If for example, our source host has the IP address: 192.168.0.7, then you can use the following command providing the password for user ‘panos’:
scp -pv panosf@192.168.0.7:/volume6/dockerfiles1/images/docker_dumbo2_or122.tar docker_dumbo2_or122.tar
As a result, you will get the ‘docker_dumbo2_or122.tar’ in the target host folder from which run the command.
Step 4 – Load the image from the .tar file to the target host docker repository
Since the target machine has received the .tar file, you can load the image (from the transferred ‘docker_dumbo2_or122.tar’ file) into the docker local registry using the command docker load. We can do that again from within the target host (and from within the folder where the .tar file has been transferred):
Then, you can check the images in your docker local repository:
Step 5 – Transfer / copy the persisted data to the target host preferred location
Before proceeding, we have to create the data persistent folder (volume) in the targeted host. We will fetch the source host Oracle data and configuration files into this folder. For instance, we can create such a folder with the name ‘datafiles12c’ inside our $HOME/DOCKER/dockerOracleDB directory like that:
sudo mkdir datafiles12c
Ensure that you have already stopped the container on the source host, e.g using the docker stop command,
Also, be sure that the user ‘panos’ has sufficient privileges for accessing the source folder with Oracle data and configuration files. (Or use sudo). In our case, this folder is the ‘/volume6/dockerfiles/OracleDataFiles/oradata_12_2_0_1’ folder.
This time we will use the rsync command. And we will do this from within the source host’s (192.168.0.7) folder, which has been mounted to the Oracle database configuration and datafiles. So, you can use the following syntax of the rsync command:
rsync -r -v -u -l -h -t /volume6/dockerfiles1/OracleDataBasesFiles/oradata_12_2_0_1/* panos@192.168.0.17:/home/panos/DOCKER/dockerOracleDB/datafiles12c
After the transfer, you should make the ‘/home/panos/DOCKER/dockerOracleDB/datafiles12c’ folder read/write accessible.
Step 6 – Create a new container on the basis of the loaded image and the transferred data
This is actually the final step for moving an Oracle container, with all its data, from a source host to a target host. Basically, on the target host, we will use a pretty similar syntax (of the docker run command), to the one we show in the very beginning. Here it is:
docker run --name pzoracle122 -p 1621:1521 -p 5600:5500 -e ORACLE_SID=dockor122 -e ORACLE_PDB=dockor122pdb1 -v $HOME/DOCKER/dockerOracleDB/datafiles12c:/opt/oracle/oradata
oracle12.2.0.1-ee:dumbo2
That’s it! Now, we are ready to test it. If you have already installed the SQLcl Oracle command line tool, then you can use it. If you wish you can take a look at my post below, on how you can install and start using it:

So, on the target host you have just created the transfered container and its data, use the sqlcl to connect aa a user-schema you know, and you worked with on the previous (the source) host. Obviously, you have to use the appropriate credentials. For instance :
sqlcl system/myPassw@localhost:1621/dockor122
Cool! Everything seems to work OK! However, what about connecting as the SYS or SYSTEM user? Are you sure you remember the password?

Resetting the SYS – SYSTEM password
In case you have forgotten it No problem! Oracle offers us the necessary options to solve the problem. One can think that recreating the container on the target host using the ORACLE_PWD environment variable, can be the solution. Well, NOT really. The following syntax of the docker run:
docker run --name pzoracle122 -p 1621:1521 -p 5600:5500 -e ORACLE_SID=dockor122 -e ORACLE_PDB=dockor122pdb1 -e ORACLE_PWD=myNewSYSPassw -v $HOME/DOCKER/dockerOracleDB/datafiles12c:/opt/oracle/oradata
oracle12.2.0.1-ee:dumbo2
does not solve the issue of a forgotten password. But why? This is because we use all the data fetched from the previous, and this is also true for all the passwords stored in the database. So be aware: Passing a password value as an env variable during the creation of the container does not work for existing data!
Hopefully, Oracle has the solution. This is the setPassword.sh shell script. It is located inside the /opt/oracle/ folder but it is also sym-linked in the /home/oracle folder of the container:
You can run it even without entering the container shell. So, run it from the target host, like that:
~$ docker exec pzoracle122 ./setPassword.sh myNewSYSPassw
That way you can reset your SYS and SYSTEM (and PDBADMIN user if this user is existing) passwords at once!
Note: The output errors are about the PDBADMIN user who does not exist, so you can ignore them.
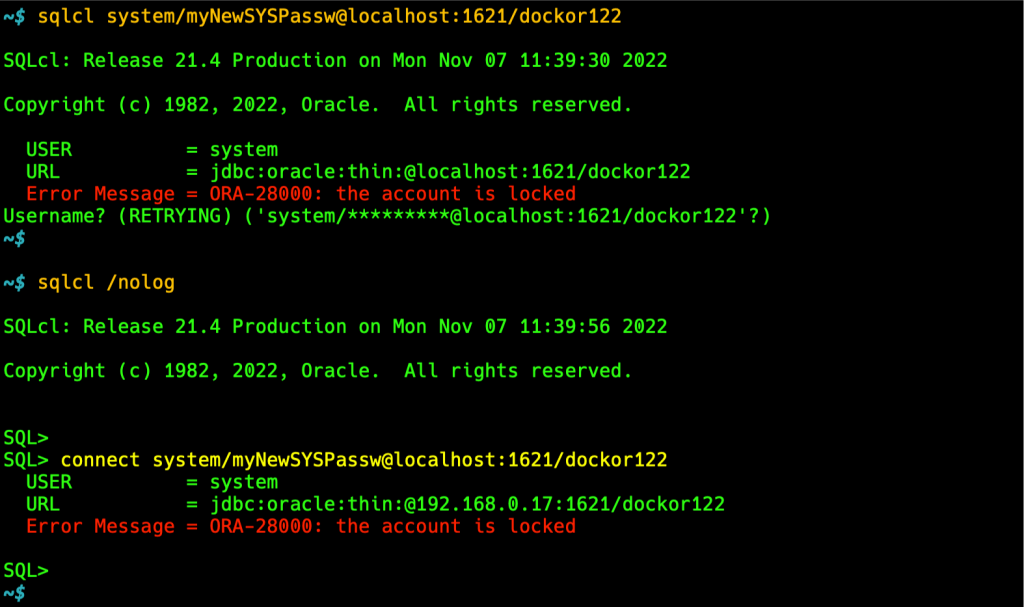
Now, Let’s try. Use either directly:
sqlcl system/myNewSYSPassw:1621/dockor122
or via sqlcl /nolog has the same result:


Oooohh! OmG! The account is locked!!!
What is this? What can I do? Well, no panic. We will deal with that.
Unlock the SYSTEM Account
An account can be locked for a number of reasons. However, one common reason is that the account has automatically locked because incorrect passwords are attempted too many times (usually more than 10, which is a default value for the user profile parameter FAILED_LOGIN_ATTEMPTS).
To unlock as locked account we have to have local access to our Database. Then we can use the ALTER USER SQL commant to unlock it, like that:
SQL> ALTER USER SYSTEM ACCOUNT UNLOCK
Let’s try:


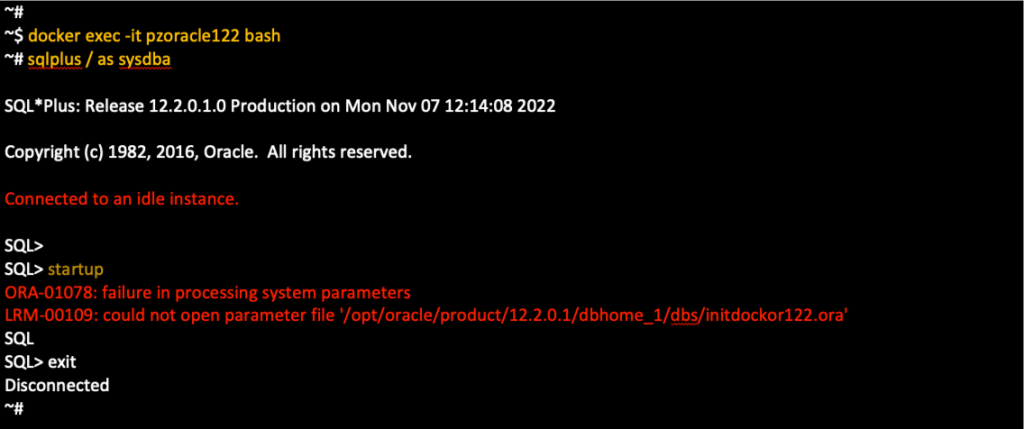
Oooohh! Not Again!!! OmG! Not Again!!! Connected to an idle instance!!!
Well, things are really getting odd! What is this again? What’s going wrong? I have already connected before, as test1, how can this happen?
Solve the issue “Connected to an idle instance.”
Generally, the error means that the database has not been started, so we have to start it manually. As you can see above, this is what we also tried and we got more error messages. From the other side, if you remember, after we created the container, we were able to connect using the user-schema test1. So, now we are sure, that we have a running Oracle instance, and trying to manually startup the database is meaningless.
Well, this is again a common issue, most of us face, when we are in rush, or we are not careful enough. Actually, in most cases, this error indicates a problem with the name of the running Oracle service and this is exactly what happens here. Let’s see what are environment variables that are being used within the container.
We can capture all the environment variables for ORACLE inside the container, by running the ‘env | grep ORACLE’ shell command. Since we are trying to connect as SYS (or SYSTEM) we are particularly interested in the ORACL_SID environment parameter. So, locate it. After that check, if the same name appears in the status report of the Oracle listener. For this purpose, you have to run: ‘lsnrctl status’ command. You can see the output below:
See carefully, and you will see that there is a difference. The value of the ORACLE_SID env variable is ‘dockor122’ and this is exactly what we used as a parameter when we created the container. But, as you can see the Oracle listener used the ‘DOCKOR122’ instead. And this is the caused problem here. In Unix/Linux systems the ORACLE_SID value is case-sensitive. Thus, the database with the name ‘dockor122’ is not running – it does not exist! And this is because we got the message “Connected to an idle instance.”
Actually here, to solve the issue, we have to rename the ‘dockor122’ to ‘DOCKOR122’ (in upper case). We can do that from within the container, by setting the ORACLE_SID environment variable. After that, hopefully, we will be able to connect locally (using the command ‘sqlplus / as sysdba’). See the output below:
So, the very next time you are going to transfer an Oracle container with all its data, you should use the exact ORACLE_SID value, as it had been set in the source container.
However, it’s worth underlying here, that this issue is quite tricky, and you cannot realize it exists if you always use a remote connection. If you never attempt to access the database locally (from within the running container using “sqlplus / as sysdba”) you probably never will face the issue, because accessing it from another host via TCP/listener, the instance name you pass, is case insensitive:
~$ sqlcl system/myNewSYSPassw@192.168.0.17:1621/dockor122
Finally, don’t miss to unlock the SYSTEM Account:
Takeaways

Below are some important points to remember, that help you avoid Oracle Errors, like the ones we have shown before:
- Before transferring an Oracle container/image, ensure the exact database service name exposed as ORACLE_SID, as well as any other pluggable database (PDB) service name exposed with ORACLE_PDB.
- Also, be sure that you know well the SYS and SYSTEM passwords.
- When you create a new container using the docker run command and you use environment variables ORACLE_SID and/or ORACLE_PDB be quite precise with their case sensitivity values.
- If you are not sure about the SYS and SYSTEM passwords used in the initial container, then when you recreate a transferred container with the docker run command, use a new password value using the ORACLE_PWD environment variable
- If you create a brand-new Oracle container avoid using lower-case literals as values for ORACLE_SID and ORACLE_PDB environment variables. Prefer using UPPER-CASE instead.
That’s it for now! I hope you enjoyed this post!
Thanks for reading and stay tuned!
