
Quick Intro to Rest API development with Spring Boot

220521
Intro
This is a quick and easy, yet well-working Spring Boot REST API project, demonstrating the fundamental building blocks of such a project. The idea is to motivate beginner learners and challenge them to start digging deeper. Of course, you can follow the official documentation for “Developing your First Spring Boot Application” or any other appropriate source. And for sure, you have to dedicate some time to familiarize yourself with the basic concepts (e.g. REST APIs, endpoints, requests, responses, etc. This post also serves as the base of other posts of mine. GitHub Repositories are provided.
Prerequisites
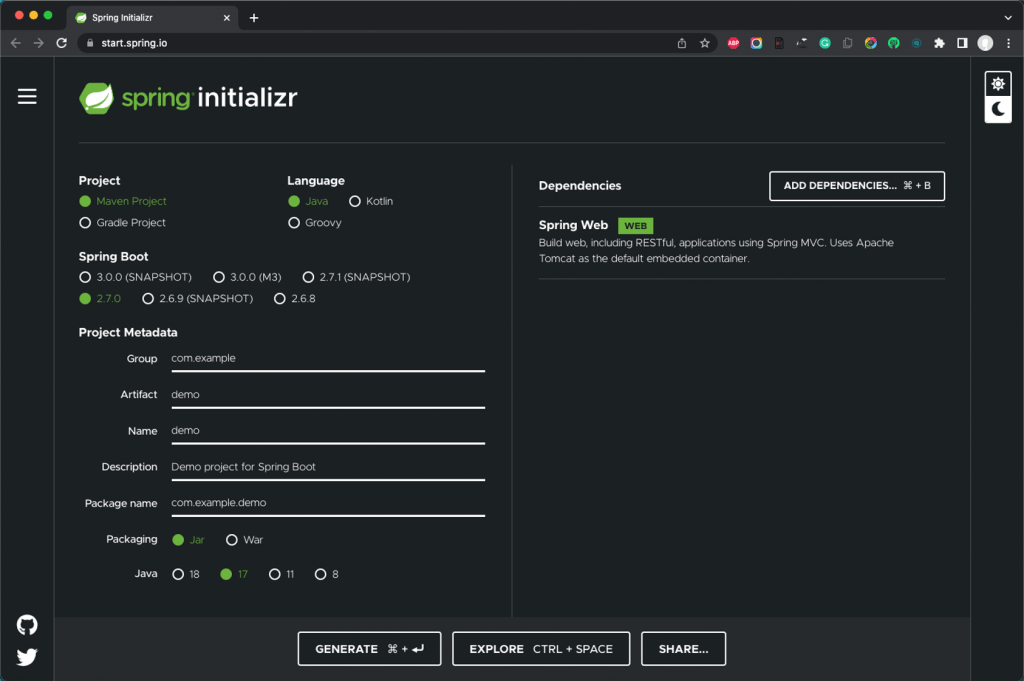
Since you started reading this post I suppose you have also started interesting in Spring Boot development and at least know about creating/initializing a project via Spring iintializr.
If you want to proceed, you should have an appropriate IDE with the necessary tools, to develop such an application. There are other posts of mine if you wish to find out how to start using Spring Boot and related tools for VS Code [here], and for IntelliJ (CE) IDEA [here]. The posts also include the usage of the Spring Initializr from within the IDE.
Furthermore, you will need also to have access to a working database, actually to a MariaDB/MySQL database.
The very-very basic demo app for a REST API
Project initialization
During the process of project creation/initialization via the Spring Intializr, you are able to add a number of dependencies that are suitable for starting developing the project. Spring Boot provides us with a number of “starters” that are .jar packaged dependencies (e.g. libraries) that are added to the project’s classpath. By clicking on the ADD DEPENDENCIES button at the Spring iintializr you can find a long list of starters/dependencies with some short descriptions. Also, you can always have access to the Maven repository which maintains a huge list of dependencies.
Also, you can always have access to the Maven repository which maintains a huge list of dependencies.

Note: Here, the Apache Maven dependency/package manager is being used. – Not the Gradle.
Since REST API development is actually a WEB application you will need at least the Spring Boot Starter Web to be added.

Moreover, if you also wish to make your development cycle easier (auto-restart/live-reload), then it will be fine to also add the Spring Boot Dev Tools.

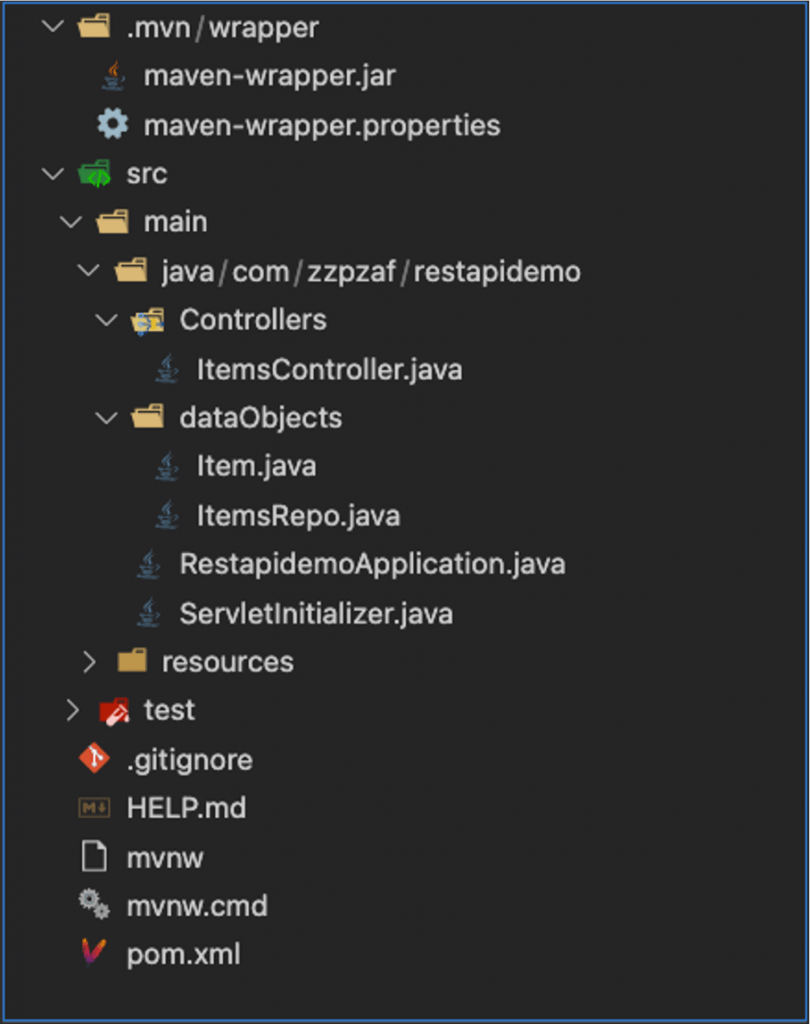
That’s it no more dependencies are needed right now. Choose a folder in your local machine and create your project. What is actually has been created is a folder structure identical to or similar to the one below:
Taking a look at the pom.xml file below, you can see the real dependencies added, automatically by the Spring Initializr:
That’s cool. Take your time to obtain more familiarity with Spring Boot, the dependencies and the pom.xml file, as well as the other files and folders created.
Working on Project
Add an object (entity) class
Adding an object class serves as a prototype of the data send back as responses to HTTP requests. Here, as an example, we use the Item.java class:
Add a Repository class
This is another class annotated as @Repository where we can gather together lists of objects (Items in our case) for sending them back as responses. It actually serves as a repository service (source of data) for a @Controller. Here is a very trivial example that returns just an ArrayList of Item objects with predefined values:
Since both of the above java classes are concerned to be data objects, we can package them together in one package e.g. the “dataObjects” package.
Note, a package here is just a folder gathering together some related classes/objects. Moreover, structuring your development project using packages is always a good idea.
Add a Controller
A Controller is nothing but a java class appropriately annotated with some Spring Annotations. Its main purpose is handling/accepting HTTP requests for specific endpoints (URL paths), and responding with responses with data (e.g. lists of objects) or with exception errors. Below is also a very simple example of a controller named ItemsController.java:
Because most likely we will add more controllers, serving for instance other endpoints for different data objects, putting our controller (ItemsController.java) in a separate package, is a good idea. Here we name this package “Controllers”. After that, the project’s folder structure has become:
Or, you can also see project’s folder structure within your IDE (here from VS Code):
Running the Project
If you are using VS Code and you’ve installed the necessary tools (as I mentioned before you can see at this post) then you can run the application, by locating the Spring Boot Dashboard tab on the left pane at the lower part of Side Bar. Then click on the Run arrow, to start the app. (If you see any error like “Error: Could not find or load main class com.zzpzaf.restapidemo.RestapidemoApplication” then you probably have first to compile the app, by clicking on the Compile option of the Lifecycle, of the Maven tab. Then run the app.)
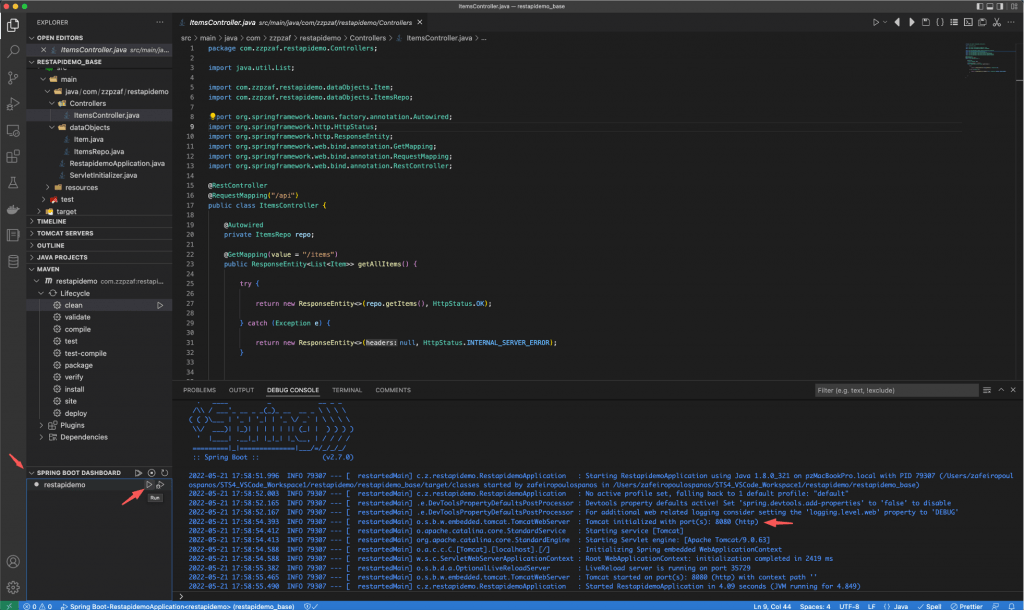
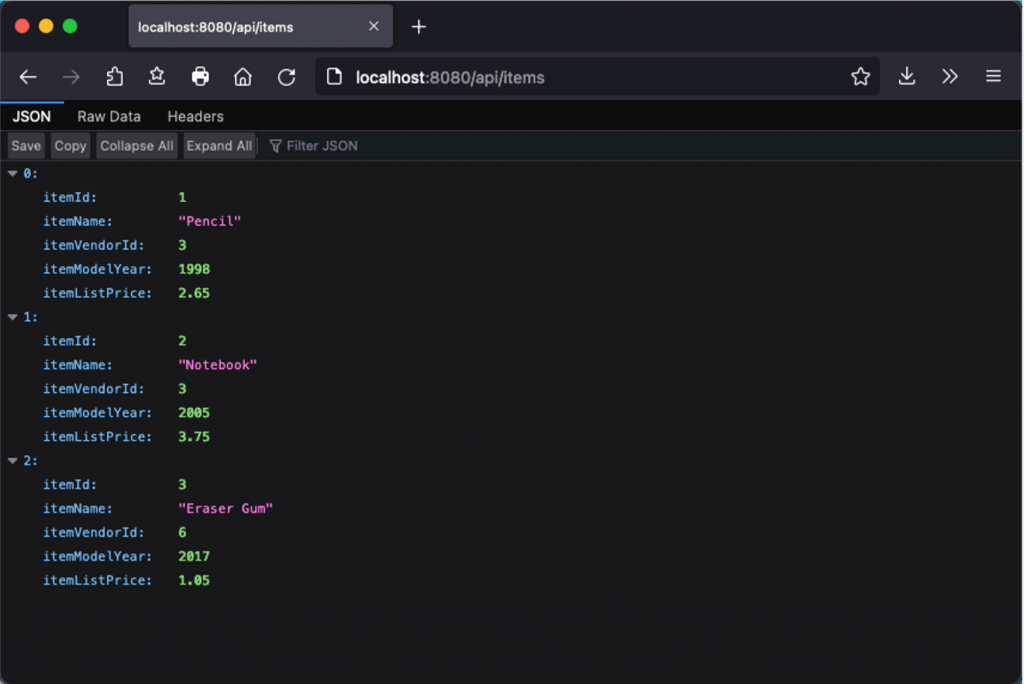
You should be aware that embedded Apache Tomcat server (provided by the spring-boot-starter-web dependency, we’ve added during the initialization of the project) listens for incoming HTTP requests, at the port: 8080. So, grab your browser, type the URL: http://localhost:8080/api/items, and press Enter:
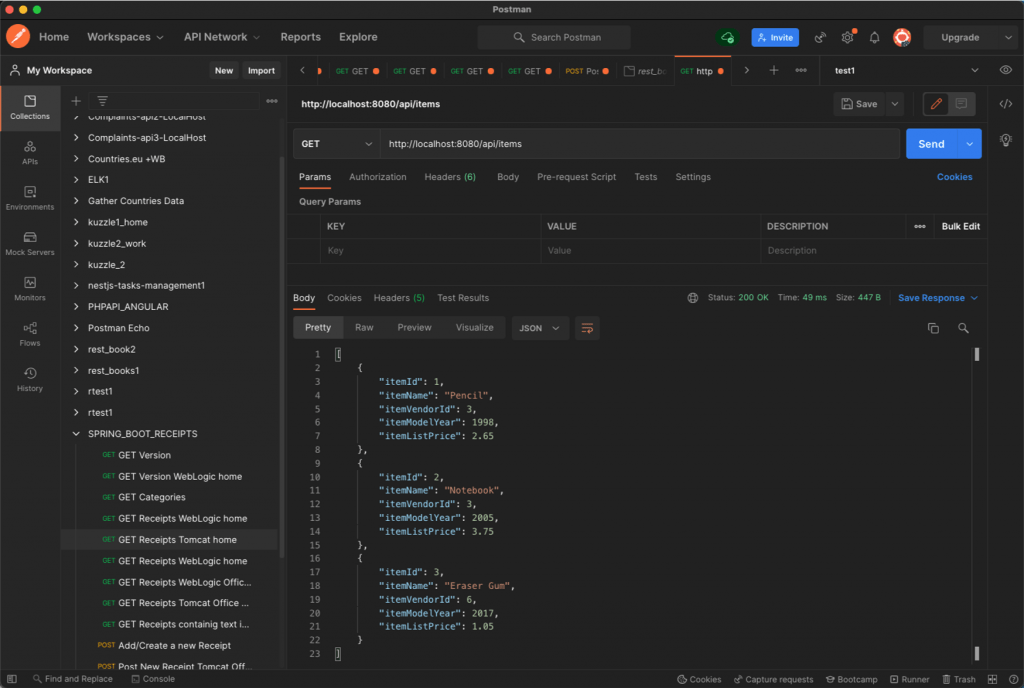
Of course, a much better approach is to install and use the well-known Postman API testing tool, to work with your API. For instance:
Cool!. So far, so good.
If you have succeeded in following the above guidelines, you have already created a simple project codebase. However, for your convenience, here is the repo that you can use as a base for further development:
https://github.com/zzpzaf/restapidemo_base.git.
Working with data in a real database
So far, so good. However, using just an ArrayList to create some item data gives you the ground to see how you can serve some data via a REST API endpoint, but actually, is not that a big deal. In most cases, a REST API is backed by a real Database, the persistence data layer for saving and retrieving the application’s data.
Below, we are going to extend our basic example, by using a real Database.
Data preparation with a real database (MariaDB)
Between SQL Databases and NoSQL Databases, here we are going to use a SQL Database and more precisely the MariaDB an open-source (binary) replacement of MySQL. If you haven’t yet installed it on your machine, you can do that, by choosing, for instance, one of the following 2 options in my posts:
So, after you have access to a working MariaDB installation, you have to create a table and add some records of the items we’ve previously seen created as an ArrayList of item objects.
Working with MariaDB and SQL data can be done either by using your terminal and the mysql CLI, or by using a GUI, such as MySQL Workbench or the web-based phpMyAdmin (or any other tool allowing you to work with MariaDB/MySQL databases). Note that you might also find useful my post here on how to install phpMyAdmin on your machine. For your convenience, find below the SQL scripts that generate the Items table and add some records to it:
Next you have to grant access to a user on that table. Here we are going to grant full permission to the user with name user1, and who is auto-created during the MariaDB Docker container creation in the post here, previously mentioned:
Just for the table ‘items’:
GRANT ALL ON items TO 'user1'@'%'Or for any object in the database schema with name ‘items1’ (which in our case contains the table ‘items’)
GRANT ALL ON items1.* TO 'user1'@'%'Adding dependencies
After we have prepared our database, we can now go back and continue working on our REST API project.
First, we have to add the necessary dependencies in project pom.xml file. These are actually 2 dependencies.
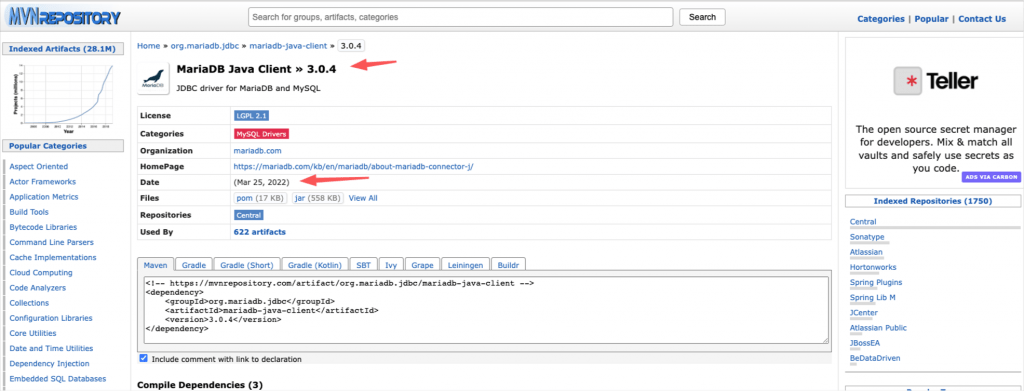
1. The MariaDB Java Client – it is a JDBC driver for both MariaDB and MySQL databases.
(The latest version -today 220520 is 3.0.4).
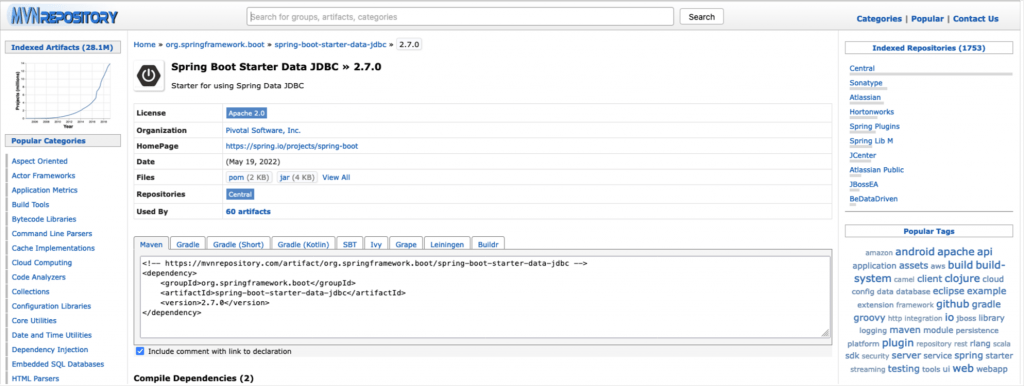
2. The Spring Boot Starter Data JDBC. This is a minimum required dependency, offering us relational connectivity and a template to work (create, execute, etc.) with raw SQL queries (No ORMs/JPA/Hibernate). It supports all major SQL databases and dialects (DB2, H2, HSQLDB, MariaDB, Microsoft SQL Server, MySQL, Oracle, Postgres).
(The latest version -today 220521- is 2.7.0 – no need to be used since it follows the parent dependency which is the Spring Boot framework).
So, what actually has to be added in our pom.xml is given below.
Note, that every time you change the pom.xml file your IDE should synchronize the changes (i.e. it should remove or fetch dependencies from Maven Repository). You can configure it to do it automatically if you wish.
Adding connection parameters into the application.properties file.
Probably you have already noticed that a file with name application.properties has been created in the /src/main/resources sub-folder, in the project structure created/initialized with Spring Initializr. The file till now, is empty.
The application.properties file is used to define the external parameters (Environment properties) which will be the properties we want to be used by our Spring Boot app. There are some predefined properties that can be used and here are some of the most commonly used. Moreover, there is a whole mechanism allowing using a different application.properties files for different purposes (for development, testing, production, etc.) but this is another subject.
For now what we have to do is to set the properties and their values, which will allow us to connect to and use our MariaDB database. So add the following self-explanatory lines to your application.properties file:
That’s it, now can continue coding.
Changing the code in our repository (ItemsRepo.java)
Well, apart from the fact that we changed our pom.xml and application.properties files, actually there is not a lot remaining to be done with Java code.
So, open the ItemsRepo.java file, locate the getItems() request handling method and change it like the code below:
So simple! The Spring handles the rest.
Running the app
If you haven’t changed the data in the Items table, you will not notice any difference. The output is absolutely the same as before! However, this time we use a real database.

So, that’s it.
Again, you can access the final code at the repo:
https://github.com/zzpzaf/restapidemo-jdbc-mysql.git
Use it whenever you wish for further development.
I hope that you gain a grasp and that you are ready to start working with Spring Boot!
Happy Coding!