Apache Tomcat challenges: Install, configure, start working, SSL, and other goodies!

and other goodies210517, 220915-17
Intro
This post goes through the process of installation and configuration of the Apache Tomcat server and how to deploy an app (e.g. a .war file) and start using it. Moreover, it covers to some more extent the HTTPS/SSL configuration of Tomcat and enlightens some of the challenges one may face during that process.
Generally, you can obtain a good fundamental grasp, for the following topics:
- Tomcat and Tomcat Installation
- How to configure users and allow access to the Manager app
- Configure Tomcat for HTTPS/SSL (Including Java keytool and OpenSSL)
Note: this post mainly covers how to install and start using Tomcat in Debian/Ubuntu and macOS. However, since Tomcat is Java-based, installation on other OS is pretty similar. (In Windows, it runs as a service: check here).
The Tomcat in general
Apache Tomcat is the most popular Java Application Server of the Java / Spring Boot Developers Community.
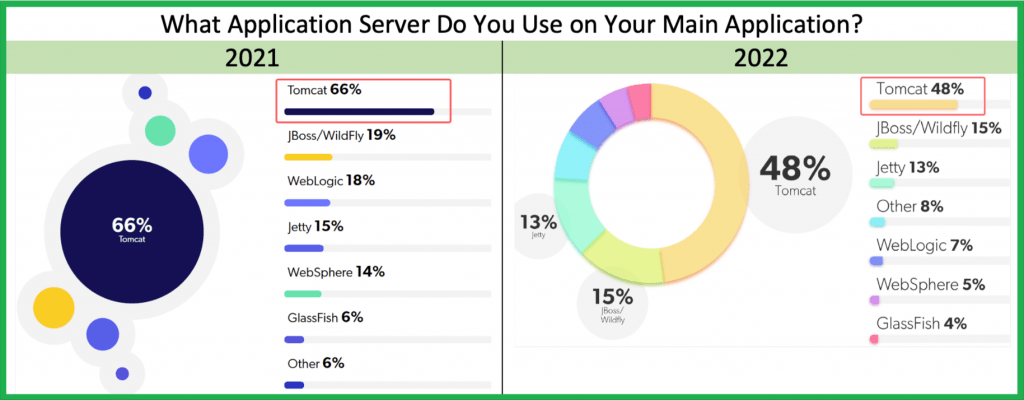
Some of the reasons it is so popular, are:
- It is Open Source
- It is a proven player (over 15 years “old”)
- Embedded in Spring Tools Suite (STS) (so far)
- Manageable in VS Code via Tomcat for Java extension.
- Part of any Maven-based web project using the Spring Boot Starter Web (e.g. created via Spring Initializr)
- Available for Gradle-based projects, as plugin – the gradle-tomcat-plugin which extends the War plugin.
- It has good documentation and community support
- It is Java-based and it supports all the 3 major platforms (Windows, Linux, macOS)
- and, quite important: it is free!
Other well-known Java Servers are:
- Jetty by Eclipse
- GlassFish by Oracle
- WildFly (ex JBoss) by Red Hat
- WebLogic by Oracle ( ? see my post here to install it)
In this post we will take a look on how to install and start working with Apache Tomcat. (This is a MacOS installation, however, since the Tomcat is built with Java, installation on other OS are pretty similar).
Choose an appropriate version for Tomcat installation
First and foremost, we have to decide which version could be more suitable for our development/deployment needs. You can go to the Apache Tomcat website and by clicking on the “Which Version” link on the left, you can see a list of the available versions.
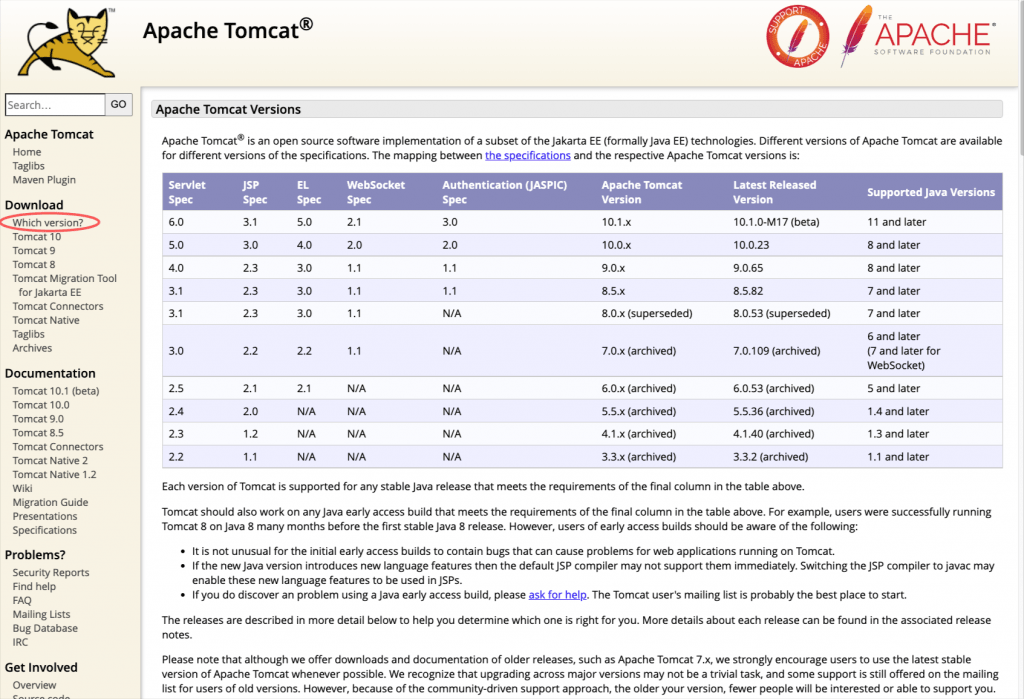
The most recent version (Sep 15, 2022) is Version 10.1.x and requires Java version 11 or later. Well, actually version 10.0.23 works OK with Java version 8, however, note that we should be aware that from Tomcat 10 and onwards, (as a result of the move from Java EE to Jakarta EE as part of the transfer of Java EE to the Eclipse Foundation), the primary package for all implemented APIs has changed from javax.* to jakarta.*. The version 10.x perhaps could be challenging enough and might require some changes that we don’t kike to deal with right now. So, unless you decided to left behind Java versions 8 and backward, a better approach might be to go for Tomcat version 9 (9.0.65 precisely) which is also OK with Java version 8, of course.
So, before to proceed, ensure that your macOS has at least Java version 8:
Installation
Go to download section and select the download package:

Note: You can also download the Full Documentation, as you can see above.
Choose a folder in your system to download it. That folder could also be Tomcat’s installation folder. Change the user access rights to that folder, and unzip the downloaded archive.
The installation folder structure
In order to be able to manage the Tomcat server (e.g. to deploy a Java application – .war file, we have to have management access to the Tomcat server. By default, this is disabled, so we have to do it on our own. This means that we have to configure Tomcat for that. Tomcat, in its default configuration, uses role-based authorizations, and it has predefined some of the necessary manager/admin roles for the purpose. So, simply put, what we have to do, is just add a user (defining his/her credentials username, and password, and give him/her those manager/admin roles. Before doing that, let’s take a look at some of the important folders of the unzipped structure created:
Tomcat main/important folders and subfolders
- bin: contains the binaries; and startup script (startup.bat for Windows and startup.sh for Unixes and Mac OS), shutdown.sh script (shutdown.bat for Windows and shutdown.sh for Unix and Mac OS), and other binaries and scripts.
- conf: contains the system-wide configuration files, such as server.xml, web.xml, and context.xml. (We will use the server.xml later on, to configure the Tomcat server for HTTPS/SSL)
- webapps: contains the webapps to be deployed. You can also place the WAR (Webapp Archive) file for deployment here.
- lib: contains the Tomcat’s system-wide JAR files, accessible by all webapps. You could also place an external JAR file (such as MySQL JDBC Driver) here.
- logs: contains Tomcat’s log files. You may need to check for error messages here.
- work: Tomcat’s working directory used by JSP, for JSP-to-Servlet conversion.
Start / stop the Apache Tomcat server
The installation offers us some executable Bash scripts (into /bin subfolder), 2 of which can be used for starting and stopping the Tomcat server.
Before to run them. ensure that all batch shell scripts are executables, e.g.:
➜  Tomcat
➜  Tomcat chmod +x ./bin/*.sh
➜  Tomcat
To start Tomcat server, use:
./bin/startup.sh
After that, you can check it via your browser (8080 is the default port for Tomcat)
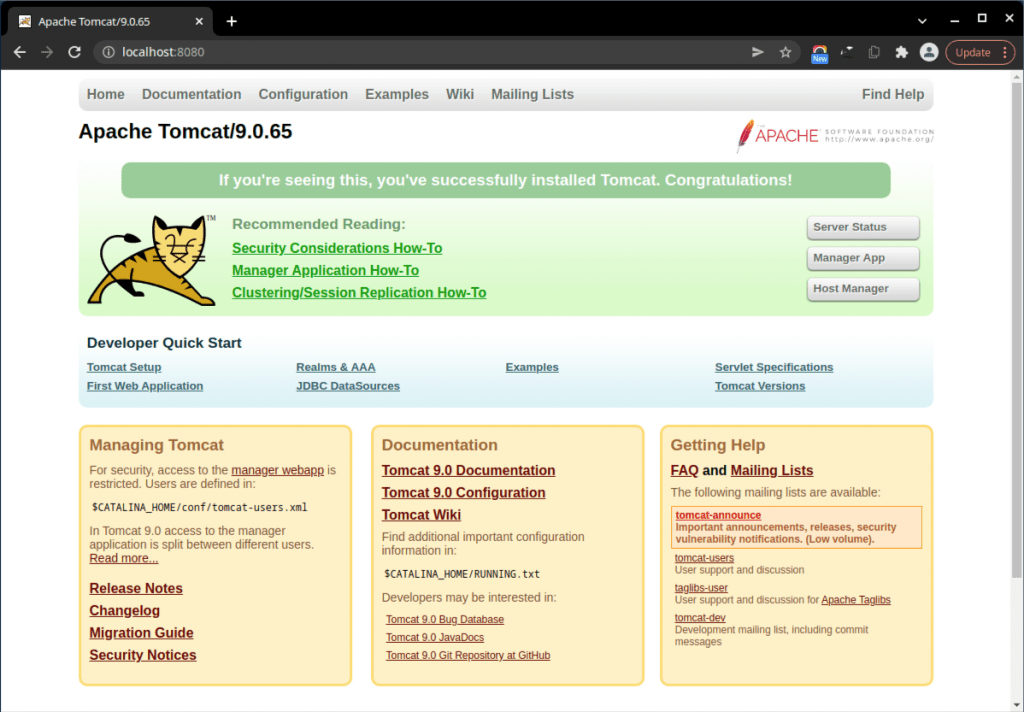
Similarly, you can shutdown / stop the running Tomcat, by running:
./bin/shutdown.sh
Allow access to the Manager app
As you probably noticed above, the installation folder structure contains a subfolder name /conf. The /conf folder contains the system-wide configuration files. This folder also includes the tomcat-users.xml file, where we can add a new user and assign him managerial roles. So, go to the ‘ ../Tomcat/conf/tomcat-users.xml ‘ file, open it for editing, and add the following lines before the final closing tag (replacing username and password with the ones you wish):
Then restart the Tomcat server (stop and start it again). After that, you will be able to access Server Status and Manager App of the following button/links:

after, of course, you have logged-in:

Deploy a Java application (.war file) on the Tomcat Server
We can deploy our Java applications (actually .jar or more often for web apps .war files) via the Manager App link, i.e. via the Tomcat Web Application Manager:
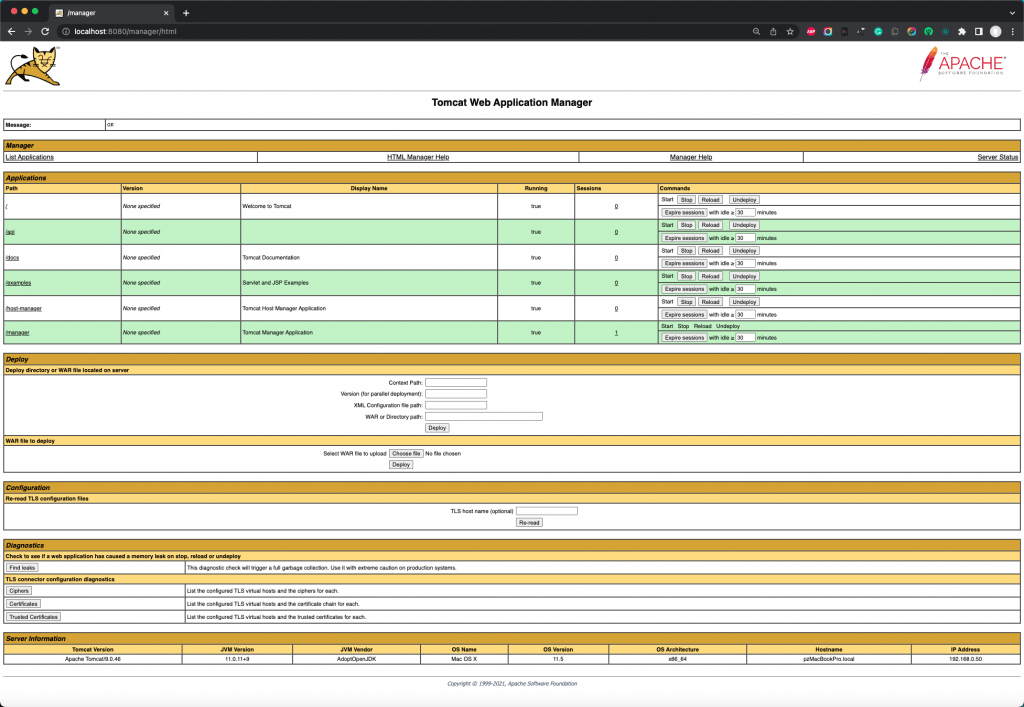
Deploying a .war file can be done in the WAR file to deploy section:

Very simply, choose the .war file you wish and hit Deploy. After that, you can see the deployment in the Applications section. If your file had the name “api”:
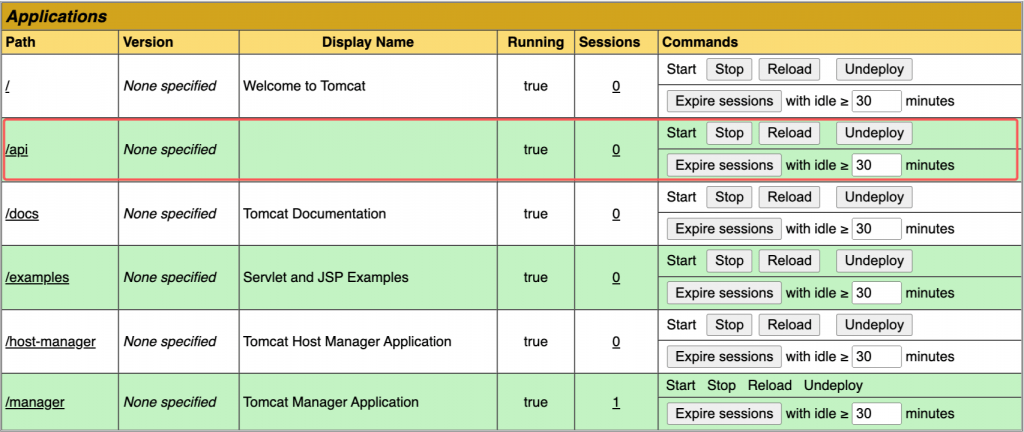
Configure Tomcat for HTTPS/SSL
Create a self-signed server certificate
In the case you want to secure your Java web app using the HTTPS protocol, you also have to configure the Tomcat accordingly. For our case here we are going to use a self-signed certificate. We can create a self-signed certificate using well-known tools such as the standard OpenSSL tool, or the Java keytool.
Using the java keytool
? Note: A Java KeyStore (JKS) file is a protected structured document that mainly contains keyStore sections about private certificates and other entries of trusted certificates imported. The Tomcat works only with the JKS, PKCS11, or PKCS12 format keystores. JKS store type is the default one, till version Java 9. From Java version 9 and onwards the default keystore format is the industry standard PKCS12. However, be careful enough, and use the right version of the keytool that has been shipped with the same version of the JDK, as your runtime version of Java. Otherwise, you might face issues initializing the Tomcat SSL Connector, if, for example, you have used the keytool from JDK version 11 to create your keystore (default format PKCS12), and your Java runtime environment uses Java 1.8. (Errors like: “Failed to initialize component [Connector[HTTP/1.1-8443]]” and “Invalid keystore format”). If you use the -deststoretype to set the type to the deprecated format jks, you probably will not face any issues, however, you will get a warning: “Warning: The JKS keystore uses a proprietary format. It is recommended to migrate to PKCS12 which is an industry-standard format…”. The Catalina daily log (in /logs sub-folder) provides you the information about your Java runtime version.
The Java keytool is a tool to manage (public/private) security keys and certificates and store them in a Java KeyStore file (usually having the extension .jks). The keytool is provided with any standard JDK/JRE distributions and usually, you can find it under the %JAVA_HOME%\bin folder.
Using keytool to create a new (a default) keystore file, is pretty straightforward. We have just to give it an alias name and the preferable algorithm. For instance:
keytool -genkey -alias tomcat1 -keyalg RSA
The above command creates interactively, a new .keystore file as well as a server certificate. Since we didn’t provide any storetype option, the default keystore type depends mainly on the JDK version. The latest versions of java create a PKCS12 type, however the older ones, a JKS type. You can force the type of the keystore you are going to create, by simply adding the -storetype parameter with the PKCS12 value, like below:
keytool -genkey -alias tomcat1 -keyalg RSA -storetype pkcs12
Executing the command, we have also interactively, to provide some information (which is almost standard for any digital certificate), like name, organisation and organisation unit, the city and the country. Below, you can see an example of how we created such a certificate (after a Java check):
keytool -genkey -alias tomcat1 -keyalg RSA -storetype pkcs12
Since we haven’t defined any specific pathname for our keystore (using the -keystore parameter), a new “.keystore” file should have been generated inside your Home folder. To check it use the following command, (providing the password we used before – the default is “changeit”):
If you wish a “silent” execution you can pass the whole information needed to be provided interactively, in the command line, as well as to define your own full pathname of the keystore file, you can do this like that:
/opt/jdk/jdk1.8.0_251/bin/keytool -genkey -alias tomcat1 -keyalg RSA -storepass mypassw1 -keypass mypassw1 -keystore $HOME/Tomcat/conf/tomcatkeystore.jks -storetype pkcs12 -dname "CN=Panos, OU=development, O=devxperiences.com, L=ATHENS, ST=ATTIKA, C=GR"
Running the above command creates a keystore file named “tomcatkeystore.jks” (of standard PKCS12 format) into the /conf sub-folder of the Tomcat installation.
To get its info, you can use again the keytool -list command, passing this time the keystore full pathname as well:
keytool -list -keystore $HOME/Tomcat/conf/tomcatkeystore.jks
Configure the Tomcat to use our JKS keystore
As we’ve already said, the file that we have to modify/update is the server.xml file in the /conf sub-folder of the Tomcat installation. You can see the default content of the server.xml file here.
Tomcat uses Connectors to configure specific features. A Connector represents an endpoint by which requests are received and responses are returned. The default HTTP connector uses the version HTTP/1.1 and listens to the 8080 port. But if the HTTPS protocol is being used, then it redirects it to the 8443 port. Similarly, the secure HTTPS protocol should be configured via a connector.
So, what we have to change for now, is for instance, to modify the commented block marked with the red rectangular, which you can see below:

Generally, we have to:
- set the SSLEnabled attribute to true.
- set the scheme attribute value to https
- set the secure attribute to the value true
? Note that, from Tomcat 8.5 and onwards, the majority of the SSL configuration attributes in the Connector are deprecated, however they have to be used inside an SSLHostConfig element. [Tomcat 10 will drop support for the SSL configuration attributes in the Connector]. So, we have to define at least one SSLHostConfig element, where we have also to define at least one Certificate. In our case what we have to do is to define the certificateKeystoreFile attribute and pass it the pathname of our keystore file and the password (as well as the algorithm we’ve used to create the server certificate.
So, un-commend that block, make the changes below and save it:
If everything is OK, then you can access the 8443 port using the HTTPS protocol (of course, as you can see below, your browser objects to the fact that the server certificate is a self-signed one, but you can ignore it):
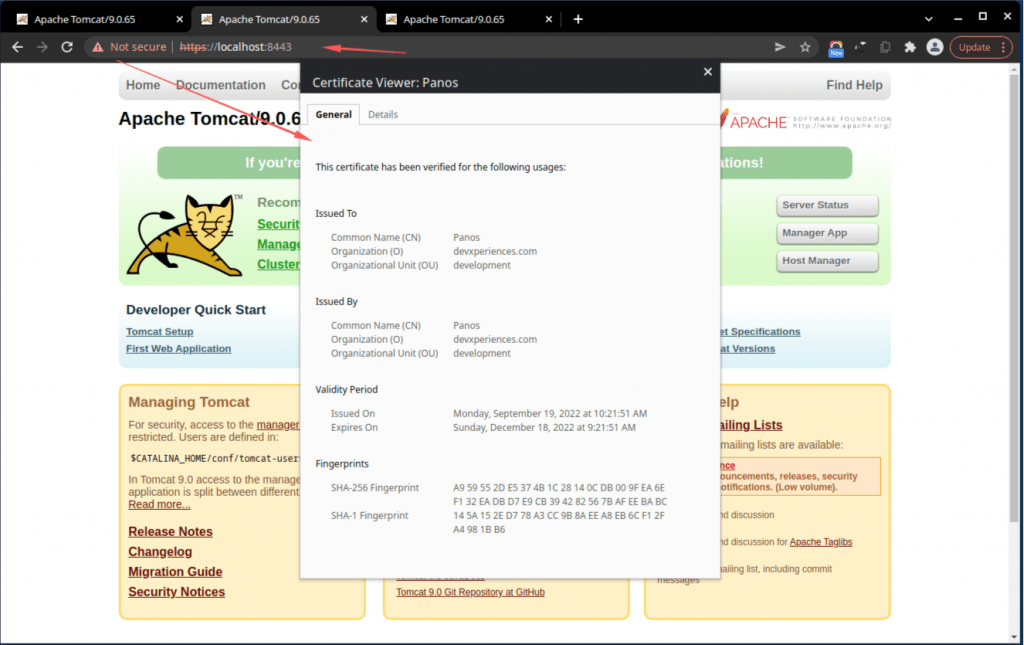
Using the OpenSSL tool(s)
? Note: Before proceeding, you have to be aware, that using OpenSSL-created certificates and OpenSSL implementation on Tomcat, requires that the APR-based native library has been already installed in your system, and also it is accessible by Tomcat. APR in its turn also requires the Apache Portable Runtime (APR) library itself. APR is a supporting library for the Apache web server, offering also some more encasements and functionalities You can find more information on how to install those libraries in a couple of posts of mine:
Installing the Apache Portable Runtime APR Libraries
Installing the Apache Portable Runtime (APR) based Native library for Tomcat
Check about the installation of OpenSSL in your system
Before proceeding, be sure that you have already installed the OpenSSL in your system. For instance:
? Notes for macOS
be sure that you are going to use the OpenSSL version you wish. In some macOS the OpenSSL installed via Homebrew may differ from the default one showing via the “which openssl” command. For instance, you can find the LibreSSL version installed as default in your MAC, which might not be your choice, and perhaps you prefer to use the “official” OpenSSL version that is being used by Homebrew.
Below, you can see that the “default” OpenSSL on your MAC, is the LibreSSL:
To find out if and where the OpenSSL is installed in your MAC, as well as other relevant information (e.g. version, etc.) use the commands below:
As you can see above, brew provides enough information to understand where are binaries installed in our MAC (Generally the Homebrew puts symlinks into the directory: /usr/local/opt/. So, if you wish you can directly get the packages from there, e.g.:
using the ls command: ls -l /usr/local/opt/openssl@3*
lrwxr-xr-x 1 zp admin 25 Sep 16 17:47 /usr/local/opt/openssl@3 -> ../Cellar/openssl@3/3.0.5
➜  ~  ls -l /usr/local/opt/openssl@3*                                                                                         lrwxr-xr-x  1 zp  admin  25 Sep 16 17:47 /usr/local/opt/openssl@3 -> ../Cellar/openssl@3/3.0.5
➜  ~
So, you can either make the openssl@3 your default openssl version by placing it first in your PATH, or use it directly using its full pathname: /usr/local/opt/openssl@3/bin/openssl.
OpenSSL has a rich set of commands and parameters that you can use. Below is a list of some of the often-used of them:
- openssl: This is the basic command line tool for creating and managing OpenSSL certificates, keys, and other files.
- version or version -a : Gives us short and extended information about the OpenSSL installed in the system.
- req: This subcommand specifies that we want to use X.509 certificate signing request (CSR) management. The “X.509” is a public key infrastructure standard that SSL and TLS adhere to for their key and certificate management. We want to create a new X.509 cert, so we are using this subcommand.
- -x509: This further modifies the previous subcommand by telling the utility that we want to make a self-signed certificate instead of generating a certificate signing request, as would normally happen.
- -nodes: This tells OpenSSL to skip the option to secure our certificate with a passphrase. We need Apache to be able to read the file, without user intervention, when the server starts up. A passphrase would prevent this from happening because we would have to enter it after every restart.
- -days : This option sets the length of time that the certificate will be considered valid. We set it for 8 years here. (365×8=2920)
- -keyout: This line tells OpenSSL where to place the generated private key file that we are creating.
- -out: This tells OpenSSL where to place the certificate that we are creating.
- -newkey rsa:2048: This specifies that we want to generate a new certificate and a new key at the same time. We did not create the key that is required to sign the certificate in a previous step, so we need to create it along with the certificate. The rsa:2048 portion tells it to make an RSA key that is 2048 bits long.
? Find a full list at official man-pages, here.
After we have obtained a clearer view of OpenSSL installation variations, we can proceed and use it to create an independent self-signed private key certificate. Note: the term “independent” here is being used to clarify that both the private key and the certificate are created in separate files and they are not residing inside any keystore file.
Create a new independent SSL certificate with a private key
Supposing that you have already place the openssl first in your PATH, as well as you are inside your Home directory (and you have deployed the Apache Tomcat in a folder named /Tomcat), you can use the openssl tool to create the private key and the certificate files int he /conf subfolder, like below:
The above command works interactively, i.e. it asks input for some standard information about the certificate you are going to create, as you can see below:
Then, it creates a self-signed certificate with a lifetime of 2 years (730 days), using the private key (via private key’s file: “tomcat_devx_01.key”). OpenSSL will store that certificate in a X509-formatted file called “tomcat_devx_01.pem“. The 2 files “tomcat_devx_01.key” and “tomcat_devx_01.pem” for the private key and the certificate respectively, are placed into the /conf subfolder:

Note, that we used the -nodes parameter, and thus, we haven’t created a password-protected key file. This is not the best but it is a common practice for certificates for servers you have under your own control, however, you have always to keep safe the key file. You can take a look at the private key, using the following command:
~$ openssl rsa -in Tomcat/conf/tomcat_devx_01.key -check
Once complete, verify the self-signed certificate with the –x509 command. The full description of that command is given here.
For full/extended info:
~$ openssl x509 -noout -subject -issuer -enddate -in Tomcat/conf/tomcat_devx_01.pem
Or, for short info:
~$ openssl x509 -in Tomcat/conf/tomcat_devx_01.pem -text
After you have obtained a no-nonsense grasp of the OpenSSL tool, it’s time to update the Apache Tomcat server.xml file to use the private key and the certificate we created. See below how to update the block (previously used with keystore):
Again, after restarting the Apache Tomcat, and if everything is OK, you can access the 8443 port using the HTTPS protocol :
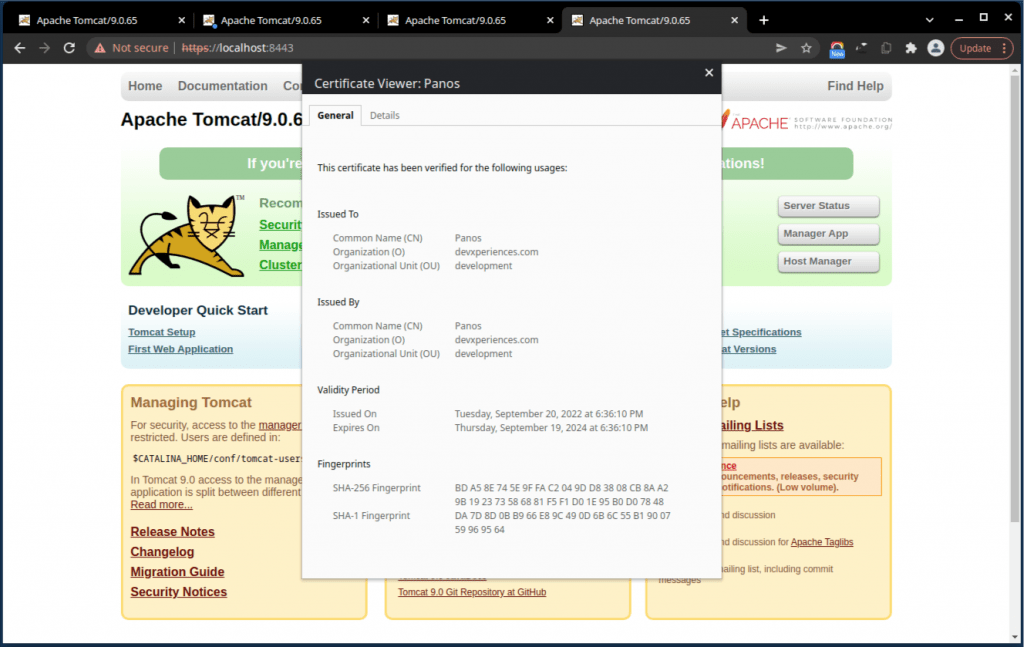
Note that it is possible to import an X509 .pem certificate into a Java keystore, converting it to the commonly used withJava keystore, DER format. (DER stands for “Distinguished Encoding Rules” and generally, it s a binary format of an X509. certificate. You can do that, by using the following 2 commands:
Then you can list the certificates inside your default keystore. See the full output below:
Improvements to HTTPS
You can see in the Tomcat official documentation ( SSLHostConfig – protocols attribute), that Tomcat supports a number of HTTPS transport protocols. Some of them are either obsolete or unsafe. The most recent supported protocol is the TLSv1.3 which offers extended security. Moreover, it is also a good idea to upgrade our settings from HTTP1.1 to HTTP1.2-HTTP/2.
So, if you have no other considerations (browser support, support of hashing functions, etc.), we can upgrade our Tomcat settings for the HTTP/2, as well as to allow only the TLSv1.3 protocol. Again, go to your Tomcat server.xml file and update just the block for HTTPS we have worked on so far, like the code block below:
That’s it!
I hope you enjoyed this post, and thank you? for reading it!
[Related: using the Apache Tomcat with VS Code, see this section in another post of mine]
