Make… your makefile(s)
240425-0511
One stop shop for a really practical kick-start with make and makefile(s) for your C++ projects
Intro
It seems that in about 3 years the make utility turns its fifties (!) and it still remains a really valuable tool helping programmers to automate the processes for compiling and linking their projects. So, obviously, you can find dozens of posts, articles, training videos, etc. for learning how you can use and benefit from using it. Worth to mention, that the following 2 old books might be quite helpful for any reader who wants to get deeper into the ‘make’ utility:
The GNU Make Book 1st Edition
Managing Projects with GNU Make: The Power of GNU Make for Building Anything (Nutshell Handbooks) 3rd Edition
This post is about to facilitate you starting using the make utility, by making makefiles on your own, and using it for compiling/linking your simple C++ projects. However, I would like to make a couple of notices about it, as I mostly have taken them from official docs.
‘make’ is an automation tool but it isn’t a solo C++ tool, neither it is limited to any particular language.
Apart, from its built-in commands, it can use any available shell command to automate what you want to automatically have as output.
‘make’ uses a sort of script/text files that contain the commands and instructions for its action(s). By default, it uses a script file named “makefile” but any filename can also be used.
You can “instruct” a makefile not to compile the entire application (every source file) every time whenever you make a change to a particular source file (e.g.: a functionality or a class). Makefile will automatically compile only those files where change has occurred.

The GNU Make tool (short gmake) is a member-mate of the build system commonly used in Unix/Linux systems (e.g.: GNU Binutils – a collection of binary tools). “GNU Make is a tool which controls the generation of executables and other non-source files of a program from the program’s source files.”
Before proceeding, it will be good to check the presence of the make utility in your system
Get some info about make installed in your system and/or install it
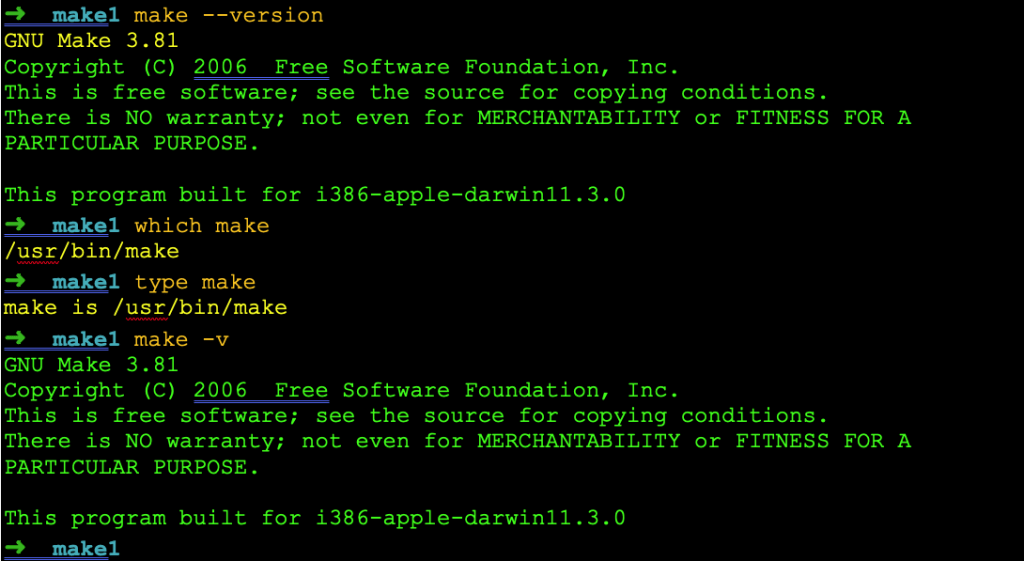
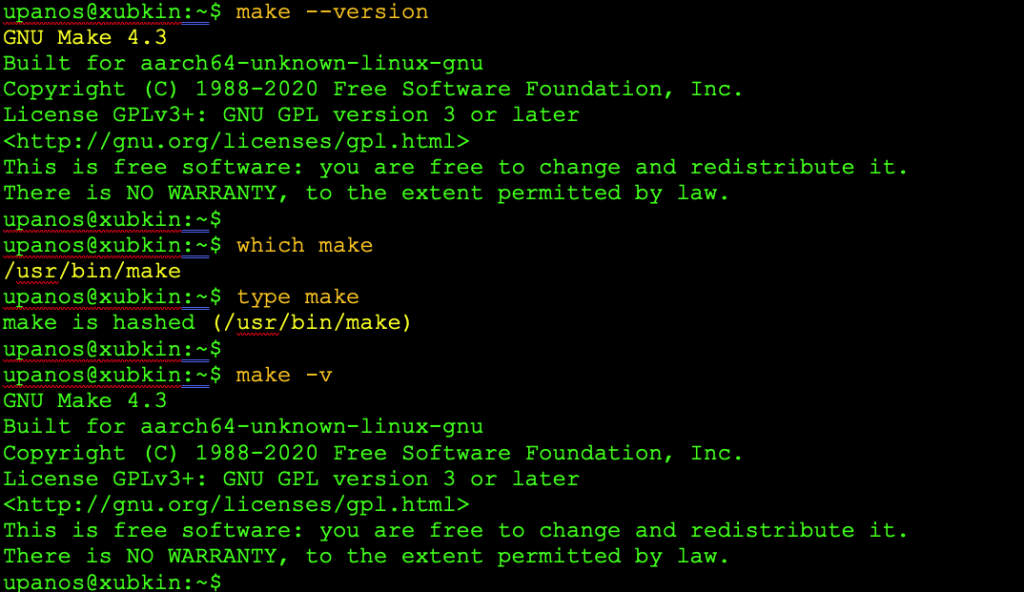
You can use the commands:
$ make -v<br>
$ make --version
$ which make
$ type make
The output is expected to be similar to:
Installation
In case that your system lacks the make tool, you can install it as a stand-alone utility, however the better approach is to install the family of the GNU toolchain
Debian/Ubuntu
$ apt install build-essential
Fedora/RHEL
$ yum groupinstall ‘Development Tools’
macOS
macOS has pre-installed a make version, but if you wish you can install the latest GNU make (‘gmake’) utility. This can be done via brew:
$ brew install make
Below is the output and the info of the gmake utility installed:
You might also wish to install the GNU binutils
$ brew install binutils
and GCC (GNU Compiler Collection)
$ brew install gcc
Note that it might be also necessary to have installed the xcode command line utilities:
$ xcode-select --install
After this short intro, let’s start!
The very basics
‘make. searches the current directory for a makefile, e.g., GNU Make searches files in order for a file named one of: GNUmakefile, makefile, or Makefile, and then invokes the specified (or default) target(s) from that file. Any filename can be also used:
$ make -f
Rules and Targets
A rule in the makefile tells Make how to execute a series of commands in order to build a target file from source files. It also specifies a list of dependencies of the target file. This list should include all files (whether source files or other targets) which are used as inputs to the commands in the rule. Usually, each rule has a single unique target (an output file), rather than multiple targets. The GNU Make documentation refers to the commands associated with a rule as a “recipe”.
Here is what a simple rule looks like:
target: dependencies
    (prerequisites) …<br>commands<br>
…
For instance:
out.o: src.cpp src.h
out.o: the target
src.cpp: the 1st prerequisite
src.h: the 2nd prerequisite and the last one in this case
Please note that when a target is invoked (i.e.: when the commands of that target are fired), then, the output of the commands’ run, will be a file with the same name as the target.
When you run Make, you can specify particular targets to update, for example:
$ make target3
Otherwise, ‘make’ -by default- executes only the first target listed in the makefile. However, other targets are checked (and triggered) only if they are dependencies for the first target. The order of the targets does not matter. The make utility will build them in the appropriate order.
Variables in makefile(s)
The syntax for assigning to a Make variable is:
VAR = A text value of some kind # recursive expanded variable<br>
or
VAR := A different text value # non-recursive
Wherever you use variables that they are not going to be changed later on (from a possible re- assignment in rules) then instead of using just the ‘=’, which is for recursive assignment, use the ‘:=’ which stands for simple assignment.
:= Simple (or one-time, or normal) assignment
= Recursive (or immediate, or dynamic, or renewing) assignment
Note that a Recursive assignment expression is evaluated every time the variable is encountered in the makefile.
Other possible assignments
?= Conditional (or safe, or “lazy”) assignment
+= Appending assignment
Conditional assignment assigns a value to a variable only if it does not have a value
Appending assignment adds at the end of the previous assignment.
As a last way of variable assignment we should mention the case where we assign the output of a shell command to a variable:
!= shell output assignment
The syntax for accessing a make variable is
$(VAR)
begins with a $ and is enclosed within parentheses (…) or braces {…}.
Compiling C++ programs
$(CXX) $(CPPFLAGS) $(CXXFLAGS) -c
Linking a single object file
$(CC) $(LDFLAGS) n.o $(LOADLIBES) $(LDLIBS)
Variables Used By Built-in Rules
This rule does the right thing for a simple program with only one source file. It will also do the right thing if there are multiple object files (presumably coming from various other source files), one of which has a name matching that of the executable file.
The built-in rules use a set of standard variables that allow you to specify local environment information (like where to find the ROOT include files) without re-writing all the rules. The ones most likely to be interesting to us are:
| CC | the C compiler to use |
| CXX | the C++ compiler to use |
| LD | the linker to use |
| CFLAGS | compilation flag for C source files |
| CXXFLAGS | compilation flags for C++ source files |
| CPPFLAGS | flags for the c preprocessor (typically include file paths and symbols defined on the command line), used by C and C++ |
| LDFLAGS | linker flags |
| LDLIBS | libraries to link |
Automatic Variables or “Magic” variables
Automatic variables are set by make after a rule is matched. The commonly used are:
| $@ | the target filename. |
| $* | the target filename without the file extension. |
| $< | the first prerequisite filename. |
| $^ | the filenames of all the prerequisites, separated by spaces, discard duplicates. |
| $+ | similar to $^, but includes duplicates. |
| $? | the names of all prerequisites that are newer than the target, separated by spaces. |
For instance:
out.o: src.cpp src.h
$@ : the target (out.o)
$< : the 1st prerequisite (src.cpp)
$^ : all prerequisites (src.cpp src.h)
The “classic” implicit (pattern) rule for target and prerequisite:
%.o: %.c
It “says how to make any file stem.o from another file stem.c.”
Here is the 1st example from the official Pattern Rule Examples:
%.o : %.c
        $(CC) -c $(CFLAGS) $(CPPFLAGS) $< -o $@
” defines a rule that can make any file x.o from x.c. The recipe uses the automatic variables ‘$@’ and ‘$<’ to substitute the names of the target file and the source file in each case where the rule applies (see Automatic Variables).”
Start working with makefiles for C++ programs – Examples
About the C++ compiler in macOS
Note that, we are in a macOS, and we use the gcc version 12 installed via brew, leaving aside the default clang/LLVM compiler, which Apple by default linked to ‘gcc’.

So, instead of GCC/g++, we will use either gcc-12 / g++-12.
Example 1
Let’s start with the very simple ‘Hello’ program in C++ and use an example make file for compiling it.
We can compile the program giving the command:
$ g++-12 main.cpp -o hello
Now, let’s create the simplest possible makefile and compile the program using just make:
In the above makefile, first, we define the CC variable. Then, we define one target, the ‘hello’ target, which has as its dependency the source “main.cpp” file. Finally, using the variable $(CC), we compile our program.
Please, mind the gap! -> the <TAB> at the beginning of the 3rd last line. Note that the general syntax should follow the pattern:
<target> : <dependencies>
<tab><instructions>
Otherwise, the ‘make’ stops and you might get a message similar to: “*** missing separator. Stop.”
Furthermore, we can suppress the outputs (using the @) and also, we can add a rule/command to execute the compiled file:
Then you can invoke the make without specifying any target, since we have just only 1 -the hello:

Note: In case where no changes took place since the last compilation of your source file, the the make informs you with the message: “make: `hello’ is up to date.”.
Next, we can add the CFLAGS variable. This actually adds the -Wall, that outputs any warning messages during the compilation.
As the next step, we can add and use variables Variables for the source(s) and the output (target) file. They are SRC and TARGET respectively.
Example 2
In this example, we can add another source file together with its header file. We actually put a void function for our salutation message in the new source file and its declaration in the respective header file. Below are all 3 files:
Then, we can adjust our make file by adding the new source file. Its header file is automatically traced by the compiler (it resides in the same directory). One more adjustment can be the version of the standard of C++, against which the compiler compiles our sources. For that purpose, we will use one more flag, the -std flag with the preferred C++ standard. For C++ version 11, the updated makefile can be like that:
Example 3
Let’s add some more functionalities. We will add 2 more files for some trivial math functions. The files are the ‘calculations.cpp’ and the ‘calculations.h’ respectively. We have also made some “improvements” to the previous ‘salutation’ files. Now we use a class the “Salutation” in the namespace “nspace1”. Here are the source files listing:
Then, our makefile should look like this:
Thus, every source file we add to our project should be included as a dependency in the TARGET in our makefile. However, as you can understand, this is not a good practice. A better approach is to use shell tools that can do the job for us. Here, a working solution is to use the find command to gather all the source files in our directory. Just run the following command to see it:
$ find . -type f -iname "*.cpp"
Having said that, we can update our makefile accordingly. Here it is:
As you can see above, we have also used a new variable, the SRCEXT variable, for the extension “cpp” of our source files.
One more “improvement” that is worth to be done, is to adapt our makefile to be ready to be used in other Linux systems, where the compiler is the g++ and not the g++-12 which is our GNU version installed in our macOS. For that purpose, we can use the “uname -s” shell command to capture the basic system name. The command indicates “Darwin” for macOS computers. So, we can use the ifeq/endif directive to trace the system name. This is how our makefile becomes:
A minor change that might be noticed in the above makefile, is that we have added a last command (rm) at our TARGET, for removing (deleting) the executable (the “TARGET”) after its execution.
Project folder/file structure and makefile
So far, we used a solo folder to place all of the files of our project. However, this is not the best approach, especially when or project is getting bigger and bigger consisting of a number of dozens of source and header files.
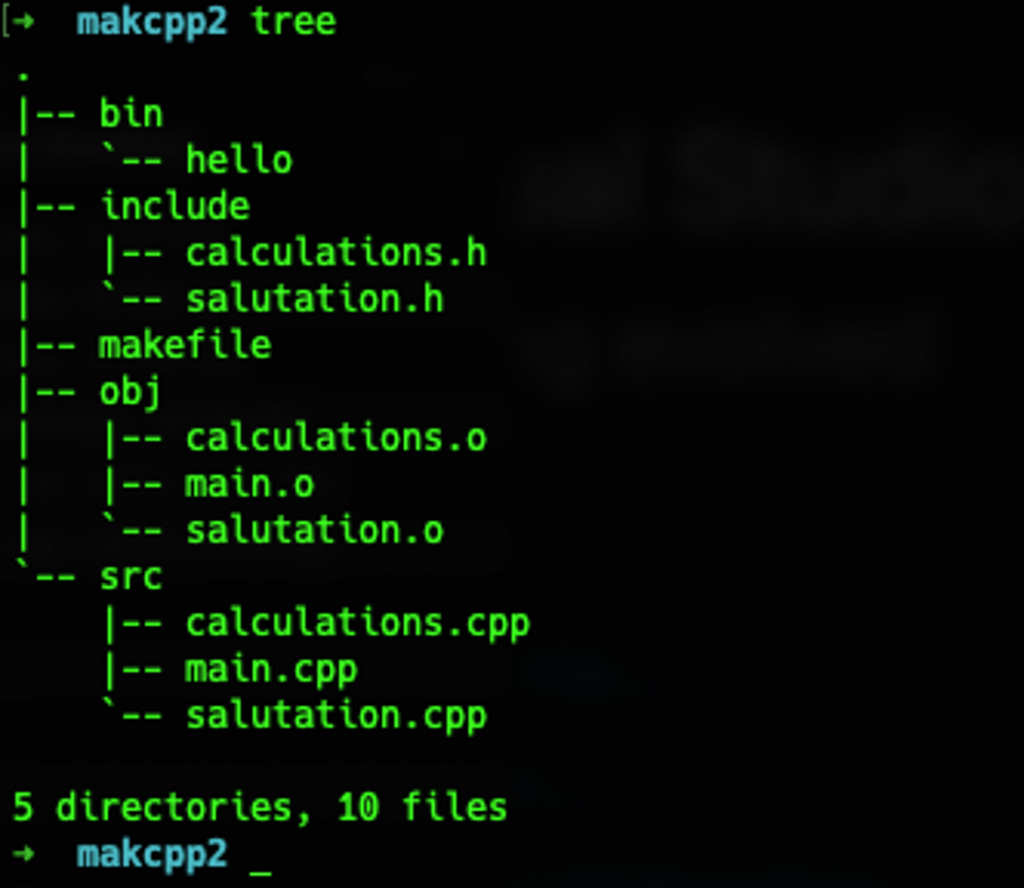
What we can do, is start using separate folders for placing different types of files. A first basic approach consists of the following folders:
| src | The application’s source files – the SRCs |
| include | Project header files |
| bin | For the output executables – the TARGETs |
Example 4
An example makefile that reflects such a structure of a project is given below:
So far so good. However, we can make some improvements. The first one is that we can clear (delete/remove) the executable(s) using a separate rule. The other one is more important. Until now, we compile and link all files at once for creating our executable. But this approach is not that good. Again, when we use more and more source files you will see that the whole process takes some no-nonsense time. Thus, a better approach is to separate the processes of compiling and linking. The compiling will take care just of creating the object files (*.o files) and the linking will be just for creating the final output; our executable.
| obj | Holds compiled object files, before the linking process |
After that the structure of our project looks like the following one:
Example 5
That said, our makefile can be like the one below:
Conclusion
Well, we made it! You can find the example project repo here, which has an updated version of the makefile, with a setup and destroy phony targets.
That’s it for now! I hope you enjoyed it!
Thanks for reading! Keep coding and stay tuned!
